Browning A5 Shotgun Owners Manual - Page 9
Disassembly
 |
View all Browning A5 Shotgun manuals
Add to My Manuals
Save this manual to your list of manuals |
Page 9 highlights
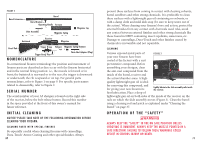
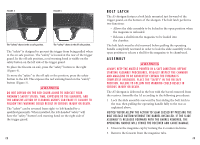
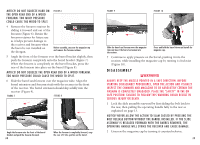
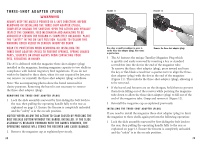
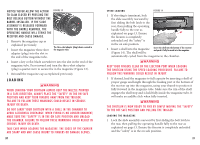
Notice! Do not squeeze hard on the open rear end of a wood forearm. Too much pressure could cause the wood to split. F i g ure 6 4 Remove the forearm retainer by sliding it forward and out of the forearm (Figure 6). Retain the forearm retainer for future use as it helps prevent damage to the receiver and forearm when the barrel is not installed on the shotgun. Before assembly, unscrew the magazine cap and remove the forearm retainer. 5 Angle the front of the forearm over the barrel bracket slightly, then push the forearm completely onto the barrel bracket (Figure 7). When the forearm is completely on the barrel bracket, press the rear of the forearm into place on the barrel (Figure 8). Notice! Do not squeeze the open rear end of a wood forearm. Too much pressure could cause the wood to split. 6 Slide the barrel and forearm over the magazine tube. Align the barrel extension and forearm studs with the recesses in the front of the receiver. The barrel extension should slip solidly into the receiver (Figure 9). F i g ure 7 F i g ure 8 Angle the forearm onto the front of the barrel bracket and push the forearm forward. 14 When the forearm is completely forward, snap the rear of it into position on the barrel. F i g ure 9 F i g ure 1 0 Slide the barrel and forearm over the magazine tube and insert the barrel extension into the receiver. Press and hold the barrel down and install the magazine cap. 7 Continue to apply pressure on the barrel, pushing it into the receiver, while installing the magazine cap by turning it clockwise (Figure 10). DISASSEM B L Y ALWAYS KEEP the muzzle pointed in a safe direction. BEFORE STARTING DISASSEMBLY PROCEDURES, open the action and VISUALLY INSPECT THE Chamber and magazine TO BE ABSOLUTELY CERTAIN THE FIREARM IS COMPLETELY UNLOADED. place the "safety" in the on safe position. Failure to follow this warning could result in ser i ous i n j ury or death . 1 Lock the slide assembly rearward by first sliding the bolt latch to the rear, then pulling the operating handle fully to the rear as explained on page 13. Notice! NEVER ALLOW THE ACTION TO SLAM CLOSED BY PRESSING THE bolt RELEASE BUTTON WITHOUT THE BARREL INSTALLED. If the slide assem b ly i s released forward w i th the b arrel remo v ed , the operating handle will strike the receiver and cause damage. 2 Unscrew the magazine cap by turning it counterclockwise. 15
-
 1
1 -
2
-
3
-
 4
4 -
 5
5 -
 6
6 -
 7
7 -
 8
8 -
 9
9 -
 10
10 -
 11
11 -
 12
12 -
 13
13 -
 14
14 -
15
-
16
-
17
-
18
-
19
-
20
-
21
-
22
-
23
-
24
-
25
-
26
-
27
-
28
-
29
 |
 |
