Browning Maxus Owners Manual - Page 21
Removal Of The Trigger Group - carbone
 |
View all Browning Maxus manuals
Add to My Manuals
Save this manual to your list of manuals |
Page 21 highlights
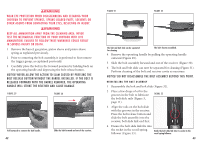
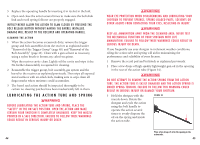
MOST SOLVENTS ARE HIGHLY FLAMMABLE. WEAR EYE PROTECTION and practice APPROPRIATE SAFETY MEASURES WHEN WORKING WITH SOLVENTS to avoid serious injury. 6 After all leading and plastic residues have been removed, run a clean, dry patch through the bore. Follow this with a final, lightly oiled patch. 7 Reassemble the shotgun and wipe all exposed metal surfaces with an oiled cloth making sure to wipe away all finger marks where moisture could accumulate. 8 Inspect the barrel and chamber to be certain no patches have inadvertently been left in them. Remove any that remain. 9 Lightly oil your firearm at the points described under "Periodic Oiling" on page 40. Regular, light oiling is extremely important to the durability and reliable operation of your shotgun. 10 The wood surfaces can also be wiped with a quality, lightweight gun oil or they can be polished with any quality furniture wax (but not both). C LEANING THE GAS S Y STEM 1 Remove the gas system from the magazine tube as explained in "Disassembly" on page 14. 2 To simplify cleaning the gas system, separate the gas piston from the piston sleeve by pulling them apart (Figure 26). 3 Spray the magazine tube, gas piston and piston sleeve with gun solvent and brush them thoroughly with a nylon brush to remove any deposits. It will Figure 26 Separate the gas system components to simplify cleaning. 38 be easier to remove the piston sleeve spring to clean the interior of the piston sleeve. Spray the inside of the gas piston. A green Scotch-Brite® kitchen scrub pad works best for removal of heavy carbon fouling on the tube and inside the gas piston. Do not remove the spring inside of the piston. Never use a steel brush on any of the gas components. 4 Complete the cleaning of the gas system by applying a very light film of oil to all parts for protection and lubrication. Reassemble the gas system by snapping the piston sleeve into the gas piston. periodic oiling The metal parts of a firearm should receive a light film of oil after the firearm has been exposed to weather or handling. Occasionally, a drop of lightweight gun oil may be placed inside the receiver on the rails on which the bolt slides (Figure 3, page 11), and on the surface of the magazine tube, where the gas piston slides. This reduces friction for smooth operation. If the firearm has been exposed to excessive dust, dirt, mud or water, the principal working parts including the gas system, should be wiped clean and lubricated with a light film of quality, lightweight gun oil. NOTICE! Do not place large quantities of oil into the action. excess oil will run back into the wood of the stock softening the wood, with consequential loosening of the stock. removal of the Trigger Group BEFORE removing the trigger group, place the "safety" in the on safe position. open the action and make certain YOUR shotgun IS completely UNLOADED. Keep the muzzle pointed in a safe direction. Failure to follow these warnings could result in serious injury or death. 39
-
 1
1 -
2
-
3
-
4
-
5
-
6
-
7
-
8
-
9
-
10
-
11
-
12
-
13
-
14
-
15
-
 16
16 -
 17
17 -
 18
18 -
 19
19 -
 20
20 -
 21
21 -
 22
22 -
 23
23 -
 24
24 -
 25
25 -
 26
26 -
27
 |
 |
