Browning Maxus Owners Manual - Page 23
Keep All Ammunition Away From The Cleaning Area. Never
 |
View all Browning Maxus manuals
Add to My Manuals
Save this manual to your list of manuals |
Page 23 highlights
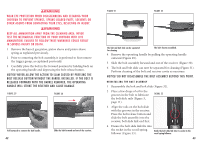
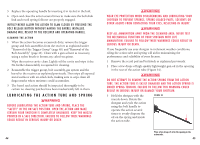
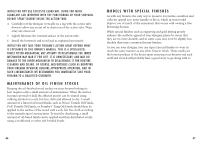
WEAR EYE PROTECTION WHEN DISASSEMBLING AND CLEANING YOUR shotgun TO PREVENT springs, spring-loaded parts, SOLVENTS OR OTHER AGENTS FROM CONTACTING YOUR EYES, resulting in injury. Keep all ammunition away from the cleaning area. Never test the mechanical function of your shotgun with live ammunition. Failure to follow these warnings could result in serious injury or death. 1 Remove the barrel, gas piston, piston sleeve and piston sleeve spring as explained previously. 2 Prior to removing the bolt assembly, it is preferred to first remove the trigger group, as explained previously. 3 Carefully place the bolt in the forward position by holding back on the operating handle and depressing the bolt release button. Notice! NEVER ALLOW THE ACTION TO SLAM CLOSED BY PRESSING THE Bolt release BUTTON WITHOUT THE BARREL INSTALLED. If the bolt is released forward with the barrel removed, the operating handle will strike the receiver and cause damage. Figure 29 Figure 30 Pull outward to remove the bolt handle. 42 Slide the bolt forward and out of the receiver. Figure 31 Figure 32 The bolt and bolt slide can be separated for cleaning. The bolt shown assembled. 4 Remove the operating handle by pulling the operating handle outward (Figure 29). 5 Slide the bolt assembly forward and out of the receiver (Figure 30). 6 The bolt and bolt slide can now be separated for cleaning (Figure 31). Perform cleaning of the bolt and receiver cavity as necessary. Notice! DO NOT DISASSEMBLE THE bolt assembly BEYOND THIS POINT. reinstalling the bolt assembly 1 Reassemble the bolt and bolt slide (Figure 32). 2 Place a few drops of oil in the grooves in the bolt to lubricate the bolt slide rails (Figure 3, page 11). Figure 33 3 Align the rails on the bolt slide with the grooves in the receiver. Press the bolt release button and slide the bolt assembly into the receiver, bolt slide link end first. 4 Ensure the bolt slide link fits into the socket in the recoil spring follower (Figure 33). Guide the bolt slide link into its socket in the recoil spring follower. 43
-
 1
1 -
2
-
3
-
4
-
5
-
6
-
7
-
8
-
9
-
10
-
11
-
12
-
13
-
14
-
15
-
16
-
17
-
 18
18 -
 19
19 -
 20
20 -
 21
21 -
 22
22 -
 23
23 -
 24
24 -
 25
25 -
 26
26 -
 27
27
 |
 |
