Bushnell 119436C Instruction Manual - Page 9
Using The Trophy Cam, The Off, On, And Setup Modes - manual
 |
View all Bushnell 119436C manuals
Add to My Manuals
Save this manual to your list of manuals |
Page 9 highlights
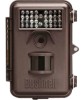
USING THE TROPHY CAM Once you've prepared your Trophy Cam by properly installing batteries and an SD card, you could simply take it outside, strap it to a tree, switch it on and leave-and you might get some great photos that are exactly what you wanted. However, we highly recommend that you first spend some additional time indoors with this manual and your camera until you know a bit more about what the 3-way switch and those control keys do. If nothing else, you'll probably want to at least set the date and time so the camera will imprint them (or not-it's your option) on your photos as they are taken, learn how to set the camera to shoot video clips instead of still photos if you like, and read some tips about mounting it on a tree. THE OFF, ON, AND SETUP MODES The Trophy Cam has three basic operational modes: • OFF mode: Power switch in the OFF position. • ON mode: Power switch in the ON position (LCD screen is off.) • SETUP mode: Power switch at SETUP position (LCD screen is on). OFF Mode The OFF mode is the "safe" mode when any actions must be taken, e.g., replacing the SD card or batteries, or transporting the device. You will also use OFF mode if you connect the camera to a computer's USB port later to download your photos/videos. And of course, when you are storing or not using the camera, you will switch it to OFF. Please note that even in the OFF mode the Trophy Cam still consumes power at a very low level. Therefore, it's a good idea to take the batteries out of the battery compartment if the camera will not be used for a long time. ON Mode Anytime after the batteries and SD card have been inserted, you can switch on the camera. When the power switch is moved to the top position, the camera will enter into the ON (Live) mode. The motion indicator LED (pg. 5, "Front View") will blink red for about 10 seconds. This interval allows time for you to close the Trophy Cam's front cover, lock it, and leave the monitored area. Once in the ON mode, no manual controls are needed or possible (the control keys have no effect). The Trophy Cam will take photos or 9
-
 1
1 -
2
-
3
-
 4
4 -
 5
5 -
 6
6 -
 7
7 -
 8
8 -
 9
9 -
 10
10 -
 11
11 -
 12
12 -
 13
13 -
 14
14 -
15
-
16
-
17
-
18
-
19
-
20
-
21
-
22
-
23
-
24
-
25
-
26
-
27
-
28
-
29
-
30
-
31
-
32
-
33
-
34
-
35
-
36
-
37
-
38
-
39
-
40
-
41
-
42
-
43
-
44
-
45
-
46
-
47
-
48
-
49
-
50
-
51
-
52
-
53
-
54
-
55
-
56
-
57
-
58
-
59
-
60
-
61
-
62
-
63
-
64
-
65
-
66
-
67
-
68
-
69
-
70
-
71
-
72
-
73
-
74
-
75
-
76
-
77
-
78
-
79
-
80
-
81
-
82
-
83
-
84
-
85
-
86
-
87
-
88
-
89
-
90
-
91
-
92
-
93
-
94
-
95
-
96
-
97
-
98
-
99
-
100
-
101
-
102
-
103
-
104
-
105
-
106
-
107
-
108
-
109
-
110
-
111
-
112
-
113
-
114
-
115
-
116
-
117
-
118
-
119
-
120
-
121
-
122
-
123
-
124
-
125
-
126
-
127
-
128
-
129
-
130
-
131
-
132
-
133
-
134
-
135
-
136
-
137
-
138
-
139
-
140
-
141
-
142
-
143
-
144
-
145
-
146
-
147
-
148
-
149
-
150
-
151
-
152
-
153
-
154
-
155
-
156
-
157
-
158
-
159
-
160
-
161
-
162
-
163
-
164
-
165
-
166
-
167
-
168
-
169
-
170
-
171
-
172
-
173
-
174
-
175
-
176
-
177
-
178
-
179
-
180
-
181
-
182
-
183
-
184
-
185
-
186
-
187
-
188
-
189
-
190
-
191
-
192
-
193
-
194
-
195
-
196
-
197
-
198
-
199
-
200
-
201
-
202
-
203
-
204
-
205
-
206
-
207
-
208
-
209
-
210
-
211
-
212
-
213
-
214
-
215
-
216
-
217
-
218
-
219
-
220
-
221
-
222
-
223
-
224
 |
 |
