Canon BJC-55 BJC-55 Setup - Page 1
Canon BJC-55 Manual
 |
View all Canon BJC-55 manuals
Add to My Manuals
Save this manual to your list of manuals |
Page 1 highlights
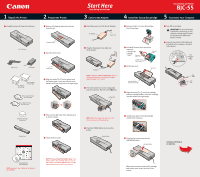
1 Unpack the Printer 1 Carefully remove all items from the box. BJC-55 Printer Power Cord AC Adapter BC-10 Black BJ Cartridge BC-11e Color BJ Cartridge BCI-11 Color Ink Tank (for future use) BCI-11 Black Ink Tank (for future use) 2 Prepare the Printer Start Here Easy Setup Instructions 3 Connect the Adapter 4 Install the Canon BJ Cartridge Color Bubble Jet Printer BJC-55 5 Connect to Your Computer 1 Remove all shipping tape and materials from the unit. Shipping Tape 2 Open the front cover. 1 Insert the power cord into the AC Adapter. AC Adapter Power Cord 2 Plug the DC plug into the right side of the printer. Front cover 3 Align the marks on the printer and the battery pack. Insert the left end of the battery pack into the printer at a slight angle. DC plug NOTE: The green CHARGE/ERROR light stays on until the battery pack is completely charged (approximately 4 to 6 hours). 3 Check the power lock switch on the right side of the printer. Move it to the mark. Lock Switch 1 Remove the BC-11e Color BJ Cartridge from its package. 2 You MUST remove these protective materials: • Orange cap • Orange tape Remove Cap Remove Tape Do Not Touch these areas 3 Lift the top cover. Top Cover Cartridge Holder moves to the center 1 Turn OFF your printer. IMPORTANT: Be sure the printer is off before continuing, or the computer will attempt to install the printer driver before the printer is ready. 2 Connect one end of a USB cable (not included) to the computer, the other to the printer. USB connection USB cable USB port 4 Align the marks on the BJ cartridge and the cartridge holder; insert the cartridge into the holder at a slight angle. SB-10 Ink Cartridge Storage Box Battery Pack 4 Press on the right side of the battery pack to lock it in place. 5 Close the front cover. NOTE: When the power lock switch is to the left, you cannot turn the printer on. 4 Press the POWER button to turn on the printer. Power Button 5 Gently press down on the BJ cartridge until it locks into place. 6 Close the top cover and press the CARTRIDGE button. Cartridge Button Continue with Step 6 on side two. Documentation and Software Kit NOTE: Electronic User's Guide is included on the CD-ROM. NOTE: You must install the battery pack. If the battery pack is not installed when you turn on the printer, the CHARGE/ERROR lamp will light orange and the printer will beep six times. Wait a few moments while the BJ cartridge and holder move to the left side of the printer.
-
 1
1 -
 2
2
 |
 |