Canon CanoScan LiDE90 LiDE 90 Quick Start Guide Instructions - Page 1
Canon CanoScan LiDE90 Manual
 |
View all Canon CanoScan LiDE90 manuals
Add to My Manuals
Save this manual to your list of manuals |
Page 1 highlights
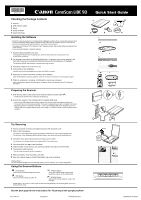
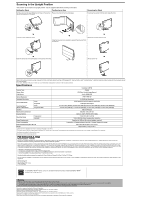
Checking the Package Contents 1 Scanner 2 USB Interface Cable 3 Stand 4 Setup CD-ROM 5 Quick Start Guide Installing the Software • Do NOT connect the scanner to a computer before installing the software. If you connect the scanner and the Found New Hardware Wizard appears, unplug the USB cable from the computer, and then click [Cancel]. • Quit all running applications before installation, including anti-virus software. • To upgrade from Windows® XP to Windows Vista™ operating system, first uninstall software bundled with the Canon scanner. • Log in as an administrator to install the software. 1 Place the Setup CD-ROM in the drive. For Macintosh®: Double-click the [Setup] icon. Enter the administrator ID and password on the authentication dialog box. 2 For Windows Vista, when the [AutoPlay] dialog box (*1) appears, run the setup program, and then click [Continue] to proceed when the [User Account Control] dialog box (*2) appears. For Windows 2000/XP and Macintosh, skip this step and go to step 3. 3 Click [Easy Install] on the main menu (*3). 4 Click [Install] to start installation. Carefully read the License Agreement, and then click [Yes] to proceed. 5 Follow the on-screen instructions to perform the installation. When the Registration dialog box appears, follow the on-screen instructions to ensure product support. 6 When the installation is complete, click [Restart] to restart your computer. After restarting the computer, "Solution Menu" will appear. Refer to the last part of the "Try Scanning" description. Preparing the Scanner 1 Slide the lock switch on the bottom of the scanner toward the unlock mark ( ). • Always lock the scanner when carrying or transporting it. 2 Connect the scanner to the computer with the supplied USB cable. • Only use the USB cable provided with the scanner. Use of other cables may lead to a malfunction. • The scanner does not have a power switch. The power is activated as soon as the computer is turned on. • When the scanner is connected to the USB 1.1 port and "HI-SPEED USB Device Plugged into non-HI- SPEED USB Hub" message appears, ignore the message. The scanner operates in this condition without problems. Quick Start Guide *1 *2 *3 Try Scanning 1 Place a document on the document glass and close the document cover. 2 Start ArcSoft PhotoStudio. For Windows: Select [Start]-[(All) Programs]-[ArcSoft PhotoStudio 5.5], then click [PhotoStudio 5.5]. For Macintosh: Open [Applications]-[PhotoStudio] folders, then double-click the [PhotoStudio] icon. 3 Click [File] menu, [Select Source] and select the scanner model. For Windows: Do not select the one that includes [WIA] in the model name. 4 Click the acquire icon to start ScanGear. 5 Select the type of document you are scanning in [Select Source] and click [Preview]. 6 Click [Scan] to start scanning. • Do not move the scanner while it is operating. 7 When prompted to close ScanGear, click [OK]. 8 Save the scanned image in ArcSoft PhotoStudio and close the window. You can select MP Navigator EX, the Scanning Guide (on-screen manual), or the Online Registration. Using the Scanner Buttons COPY Button Prints (copies) the scanned image with a printer. PDF Button Saves the scanned image as a PDF file. PHOTO Button Opens the scanned image in the bundled application program, ArcSoft PhotoStudio. E-MAIL Button Attaches the scanned image to a new e-mail message. • For Mac OS X v.10.3.x/10.2.8 or later: Refer to Other Scanning Methods in the Scanning Guide (on-screen manual) before using. See the back page for the instructions for "Scanning in the upright position". QT5-1318-V01 XXXXXXXX ©CANON INC. 2007 Bottom Top PRINTED IN VIETNAM
-
 1
1 -
 2
2
 |
 |
