Canon D320 imageCLASS D320 Set-Up Sheet - Page 3
Loading Paper in the Cassette, Connecting the Power Cord
 |
UPC - 013803016468
View all Canon D320 manuals
Add to My Manuals
Save this manual to your list of manuals |
Page 3 highlights
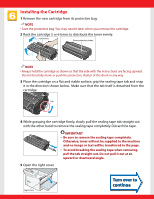
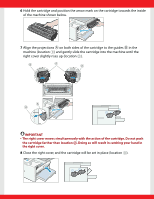
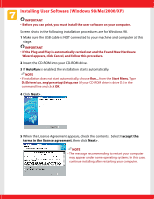
Loading Paper in the Cassette 1 Load the paper stack in the cassette. • Insert the paper stack into the cassette as far as it will go. 2 Slide the width guides A and the length guide B to fit the size of the paper stack. • Adjust the guides so that there is no space between the guides and the paper. NOTE • Make sure the paper stack does not exceed the width and length guides' claws. 3 Set the multi-purpose tray on top of the cassette. Connecting the Power Cord When the power cord is plugged into the machine and into the wall outlet, the machine is turned on. There is no separate ON/OFF power switch. Once connected, the machine needs to warm up before you can use it. The LCD displays PLEASE WAIT, then INSTALL CARTRIDGE. The LCD returns to the standby display when you install the cartridge and load paper in the cassette or multi-purpose tray. NOTE • Insert the power cord straight into the power cord connector on the left side of the machine. Do not insert it at an angle. Otherwise, the machine may not be properly connected to the power source and may not turn on. If this happens, disconnect the power cord, and reconnect it correctly after a minute or more. • When disconnecting or connecting the power cord, be sure to unplug or plug the power cord from the wall outlet, not from the power cord connector on the machine.
-
 1
1 -
 2
2 -
 3
3 -
 4
4 -
 5
5 -
 6
6 -
 7
7 -
 8
8
 |
 |
