Canon DP-V3010 User LUT Creation Guide - Page 7
Examples of Creating LUT Files - manual
 |
View all Canon DP-V3010 manuals
Add to My Manuals
Save this manual to your list of manuals |
Page 7 highlights
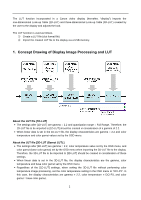
3. Examples of Creating LUT Files 1D-LUT: When using a Viewing LUT* for Canon Log gamma conversion The method of creating a LUT file (1D-LUT) using a Viewing LUT for conversion from Canon Log gamma to WideDR gamma is described below. * This example describes the case when using "LUT (lookup table) for Canon Log Gamma, Canon Log 10 to WideDR 10 LUT Version 1.1". ① Download the Viewing LUT to the PC to be used. • Download the Viewing LUT provided by CINEMA EOS noted above from the Canon website. ② Convert the dynamic range of the Viewing LUT. • The Viewing LUT is a 10-bit input 10-bit output 1D-LUT. • The Viewing LUT has a black level of 4 and a white level of 1019, so perform range conversion to adjust to the dynamic range of the display. Next, normalize to 1023 to match the LUT file (1D-LUT) format. Labeling the n-gradation lattice point data of the Viewing LUT as Lut (n), the n-gradation lattice point data (LUT file (1DLUT)_n) after range conversion and normalization is obtained by the following calculation. (n: 0 to 1023) LUT file (1DLUT)_n = ( ( Lut (n) - 4 ) × 1023 ÷ (1019 - 4 ) ) ÷ 1023 All the lattice point (gradation 0 to 1023) data of the Viewing LUT is calculated based on the above formula. The number of bits is 32 bits (fixed value). ③ Change the format. • Refer to "2. LUT File Configuration". ④ Save the created LUT file to the USB memory. • USB memory format: FAT32 or FAT16 • LUT file copy destination folder: USB memory root folder Setting the display and importing the LUT file Also refer to the Instruction manual of the display. ① Connect the USB memory on which the LUT file is saved to the USB terminal of the display. ② Set "Picture Mode" or "Color Gamut" to a setting other than "ACESproxy" in the OSD menu. • Set the color temperature and color gamut to arbitrary values. ③ Select "Adjustment" → "Detail Settings" → "LUT Import" in the OSD menu. • Filename: Select the corresponding LUT file name. • LUT Type: Select "Gamma LUT". • Select LUT: Select Gamma LUT 1 - 8. ④ Select "Execute". • LUT file import starts. • When import is complete, the message "Import is completed." is displayed on the screen. 7
-
 1
1 -
 2
2 -
 3
3 -
 4
4 -
 5
5 -
 6
6 -
 7
7 -
 8
8 -
 9
9 -
 10
10 -
 11
11
 |
 |
