Canon DR 5010C Easy Start Guide - Page 1
Canon DR 5010C - imageFORMULA - Document Scanner Manual
 |
UPC - 013803071535
View all Canon DR 5010C manuals
Add to My Manuals
Save this manual to your list of manuals |
Page 1 highlights
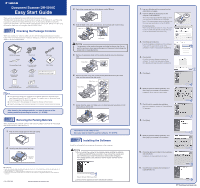
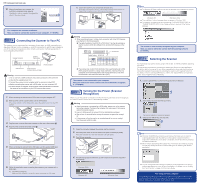
Document Scanner DR-5010C Easy Start Guide Thank you for purchasing the Canon DR-5010C Document Scanner. This Easy Start Guide describes the procedure for setting up the scanner for use. Follow the procedures outlined in this Easy Start Guide to set up the scanner. Details on using the scanner are described in the User's Guide packaged with the scanner. Before you start using the scanner, make sure to thoroughly read the User's Guide. Checking the Package Contents When you unpack your scanner, make sure all of the following accessories are included. If any of the items listed below are missing or damaged, contact your local authorized Canon dealer or service representative. DR-5010C Scanner Document Eject Guide Adobe Acrobat Setup Disc Power Cord Checking thEDe aoPacscukymageSenCttoaSncrteatnntGsneur DidRe-5010C Document Eject DR-5010C Guide ScdaenInafelaerWnr yhoeronsf etyhroveuicitueenmrpetsapPhocelrsiewskcsseteyapcreodnCarnouTnontbacrrhendeteTsireisvldchorae,Euaawr.mernaneanskadsyrekeyeoreSos,umcutmstarluiifisarnbortskeereGienddptuogsuiiinudntrohcrertetohhhddraiaeosaeslulUmEisngocasagfhresgitlbytyhreh'seeSrdeesGtf,aCaotcuhrdlalotioednntGwheoptuaeinrnpiocdgUDactecseyRaekotdc-oar5ucu'sg0rseree1eGlsod0tsfucoCuowiardprliDiseetathes.ohutcettathihunrseoemgcrsaiieunzcnnpecantdlnuteShndCrc.eeeaaDrds.nnec.Bnotaeaennrif.lonsreeornyfoourusuisnstgea.rtthFueosllionwg the Quick Reference Guide (EThaissyMSatanrutaGl)uide USB Cable Document Scanner SAedtoubpeDAisccrobat SetDuRp -D50is1c0C (U.S.A aWnadrCraanntyadCaaordnly) insTehrteedDRin-5th0e10UCseSr'estuGpuDidiesU.csiser's Guide ( R M6CI3SA90USN08G8IOS0A2DNAS81IAX0.I9COIN9EA-NLCN5TRA1PLDD75-BTR01 U.S.A aengdisCtraantioandaCoanrdly) 9Z9 Easy Start Guide (This Manual) USB Cable Document Scanner User's Guide DR-5010C Setup Disc The DR-5010C Setup Disc is inserted in the User's Guide. Warranty Card (U.S.A and Canada only) 0880281099-L5T1P7-BR01 CANON CANADA INC. 6390 DIXIE RD MISSISSAUGA ON L5T 9Z9 Registration Card (U.S.A and Canada only) Note ● The DR-5010C Setup Disc contains the Softwares (DR-5010C Scanner Driver and CapturePerfect3.0) and PDF manuals. For details, refer to "About the Setup Disc" on page 16 of the User's Guide. ● Items included in this package are subject to change without notice. ● Keep the package and packing materials for storing or transporting the scanner. After checking the package contents, you need to remove all the packing materials protecting the scanner. (☞STEP2) Removing the Packing Materials After unpacking the scanner, perform the following steps to remove all the orange tape and protective materials from it. 1. Peel off all the orange tape from the outer casing. 2. Carefully open the document feed tray. Document Feed Tray ■ Trademarks • Canon and the Canon logo are registered trademarks of Canon Inc. in the United States and may also be trademarks or registered trademarks in other countries. • Microsoft Windows® is a registered trademark of Microsoft USA in the United States and other countries. • Other brands and product names used in this manual may be trademarks or registered trademarks of their respective companies. PUB. CE-IE-672 ©2008 CANON ELECTRONICS INC. 3. Peel off the orange tape from all the places marked ▼ below. 4. Grab the edge of the upper unit as shown, and carefully open it until it stops. Upper Unit Pickup Roller Warning The protrusion in the middle of the upper unit holds the pickup roller. Do not grab this protrusion when opening the upper unit, because it may damage the pickup roller or cause feed errors. 5. Remove the protective sheet and the packing materials securing the pickup roller. Pickup Roller 6. Remove the roller cover, take out the packing materials securing the retard roller, and then reinstall the roller cover. Roller Cover Retard Roller 7. Gently close the upper unit. Make sure it is closed securely by pushing on both edges until you hear a click. The scanner is now ready for use. Next, you need to install the scanner software. (☞STEP3) Installing the Software Install the software before connecting the scanner to the computer. Warning ❏ Do not connect the scanner to the computer before installing the software. In a Windows 2000/XP/Vista environment, if you connect the scanner and turn it ON before you install the software, a wizard screen will appear. If this wizard appears, click [Cancel] to exit the wizard, and then turn the scanner OFF. Wizard Screen (Windows 2000) ❏ Close all other applications before installing the software. 1. Log on to Windows with an account that has administrator privileges. 2. Insert the DR-5010C Setup Disc into the computer's CD-ROM drive. The setup wizard automatically starts up when you insert the CD-ROM into the CD-ROM drive. If the setup wizard does not start up, run the setup.exe application on the CD-ROM. For Windows Vista When using Windows Vista, the "User Account Control" screen may appear. In this case, log on as an administrator and click [OK]. 3. Click [Typical Installation]. [Typical Installation] installs all of the software. If you want to select which parts of the software to install, click [Custom Installation]. 4. Click [Install]. All of the currently displayed software is installed. To install only selected software, click [Back] and select [Custom Installation]. 5. Click [Next]. 6. Read the software license agreement, and click [Yes] if you consent to its conditions. Installation of the scanner driver starts. 7. Click [Finish] to complete the installation. Next, the installation wizard for CapturePerfect 3.0 appears. 8. Click [Next]. 9. Read the software license agreement, and click [Yes] if you consent to its conditions. 10. Check the destination folder for the installation, and click [Next]. Installation of CapturePerfect 3.0 starts. 11. Click [Finish] to complete the installation of CapturePerfect 3.0. ☞Continued on back side
-
 1
1 -
 2
2
 |
 |