Canon Digital Rebel /app/pdf/d_eos/DigRebel_Install.pdf
Canon Digital Rebel - EOS 6.3MP Digital Rebel Camera Manual
 |
UPC - 013803028997
View all Canon Digital Rebel manuals
Add to My Manuals
Save this manual to your list of manuals |
Canon Digital Rebel manual content summary:
- Canon Digital Rebel | /app/pdf/d_eos/DigRebel_Install.pdf - Page 1
X Mac OS 9 * In OS 9, double-click the [Mac OS 9] folder in the CD window s [Canon EOS Digital Installer]. \ The Installer panel appears. 4 Click [Digital Camera Software Installation]. M 8Complete the installation. \ When [Installation has finished] appears, installation is complete. M Click - Canon Digital Rebel | /app/pdf/d_eos/DigRebel_Install.pdf - Page 2
at the same time, depending on your version of Windows: • Windows XP, Me: [Canon Camera WIA Driver] • Windows 2000, 98 SE: [Canon Camera TWAIN Driver] 8Click the checkbox for [EOS Kiss/REBEL/300D]. M Once you have clicked the [EOS Kiss/REBEL/300D] checkbox so that it changes to , click the [Next
-
 1
1 -
 2
2
 |
 |
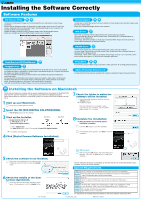
Check that your Macintosh complies with the system requirements for the software on the SOLUTION
DISK and then click the checkboxes
in this guide as you follow the installation procedure.
Where explanations are common to all operating systems, the screens used in the examples are from
OS X.
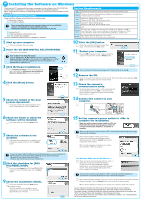
1
Start up your Macintosh.
M
Close any programs that are running.
2
Insert the CD (EOS DIGITAL SOLUTION DISK).
M
The CD icon
appears on the desktop.
3
Start up the Installer.
M
Double-click the CD icon
s
the [
Mac OS X
] folder
s
[
Canon EOS Digital Installer
].
* In OS 9,
double-click
the [
Mac OS 9
] folder in the CD window
s
[
Canon EOS Digital Installer
].
\
The Installer panel appears.
4
Click [Digital Camera Software Installation].
M
5
Check the software to be installed.
M
Check that the checkboxes for the software to be
installed are selected and then click the [
Install
]
button.
6
Check the details of the User
License Agreement.
M
If you have checked the details and agree to the
terms of the Agreement, click the [
Agree
] button.
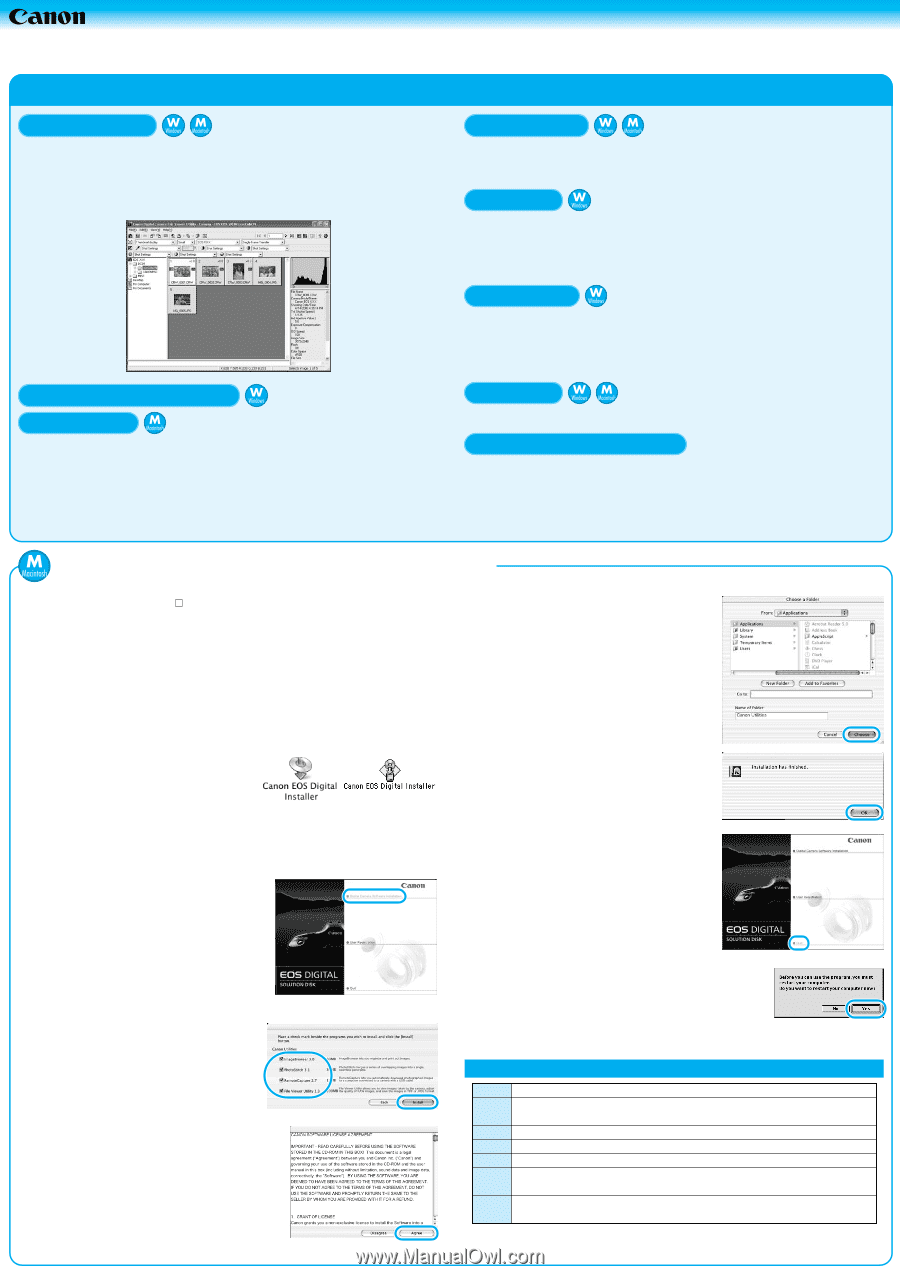
7
Check the folder in which the
software will be installed.
M
Check the install destination and then click the
[
Choose
] button.
\
Installation begins.
The time required for the installation varies
depending on your computer, but should take
approximately 2 to 4 minutes.
8
Complete the installation.
\
When [Installation has finished] appears,
installation is complete.
M
Click the [
OK
] button to end the installation.
M
If the Installer panel appears, click [
Exit
] to end the
installation.
For OS 9 users :
M
After clicking the [
OK
] button, the restart dialog box
appears. Then click the [
Yes
] button to restart your
computer.
See the Software Instructions for information on the next step (how to connect the camera to your
computer, and how to use the software).
For instructions for installing Photoshop Elements, refer to the Software Instructions (M-6).
Installing the Software Correctly
Primarily for shooting RAW images and recommended for users interested in serious image
processing.
Can be used for displaying images as thumbnails or single images saved on the CF card in the
camera, displaying and processing RAW images, downloading images to your computer and
transferring them to retouching software.
Capable of rotating, protecting, saving, deleting images and of printing image indexes.
Allows you to display and process RAW images saved on your computer.
Primarily for shooting JPEG images and recommended for users who want an easy-to-use program
for displaying images as thumbnails or single images, downloading images to a computer and printing
the images in a range of different layouts.
Provides straightforward image processing functions and simplifies the task of arranging and
organizing images.
Can be used with the PhotoRecord print layout software to simplify a wide range of printing tasks,
including setting the size of the printed images, setting the layout, setting automatic multi-image
layout, selecting backgrounds and frames, and inserting titles and captions.
Links with e-mail software to allow images to be sent as e-mail attachments.
Enables you to control the camera from your computer to shoot single frames and take images using
the timer or interval timer.
Allows you to download images directly to the computer.
WIA Driver controls the communication between the camera and your computer.
You must install WIA driver to use File Viewer Utility, ZoomBrowser EX or RemoteCapture on
Windows XP or Windows Me.
Used simply, WIA Driver provides a simple way to download JPEG images in the [Scanner and
Camera Wizard] dialog box or Windows Explorer.
TWAIN Driver controls the communication between the camera and your computer.
You must install TWAIN driver to use File Viewer Utility, ZoomBrowser EX or RemoteCapture on
Windows 2000 or Windows 98 SE.
Used simply, TWAIN Driver allows you to display JPEG images saved on a CF card in the camera
and to transfer the images to a TWAIN Driver-compatible application.
Automatically merges multiple images to provide a simple procedure for creating panorama photos.
Full-featured retouching software equipped with a range of advanced image processing functions.
Installing the Software on Macintosh
Mac OS X
Mac OS 9
File Viewer Utility
RemoteCapture
WIA Driver
TWAIN Driver
PhotoStitch
Adobe Photoshop Elements 2.0
ZoomBrowser EX/PhotoRecord
ImageBrowser
Software Features
System Requirements
OS
Computer
CPU
RAM
Interface
Hard disk
space
Display
Mac OS X (version 10.2 recommended), Mac OS 9.0 to 9.2 (Mac OS 9.2 recommended)
Macintosh computer with one of the above OS installed and a USB port as a standard feature
* Users of first-generation iMacs require a firmware update.
Power PC
Mac OS X : Minimum 256 MB required, Mac OS 9.0 to 9.2 : Minimum 128 MB required
USB
File Viewer Utility : 100 MB or more, RemoteCapture : 15 MB or more, ImageBrowser : 50 MB
or more, PhotoStitch : 30 MB or more, Adobe Photoshop Elements 2.0 : 400 MB or more
800
×
600 dots, 32,000 colors or more required
1024
×
768 dots or more recommended
CT1-1257-000
© CANON INC. 2003
PRINTED IN JAPAN