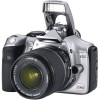
Canon Digital Rebel /app/pdf/d_eos/DigRebel_Install.pdf - Page 2
Installing the Software on Windows - 300d user guide
 |
UPC - 013803028997
View all Canon Digital Rebel manuals
Add to My Manuals
Save this manual to your list of manuals |
Page 2 highlights
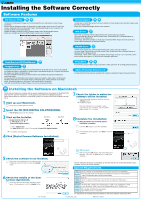
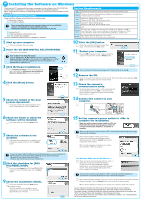
Installing the Software on Windows ● Check that your PC complies with the system requirements for the software on the SOLUTION DISK and then click the checkboxes in this guide as you follow the installation procedure. ● Where explanations are common to all operating systems, the screens used in the examples are from Windows XP. Correct Installation Procedure ● Always install the software as described in the procedures below. 1. Start up your computer. 2 to 11. Install the software. ● Never connect the camera to your computer before you have installed the software. The software will not be installed correctly. ● Connect the camera to your computer for the first time in step 14. 12. Remove the CD. 13. Check the camera's communication mode. 14 to 15. Complete the installation. ● Once you connect the camera to your PC, installation is complete. System Requirements OS Windows XP (Home Edition/Professional), Windows Me, Windows 2000, Windows 98 SE PC with one of the above OS preinstalled and a USB port as a standard feature Computer * Upgraded machines not supported. CPU Windows XP : 300 MHz Pentium or better Windows Me, 2000, 98 SE : 150 MHz Pentium or better RAM Windows XP : Minimum 256 MB required Windows Me, 2000, 98 SE : Minimum 128 MB required Interface USB Hard disk space File Viewer Utility : 100 MB or more, RemoteCapture : 20 MB or more, WIA Driver : 25 MB or more, TWAIN Driver : 25 MB or more, ZoomBrowser EX (including the PhotoRecord) : 120 MB or more, PhotoStitch : 40 MB or more, Adobe Photoshop Elements 2.0 : 350 MB or more Display 800 × 600 dots, High Color (16-bit color) or more required 1024 × 768 dots True Color (32-bit color) or more recommended 1 Start up your computer. M Close any programs that are running. 2 Insert the CD (EOS DIGITAL SOLUTION DISK). M The Installer panel appears. If the Installer Panel Does Not Appear Click the [Start] button s [My Computer]. (In other versions of Windows, double-click [My Computer] on the desktop) Then right-click the CD-ROM drive containing the CD, select [Open] from the menu that appears and double-click the [SETUP] icon. 3 Click [Software Installation]. M The [Preparing to Install] window is displayed, and after a brief wait, the [Welcome to the InstallShield Wizard for Solution Disk] window is displayed. 4 Click the [Next] button. M 5 Check the details of the User License Agreement. M If you have checked the details and agree to the terms of the Agreement, click the [Yes] button. 6 Check the folder in which the software will be installed. M Check the details and click the [Next] button. 7 Check the software to be installed. M Check that the checkboxes for the software to be installed are selected and then click the [Next] button. 10 Click the [OK] button. M Check the information in [Canon Solution Disk setup...] and then click the [OK] button. 11 Restart your computer. M Check that is inserted in [Yes, I want to restart my computer now.] and then click the [Finish] button. Do not remove the CD before restarting your PC. Remove the CD in step 12. 12 Remove the CD. M Once the computer has restarted, remove the CD. When the Installer panel appears, click [Exit] to exit the Installer and then remove the CD. 13 Check the camera's communication mode. M Set the camera's power switch to and check that [Communication] in menu < > is set to [Normal]. When you have finished the settings, set the camera's power switch to . 14 Connect the camera to your computer. M USB port Dedicated USB cable Dedicated USB cable DIGITAL terminal 15 Set the camera's power switch to to complete the installation. M When you set the camera's power switch to , the [Found New Hardware] message appears. When the message automatically disappears, installation is complete. Do not set the camera's power switch to until the [Found New Hardware] message automatically disappears. M When [EOS Kiss REBEL 300D] screen (event screen) and the [Scanner and Camera Wizard] dialog box appear, click the [Cancel] buttons and close all the open windows. ● When a window appears prompting you to restart your computer, restart the computer. To use File Viewer Utility, ZoomBrowser EX or RemoteCapture, you must install one of the following drivers at the same time, depending on your version of Windows: • Windows XP, Me: [Canon Camera WIA Driver] • Windows 2000, 98 SE: [Canon Camera TWAIN Driver] 8Click the checkbox for [EOS Kiss/REBEL/300D]. M Once you have clicked the [EOS Kiss/REBEL/300D] checkbox so that it changes to , click the [Next] button. 9 Check the installation details. M Check the details and click the [Next] button. \ Installation begins. ● The time required for the installation varies depending on your computer, but should take approximately 2 to 4 minutes. For Windows 2000, Me and 98 SE users : M When you set the camera's power switch to , a dialog box such as [Found New Hardware] or [Create driver information database] appears, depending on your operating system and computer system. If the display automatically clears at this point, installation is complete. Do not set the camera's power switch to until the [Found New Hardware] or [Create driver information database] message automatically disappears. M When [EOS Kiss REBEL 300D] screen (event screen) and the [Scanner and Camera Wizard] dialog box appear, click the [Cancel] buttons and close all the open windows. ● When a window appears prompting you to restart your computer, restart the computer. ● See the Software Instructions for information on the next step (how to use the software). ● For instructions for installing Photoshop Elements, refer to the Software Instructions (W-8). ● If you were unable to successfully install the software using the procedure given in this guide, see "When You Have Problems with Installation" in the Software Instructions. ● If you connected the camera to your computer before installing the software, see "Troubleshooting" (W-82) in the Software Instructions.
-
 1
1 -
 2
2
 |
 |
