Canon EOS-1D C EOS MOVIE Plugin-E1 for Final Cut Pro Ver.1.6 for Macintosh Qui - Page 4
[Log and Transfer] Window View and File Conversion, Start up Final Cut Pro, select [File] - dslr
 |
View all Canon EOS-1D C manuals
Add to My Manuals
Save this manual to your list of manuals |
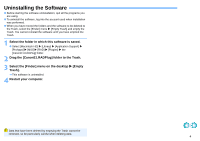
Page 4 highlights
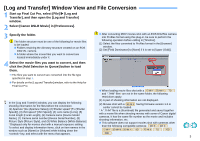
[Log and Transfer] Window View and File Conversion 1 Start up Final Cut Pro, select [File] [Log and Transfer], and then open the [Log and Transfer] window. 2 Select [Canon DSLR Movie] in [Preferences]. 3 Specify the folder. The folder structure must be one of the following for movie files to be loaded. Folders retaining the directory structure created on an EOS DIGITAL camera A folder where the movie files you want to convert are located immediately under it After converting MOV movies shot with an EOS DIGITAL camera into ProRes format using this plug-in, be sure to perform the following operation before editing in [Timeline]. (1) Select the files converted to ProRes format in the [Browser] window. (2) Set [Field Dominance] to [None] if it is set to [Upper (Odd)]. 4 Select the movie files you want to convert, and then click the [Add Selection to Queue] button to load them. The files you want to convert are converted into the file type specified in step 2. For details on the [Log and Transfer] window, refer to the Help for Final Cut Pro. When loading movie files shot with a 1D Mk IV 5D Mk II 7D and ".THM" files* are not in the same folder, the following restrictions apply. (1) A part of shooting information are not displayed. In the [Log and Transfer] window, you can display the following shooting information for the files before the conversion. (1) Aperture* [Av (Aperture Value)], (2) Shutter speed* [Tv (Shutter Speed)], (3) ISO speed* [ISO Speed], (4) Lens name [Lens], (5) Focal length [Focal Length], (6) Camera name [Device Model Name], (7) Camera serial number [Device Serial Number], (8) Picture Style [Picture Style], and (9) White Balance [White Balance] * Displayed only for movies shot with a manual exposure setting. To select and display information items, click on item names in the window such as [Name] or [Volume] while holding down the (2) Movies shot with a 5D Mk II having firmware version 1.2 or earlier cannot be loaded. * A ".THM" file is a (thumbnail) file generated and saved together with a movie file when shooting movies with some of Canon digital cameras. It has the same file number as the movie and includes shooting information, etc. This software does not support movies shot with cameras other than the following compatible cameras: 1D X 1D C 1D Mk IV 5D Mk III 5D Mk II 6D 7D Mk II 7D 70D key, and select with the menu that appears. 60D . 3
-
 1
1 -
 2
2 -
 3
3 -
 4
4 -
 5
5 -
 6
6
 |
 |
