Canon EOS 70D Quick Reference Guide - Page 2

Shooting Operation - release

Page 2 highlights

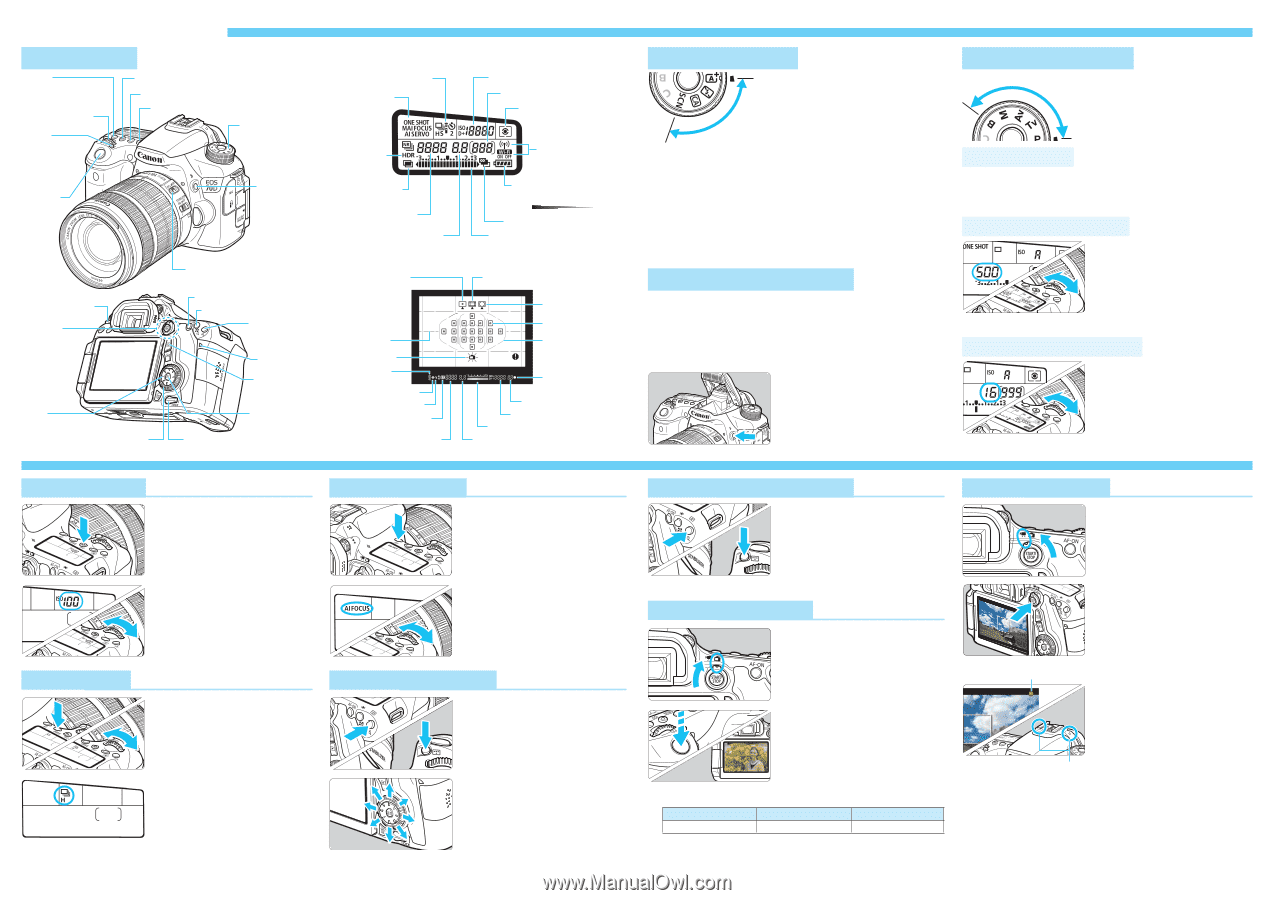
Shooting Operation Nomenclature Metering mode selection button Main Dial AF area selection mode button ISO speed setting button Drive mode selection button AF mode selection button Mode Dial Shutter button Flash button Power switch Live View shooting/ Movie shooting switch Start/Stop button Multi-controller Quick Control Dial Focus mode switch AF start button AE lock/Reduce button AF point selection/ Magnify button Access lamp Quick Control button Setting button Multi function lock switch LCD Panel Drive mode AF operation ISO speed Possible shots Metering mode HDR shooting Wi-Fi function Multiple-exposure shooting Shutter speed Aperture Battery check zxcmbn OK AEB Not good Exposure level indicator Viewfinder Information Single-point AF (Manual selection) Zone AF (Manual zone selection) 19-point automatic selection AF AF points Grid Area AF frame Electronic level Battery check AE lock Flash-ready Flash exposure compensation Shutter speed Focus confirmation light Maximum burst ISO speed Exposure level indicator Aperture Basic Zone Modes Basic Zo ne All the settings necessary for shooting are set automatically. You just press the shutter button, and the camera does the rest. A Scene Intelligent Auto 7 Flash Off C Creative Auto 8 Special scene 2 Portrait 6 Night Portrait 3 Landscape F Handheld Night Scene 4 Close-up G HDR Backlight Control 5 Sports D Using the Built-in Flash Basic Zone Modes If necessary, the built-in flash will be fired automatically in low-light or backlit conditions (except in the modes). Creative Zone Modes ooPress the button to raise the built-in flash, then shoot. Creative Zone Modes Creative Zo ne You can change the camera settings as desired to shoot in various ways. * Set the switch downward (Multi function lock released). d: Program AE ooSet the Mode Dial to . ooWhen you focus a subject, camera automatically sets the shutter speed and aperture. s: Shutter-priority AE ooSet the Mode Dial to . ooTurn the dial to set the desired shutter speed, then focus the subject. XX The aperture will be set automatically. ooIf the aperture display blinks, turn the dial until it stops blinking. f: Aperture-priority AE ooSet the Mode Dial to . ooTurn the dial to set the desired aperture, then focus the subject. XXThe shutter speed will be set automatically. ooIf the shutter speed display blinks, turn the dial until it stops blinking. i: ISO SpeedN ooPress the button, turn the or dial. ooISO 100 to ISO 12800 can be set in 1/3-stop increments. ooWhen "A" is selected, the ISO speed is set automatically. When you press the shutter button halfway, the ISO speed setting is displayed. f: AF OperationN ooSet the lens focus mode switch to . ooPress the button, then turn the or dial. X (One-Shot AF): For still subjects 9 (AI Focus AF): Switches the AF operation automatically Z (AI Servo AF): For moving subjects i Drive Mode ooPress the button, turn the or dial. u : Single shooting o: High-speed continuous shooting i : Low-speed continuous shooting B : Silent single shooting M : Silent continuous shooting Q : 10-sec. self-timer/ remote control k: 2-sec. self-timer/ remote control S AF Point SelectionN ooPress the or button. ooThe AF point selection will change in the direction you tilt the . If you press straight down, the center AF point (or center zone) will be selected. ooYou can also select a horizontal AF point by turning the dial and select a vertical AF point by turning the dial. B AF Area Selection ModeN ooPress the or button. ooLook through the viewfinder and press the button. XXEach time you press the button, the AF area selection mode changes. A Live View Shooting ooSet the switch to . ooPress the button and the image will appear on the LCD monitor. k Shooting Movies ooSet the switch to . XXThe image will appear on the LCD monitor. ooPress the button to start shooting a movie. To stop movie shooting, press the button again. ooTo shoot still photos, press the shutter button completely. Recording movie ooPress the shutter button halfway to focus, then press it completely to take the picture. ooPress the button to stop the Live View shooting. ooNumber of Possible Shots (Live View Shooting) Temperature No Flash 50% Flash Use At 23°C / 73°F Approx. 230 shots Approx. 210 shots Microphone ooWhen the shooting mode is , you can shoot movies with manual exposure. ooYou can set movie shooting settings with the menu options under the [Z1] or [Z 2] tab.

  • 1
  • 2

Shooting Operation
Nomenclature
f
: AF Operation
N
B
AF Area Selection Mode
N
i
: ISO Speed
N
A
Live View Shooting
k
Shooting Movies
S
AF Point Selection
N
i
Drive Mode
Basic Zone Modes
Creative Zone Modes
D
Using the Built-in Flash
d
: Program AE
s
: Shutter-priority AE
f
: Aperture-priority AE
o
Press the <
D
> button to raise the
built-in flash, then shoot.
Basic Zone Modes
If necessary, the built-in flash will be fired automatically in
low-light or backlit conditions (except in the <
7
> <
3
>
<
5
> <
G
> modes).
Creative Zone Modes
LCD Panel
Viewfinder Information
All the settings necessary for
shooting are set automatically.
You just press the shutter
button, and the camera does
the rest.
You can change the camera
settings as desired to shoot in
various ways.
* Set the <
R
> switch downward (Multi
function lock released).
o
Set the Mode Dial to <
d
>.
o
When you focus a subject, camera automatically sets the
shutter speed and aperture.
o
Set the Mode Dial to <
s
>.
o
Turn the <
6
> dial to set the
desired shutter speed, then
focus the subject.
X
The aperture will be set automatically.
o
I
f the aperture display blinks, turn
the <
6
> dial until it stops blinking.
o
Set the lens focus mode switch
to <
f
>.
o
Press the <
f
> button, then
turn the <
6
> or <
5
> dial.
X
(One-Shot AF):
For still subjects
9
(AI Focus AF):
Switches the AF operation
automatically
Z
(AI Servo AF):
For moving subjects
o
Press the <
i
> button, turn
the <
6
> or <
5
> dial.
o
ISO 100 to ISO 12800 can be
set in 1/3-stop increments.
o
When “A” is selected, the ISO
speed is set automatically.
When you press the shutter
button halfway, the ISO speed
setting is displayed.
o
Set the switch to <
A
>.
o
Press the <
0
> button and the
image will appear on the LCD
monitor.
o
Press the shutter button halfway
to focus, then press it completely
to take the picture.
o
Press the <
0
> button to stop
the Live View shooting.
o
Set the switch to <
k
>.
X
The image will appear on the
LCD monitor.
o
Press the <
S
> or <
B
>
button.
o
Look through the viewfinder
and press the <
B
> button.
X
Each time you press the <
B
>
button, the AF area selection
mode changes.
o
Press the <
0
> button to
start shooting a movie. To
stop movie shooting, press the
<
0
> button again.
o
To shoot still photos, press the
shutter button completely.
o
When the shooting mode is <
a
>, you can shoot movies
with manual exposure.
o
You can set movie shooting settings with the menu
options under the [
Z
1
] or [
Z
2
] tab.
o
Press the <
S
> or <
B
> button.
o
The AF point selection will
change in the direction you tilt
the <
9
>. If you press <
0
>
straight down, the center AF
point (or center zone) will be
selected.
o
You can also select a horizontal
AF point by turning the <
5
> dial
and select a vertical AF point by
turning the <
6
> dial.
o
Press the <
R
> button, turn
the <
6
> or <
5
> dial.
u
:
Single shooting
o
:
High-speed
continuous shooting
i
:
Low-speed
continuous shooting
B
:
Silent single shooting
M
:
Silent continuous shooting
Q
:
10-sec. self-timer/
remote control
k
:
2-sec. self-timer/
remote control
o
Set the Mode Dial to <
f
>.
o
T
urn the <
6
>
dial to set the desired
aperture, then focus the subject.
X
T
he shutter speed will be set automatically.
o
I
f the shutter speed display blinks, turn
the <
6
> dial until it stops blinking.
A
Scene Intelligent Auto
7
Flash Off
C
Creative Auto
8
Special scene
2
Portrait
3
Landscape
4
Close-up
5
Sports
o
Number of Possible Shots (Live View Shooting)
Temperature
No Flash
50% Flash Use
At 23°C / 73°F
Approx. 230 shots
Approx. 210 shots
6
Night Portrait
F
Handheld Night Scene
G
HDR Backlight Control
B
a
s
i
c
Z
o
n
e
C
r
e
a
t
i
v
e
Z
o
n
e
Microphone
Recording movie
<
i
> ISO speed setting button
<
R
> Drive mode selection button
<
f
> AF mode selection button
Mode Dial
<
D
>
Flash button
Shutter
button
Focus mode switch
<
B
>
AF area
selection
mode button
<
6
> Main Dial
<
q
>
Metering mode
selection button
<
9
>
Multi-controller
<
p
> AF start button
Access lamp
<
S
> AF point
selection/
Magnify button
<
Q
>
Quick Control
button
<
A
>
AE lock/Reduce button
Power switch
<
5
> Quick Control Dial
<
0
>
Setting button
Multi function lock switch
<
A
/
k
>
Live View shooting/
Movie shooting
switch
<
0
>
Start/Stop
button
Battery check
zxcm
bn
OK
Not
good
Drive mode
AF operation
HDR shooting
Multiple-exposure
shooting
Shutter speed
Aperture
Exposure level indicator
AEB
Wi-Fi function
Metering mode
Possible shots
ISO speed
Single-point AF
(Manual selection)
Grid
Electronic level
Battery check
AE lock
Flash-ready
Flash exposure
compensation
Shutter speed
Zone AF (Manual zone selection)
19-point automatic
selection AF
AF points
Area AF frame
Focus confirmation
light
Maximum burst
ISO speed
Exposure level indicator
Aperture