Canon EOS 7D EOS 7D Instruction Manual - Page 220
> One-touch RAW+JPEG
 |
UPC - 013803117493
View all Canon EOS 7D manuals
Add to My Manuals
Save this manual to your list of manuals |
Page 220 highlights
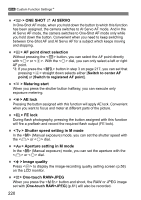
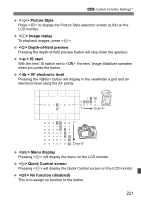
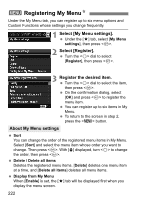
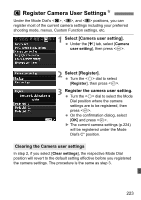
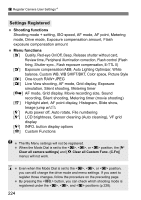
3 Custom Function SettingsN < > ONE SHOT z AI SERVO In One-Shot AF mode, when you hold down the button to which this function has been assigned, the camera switches to AI Servo AF mode. And in the AI Servo AF mode, the camera switches to One-Shot AF mode only while you hold down the button. Convenient when you need to keep switching between One-Shot AF and AI Servo AF for a subject which keeps moving and stopping. < > AF point direct selection Without pressing the button, you can select the AF point directly with or . With the dial, you can only select a left or right AF point. *3: If you press the button in step 3 on page 217, you can set that pressing straight down selects either [Switch to center AF point] or [Switch to registered AF point]. < > Metering start When you press the shutter button halfway, you can execute only exposure metering. < > AE lock Pressing the button assigned with this function will apply AE lock. Convenient when you want to focus and meter at different parts of the picture. < > FE lock During flash photography, pressing the button assigned with this function will fire a preflash and record the required flash output (FE lock). < > Shutter speed setting in M mode In the (Manual exposure) mode, you can set the shutter speed with the or dial. < > Aperture setting in M mode In the (Manual exposure) mode, you can set the aperture with the or dial. < > Image quality Press to display the image-recording quality setting screen (p.58) on the LCD monitor. < > One-touch RAW+JPEG When you press the button and shoot, the RAW or JPEG image set with [One-touch RAW+JPEG] (p.61) will also be recorded. 220
-
 1
1 -
2
-
3
-
4
-
5
-
6
-
7
-
8
-
9
-
10
-
11
-
12
-
13
-
14
-
15
-
16
-
17
-
18
-
19
-
20
-
21
-
22
-
23
-
24
-
25
-
26
-
27
-
28
-
29
-
30
-
31
-
32
-
33
-
34
-
35
-
36
-
37
-
38
-
39
-
40
-
41
-
42
-
43
-
44
-
45
-
46
-
47
-
48
-
49
-
50
-
51
-
52
-
53
-
54
-
55
-
56
-
57
-
58
-
59
-
60
-
61
-
62
-
63
-
64
-
65
-
66
-
67
-
68
-
69
-
70
-
71
-
72
-
73
-
74
-
75
-
76
-
77
-
78
-
79
-
80
-
81
-
82
-
83
-
84
-
85
-
86
-
87
-
88
-
89
-
90
-
91
-
92
-
93
-
94
-
95
-
96
-
97
-
98
-
99
-
100
-
101
-
102
-
103
-
104
-
105
-
106
-
107
-
108
-
109
-
110
-
111
-
112
-
113
-
114
-
115
-
116
-
117
-
118
-
119
-
120
-
121
-
122
-
123
-
124
-
125
-
126
-
127
-
128
-
129
-
130
-
131
-
132
-
133
-
134
-
135
-
136
-
137
-
138
-
139
-
140
-
141
-
142
-
143
-
144
-
145
-
146
-
147
-
148
-
149
-
150
-
151
-
152
-
153
-
154
-
155
-
156
-
157
-
158
-
159
-
160
-
161
-
162
-
163
-
164
-
165
-
166
-
167
-
168
-
169
-
170
-
171
-
172
-
173
-
174
-
175
-
176
-
177
-
178
-
179
-
180
-
181
-
182
-
183
-
184
-
185
-
186
-
187
-
188
-
189
-
190
-
191
-
192
-
193
-
194
-
195
-
196
-
197
-
198
-
199
-
200
-
201
-
202
-
203
-
204
-
205
-
206
-
207
-
208
-
209
-
210
-
211
-
212
-
213
-
214
-
 215
215 -
 216
216 -
 217
217 -
 218
218 -
 219
219 -
 220
220 -
 221
221 -
 222
222 -
 223
223 -
 224
224 -
 225
225 -
226
-
227
-
228
-
229
-
230
-
231
-
232
-
233
-
234
-
235
-
236
-
237
-
238
-
239
-
240
-
241
-
242
-
243
-
244
-
245
-
246
-
247
-
248
-
249
-
250
-
251
-
252
-
253
-
254
-
255
-
256
-
257
-
258
-
259
-
260
-
261
-
262
-
263
-
264
-
265
-
266
-
267
-
268
-
269
-
270
-
271
-
272
-
273
-
274
-
275
-
276
 |
 |