Canon EOS C700 PL EOS C700 EOS C700 PL EOS C700 GS PL EOS C700 FF EOS C700 FF - Page 111
Selecting the Audio Input Source for Audio Channels, Adjusting the Audio Recording Level
 |
View all Canon EOS C700 PL manuals
Add to My Manuals
Save this manual to your list of manuals |
Page 111 highlights
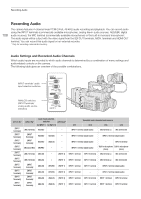
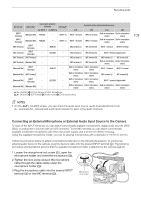
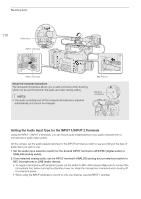
Recording Audio IMPORTANT • When connecting an analog microphone or device that does not support phantom power, make sure to set the corresponding INPUT switch to MIC or LINE, respectively. If you set the switch to MIC+48V, the microphone or device may be damaged. 111 Selecting the Audio Input Source for Audio Channels You can select the audio input source that will be recorded on CH1/CH2 or CH3/CH4, independently for each pair of audio channels. For details refer to the Audio Settings and Recorded Audio Channels table (A 108). 1 Select the desired pair of audio channels. Setup screen: Monitoring menu: [AUDIO] > [CH1/2 IN] or [CH3/4 IN] [Audio Setup] (¡) > [Audio Input] > [Select CH1/2 Input] or [Select CH3/4 Input] 2 Select [INPUT Terminals] (external microphone or audio device), [MIC Terminal] (external microphone) or [Monaural Mic] (built-in microphone) and then press SET. • If necessary, repeat steps 1 and 2 to select the audio input source for the other pair of audio channels. Recording a Single Analog Audio Input to Two Audio Channels By default, when using analog audio sources (line in or microphone) connected to the INPUT terminals, each audio input is recorded to a separate audio channel (INPUT 1 to CH1 and INPUT 2 to CH2). If necessary (for example, as an audio backup recording), you can record the same analog audio source connected to the INPUT 1 terminal to both audio channels, CH1 and CH2. In that case, you can adjust the audio recording levels of each channel independently of each other. 1 Open the [CH2 Input] submenu. Setup screen: Monitoring menu: [AUDIO] > [OPTIONS] > [Audio Input] > [CH2 Input] [Audio Setup] (¡) > [Audio Input] > [CH2 Input] 2 Select the desired option and then press SET. Options [INPUT 2]: [INPUT 1]: Records audio to each channel separately. Analog audio input into INPUT 1 is recorded to CH1, while audio input into INPUT 2 is recorded to CH2. Analog audio input into INPUT 1 is recorded to both channels. Audio input into INPUT 2 will not be recorded. Adjusting the Audio Recording Level When a channel is set to an analog audio input, you can select the automatic audio recording level adjustment or adjust the audio level manually, independently for each channel. When a channel is set to a digital audio source or the built-in monaural microphone, the audio recording level cannot be adjusted. Repeat the following procedure as necessary to adjust the audio recording level for the audio channels used. 1 Open the [Audio Rec Level] screen/submenu of the desired audio channel. Setup screen: [AUDIO] >[REC LEVEL] > Desired audio channel(s) ([CH1] to [CH4], [CH1/2], Monitoring menu: [CH3/4]) [Audio Setup] (¡) > [Audio Input] > [Audio Rec Level CH1] to [Audio Rec Level CH4], [Audio Rec Level CH1/2] or [Audio Rec Level CH3/4]
-
 1
1 -
2
-
3
-
4
-
5
-
6
-
7
-
8
-
9
-
10
-
11
-
12
-
13
-
14
-
15
-
16
-
17
-
18
-
19
-
20
-
21
-
22
-
23
-
24
-
25
-
26
-
27
-
28
-
29
-
30
-
31
-
32
-
33
-
34
-
35
-
36
-
37
-
38
-
39
-
40
-
41
-
42
-
43
-
44
-
45
-
46
-
47
-
48
-
49
-
50
-
51
-
52
-
53
-
54
-
55
-
56
-
57
-
58
-
59
-
60
-
61
-
62
-
63
-
64
-
65
-
66
-
67
-
68
-
69
-
70
-
71
-
72
-
73
-
74
-
75
-
76
-
77
-
78
-
79
-
80
-
81
-
82
-
83
-
84
-
85
-
86
-
87
-
88
-
89
-
90
-
91
-
92
-
93
-
94
-
95
-
96
-
97
-
98
-
99
-
100
-
101
-
102
-
103
-
104
-
105
-
 106
106 -
 107
107 -
 108
108 -
 109
109 -
 110
110 -
 111
111 -
 112
112 -
 113
113 -
 114
114 -
 115
115 -
 116
116 -
117
-
118
-
119
-
120
-
121
-
122
-
123
-
124
-
125
-
126
-
127
-
128
-
129
-
130
-
131
-
132
-
133
-
134
-
135
-
136
-
137
-
138
-
139
-
140
-
141
-
142
-
143
-
144
-
145
-
146
-
147
-
148
-
149
-
150
-
151
-
152
-
153
-
154
-
155
-
156
-
157
-
158
-
159
-
160
-
161
-
162
-
163
-
164
-
165
-
166
-
167
-
168
-
169
-
170
-
171
-
172
-
173
-
174
-
175
-
176
-
177
-
178
-
179
-
180
-
181
-
182
-
183
-
184
-
185
-
186
-
187
-
188
-
189
-
190
-
191
-
192
-
193
-
194
-
195
-
196
-
197
-
198
-
199
-
200
-
201
-
202
-
203
-
204
-
205
-
206
-
207
-
208
-
209
-
210
-
211
-
212
-
213
-
214
-
215
-
216
-
217
-
218
-
219
-
220
-
221
-
222
-
223
-
224
-
225
-
226
-
227
-
228
-
229
-
230
-
231
-
232
-
233
-
234
-
235
-
236
-
237
-
238
-
239
-
240
-
241
-
242
-
243
-
244
-
245
-
246
-
247
-
248
-
249
-
250
-
251
-
252
-
253
-
254
-
255
 |
 |