Canon EOS Digital Rebel EOS DIGITAL Software Instruction Manual (EOS Viewer Ut - Page 96
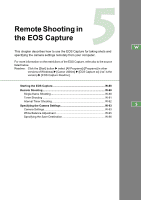
Remote Shooting
 |
View all Canon EOS Digital Rebel manuals
Add to My Manuals
Save this manual to your list of manuals |
Page 96 highlights
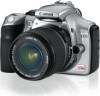
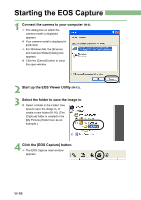
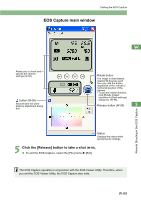
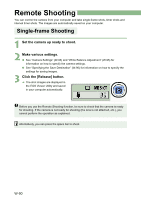
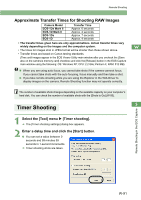
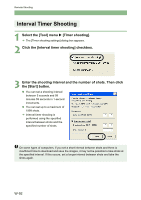
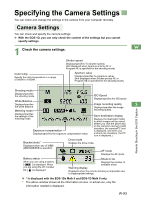
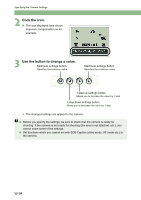
Remote Shooting You can control the camera from your computer and take single-frame shots, timer shots and interval timer shots. The images are automatically saved on your computer. Single-frame Shooting 1 Set the camera up ready to shoot. 2 Make various settings. O See "Camera Settings" (W-93) and "White Balance Adjustment" (W-95) for information on how to specify the camera settings. O See "Specifying the Save Destination" (W-96) for information on how to specify the settings for saving images. 3 Click the [Release] button. ¿ The shot images are displayed in the EOS Viewer Utility and saved in your computer automatically. Before you use the Remote Shooting function, be sure to check that the camera is ready for shooting. If the camera is not ready for shooting (the lens is not attached, etc.), you cannot perform the operation as explained. Alternatively, you can press the space bar to shoot. W-90
-
 1
1 -
2
-
3
-
4
-
5
-
6
-
7
-
8
-
9
-
10
-
11
-
12
-
13
-
14
-
15
-
16
-
17
-
18
-
19
-
20
-
21
-
22
-
23
-
24
-
25
-
26
-
27
-
28
-
29
-
30
-
31
-
32
-
33
-
34
-
35
-
36
-
37
-
38
-
39
-
40
-
41
-
42
-
43
-
44
-
45
-
46
-
47
-
48
-
49
-
50
-
51
-
52
-
53
-
54
-
55
-
56
-
57
-
58
-
59
-
60
-
61
-
62
-
63
-
64
-
65
-
66
-
67
-
68
-
69
-
70
-
71
-
72
-
73
-
74
-
75
-
76
-
77
-
78
-
79
-
80
-
81
-
82
-
83
-
84
-
85
-
86
-
87
-
88
-
89
-
90
-
 91
91 -
 92
92 -
 93
93 -
 94
94 -
 95
95 -
 96
96 -
 97
97 -
 98
98 -
 99
99 -
 100
100 -
 101
101 -
102
-
103
-
104
-
105
-
106
-
107
-
108
-
109
-
110
-
111
-
112
-
113
-
114
-
115
-
116
-
117
-
118
-
119
-
120
-
121
-
122
-
123
-
124
-
125
-
126
-
127
-
128
-
129
-
130
-
131
-
132
-
133
-
134
-
135
-
136
-
137
-
138
-
139
-
140
-
141
-
142
-
143
-
144
-
145
-
146
-
147
-
148
-
149
-
150
-
151
-
152
-
153
-
154
-
155
-
156
-
157
-
158
-
159
-
160
-
161
-
162
-
163
-
164
-
165
-
166
-
167
-
168
-
169
-
170
-
171
-
172
-
173
-
174
-
175
-
176
-
177
-
178
-
179
-
180
-
181
-
182
-
183
-
184
-
185
-
186
-
187
-
188
-
189
-
190
-
191
-
192
-
193
-
194
-
195
-
196
-
197
-
198
-
199
-
200
-
201
-
202
-
203
-
204
-
205
-
206
-
207
-
208
-
209
-
210
-
211
-
212
-
213
-
214
-
215
-
216
-
217
-
218
-
219
-
220
-
221
-
222
 |
 |