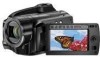
Canon HG20 VIXIA HG20 / VIXIA HG21 Instruction Manual
Canon HG20 - VIXIA Camcorder - 1080p Manual
 |
UPC - 013803096828
View all Canon HG20 manuals
Add to My Manuals
Save this manual to your list of manuals |
Canon HG20 manual content summary:
- Canon HG20 | VIXIA HG20 / VIXIA HG21 Instruction Manual - Page 1
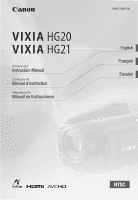
HD Camcorder Instruction Manual Caméscope HD Manuel d'instruction Videocámara HD Manual de Instrucciones PUB. DIM-879 English Français Español - Canon HG20 | VIXIA HG20 / VIXIA HG21 Instruction Manual - Page 2
TO REDUCE ANNOYING INTERFERENCE, USE THE RECOMMENDED ACCESSORIES ONLY. COPYRIGHT WARNING: Unauthorized recording of copyrighted materials may infringe on the rights of copyright owners and be contrary to copyright laws. HD Camcorder, VIXIA HG21 A / VIXIA HG20 A systems This device complies with - Canon HG20 | VIXIA HG20 / VIXIA HG21 Instruction Manual - Page 3
"product" refers to the Canon HD Camcorder VIXIA HG21 A / VIXIA HG20 A and all its accessories. 1 Read Instructions - All the safety and operating instructions should be read before the product is operated. 2 Retain Instructions - The safety and operating instructions should be retained for future - Canon HG20 | VIXIA HG20 / VIXIA HG21 Instruction Manual - Page 4
of the power supply is required, please return it to the responsible nearest Canon Service Center and please replace it with the same type number CA-570. The Adapter can be used with a power supply between 100 and 240 V AC. For areas where 120 V AC power is not used, you will need a special plug - Canon HG20 | VIXIA HG20 / VIXIA HG21 Instruction Manual - Page 5
Canon new products and promotions. The serial number of this product can be found at the battery attachment unit of the camcorder. Write down the number logo and High-Definition Multimedia Interface are trademarks or registered trademarks of HDMI Licensing LLC. • "AVCHD" and the "AVCHD" logo are - Canon HG20 | VIXIA HG20 / VIXIA HG21 Instruction Manual - Page 6
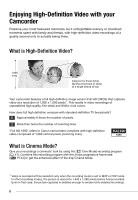
lifelike vivid colors. How does full high definition compare with standard-definition TV broadcasts? 6 Approximately 6 times the number of pixels. 2 More than twice the number of scanning lines. "Full HD 1080" refers to Canon camcorders compliant with high-definition video composed of 1,080 vertical - Canon HG20 | VIXIA HG20 / VIXIA HG21 Instruction Manual - Page 7
built-in hard disk or commercially available SD/SDHC memory cards2 using AVCHD specifications3. This Double Media recording system gives you longer recording times for more high-definition videos and photos. • You can shoot approximately 11 hours ( 120 GB HDD) or 5.5 hours ( 60 GB HDD) of video - Canon HG20 | VIXIA HG20 / VIXIA HG21 Instruction Manual - Page 8
as a computer or digital video recorder ( 82) and back them up regularly and especially after making important recordings. Canon shall not be liable for any loss or corruption of data. Do not subject the camcorder to vibrations or strong impacts The hard disk is a high-precision device. Vibrations - Canon HG20 | VIXIA HG20 / VIXIA HG21 Instruction Manual - Page 9
Important Notes About the Hard Disk Drive Do not turn off the camcorder while the camcorder is on and the ACCESS indicator is on or flashing or while the camcorder is in standby mode Doing so may result in hard disk damage or permanent data loss. Use the camcorder within its operating temperature - Canon HG20 | VIXIA HG20 / VIXIA HG21 Instruction Manual - Page 10
6 Enjoying High-Definition Video with your Camcorder 8 Important Notes About the Hard Disk Drive 14 About this Manual 16 Getting to Know the Camcorder 16 Supplied Accessories 17 Components Guide 20 Screen Displays „ Preparations 23 Getting Started 23 Charging the Battery Pack 24 - Canon HG20 | VIXIA HG20 / VIXIA HG21 Instruction Manual - Page 11
(Recording Mode) 36 Zooming 37 Quick Start Function 37 Reviewing and Deleting the Last Scene Recorded 38 Basic Playback 38 Timer 48 Manual Exposure Adjustment and Automatic Backlight Correction 49 Manual Focus Adjustment 50 White Balance 51 Image Effects 52 Digital Effects - Canon HG20 | VIXIA HG20 / VIXIA HG21 Instruction Manual - Page 12
Playback 66 Flash 67 Histogram Display 67 Drive Mode: Continuous Shooting and Exposure Bracketing 68 Camcorder 79 Connection Diagrams 81 Playback on a TV Screen 82 Saving and Backing Up Your Recordings 82 Backing Up Your Recordings on a Computer 82 Authoring High-Definition (AVCHD - Canon HG20 | VIXIA HG20 / VIXIA HG21 Instruction Manual - Page 13
FUNC. Menu 92 Setup Menus 101 Trouble? 101 Troubleshooting 107 List of Messages 116 Do's and Don'ts 116 Handling Precautions 120 Maintenance/Others 121 Using the Camcorder Abroad 122 General Information 122 System Diagram 123 Optional Accessories 127 Product Codes 128 Specifications 130 Index - Canon HG20 | VIXIA HG20 / VIXIA HG21 Instruction Manual - Page 14
you for purchasing the Canon VIXIA HG21/VIXIA HG20. Please read this manual carefully before you use the camcorder and retain it for future reference. Should your camcorder fail to operate correctly, refer to Troubleshooting ( 101). Conventions Used in this Manual • IMPORTANT: Precautions related to - Canon HG20 | VIXIA HG20 / VIXIA HG21 Instruction Manual - Page 15
is used to abbreviate menu selections. For a detailed explanation refer to Using the Menus ( 28). The camcorder's operating mode is determined by the position of the mode dial. In this manual, indicates that a function is available and indicates that the function is not available. When no operating - Canon HG20 | VIXIA HG20 / VIXIA HG21 Instruction Manual - Page 16
the Camcorder Supplied Accessories CA-570 Compact Power Adapter (incl. power cord) BP-807 Battery Pack WL-D88 Wireless Controller Lithium Button Battery CR2025 for Wireless Controller CTC-100/S Component Cable Red • Green • Blue plugs Software CD-ROM1 and Installation Guide PIXELA ImageMixer - Canon HG20 | VIXIA HG20 / VIXIA HG21 Instruction Manual - Page 17
Components Guide Left side view Right side view button ( 27)/ (print/share) button ( 73, 86) DISP. (on-screen display) button ( 42, 53)/ BATT. INFO button ( 22) Speaker ( - Canon HG20 | VIXIA HG20 / VIXIA HG21 Instruction Manual - Page 18
Introduction Back view LCD panel Top view 18 VIEWFINDER button* ( 35) Viewfinder* ( 26, 35) Dioptric adjustment lever* ( 35) Battery attachment unit ( 23) RESET button ( 104) ACCESS indicator ( 34, 61)/ CHG (charge) indicator ( 23) Start/Stop button ( 34) Mode dial Recording movies ( 34) Taking - Canon HG20 | VIXIA HG20 / VIXIA HG21 Instruction Manual - Page 19
Bottom view Tripod socket ( 117) BATTERY RELEASE switch ( 24) Serial number The serial number label is located on the top surface of the battery attachment unit. Remove the battery pack to find it. Wireless Controller WL-D88 START/STOP button ( 34) FUNC. button ( 28, 90) MENU button ( 29, 92) - Canon HG20 | VIXIA HG20 / VIXIA HG21 Instruction Manual - Page 20
White balance ( 50) Image effect ( 51) Digital effect ( 52) Recording mode ( 35) Photo quality/size (simultaneous recording) ( 68) Remote sensor off ( 98) Hard disk/memory card operation ( 22) Instant AF ( 94), MF Manual focus ( 49) Remaining battery time ( 22) While recording/during playback: Scene - Canon HG20 | VIXIA HG20 / VIXIA HG21 Instruction Manual - Page 21
effect ( 51) Digital effect ( 52) Drive mode ( 67) Photo quality/size ( 62) Instant AF ( 94), MF Manual focus ( 49) Remaining battery time ( 22) Number of available photos On the hard disk On the memory card Image stabilizer ( 94) Self timer ( 48) AF frame ( 94) Camcorder shake warning - Canon HG20 | VIXIA HG20 / VIXIA HG21 Instruction Manual - Page 22
battery pack is exhausted, the battery information may not be displayed. Remaining recording time When there is no more free space on the recording media, " END" (built-in hard disk Depending on the recording conditions, the number of available photos displayed may not decrease even after a recording - Canon HG20 | VIXIA HG20 / VIXIA HG21 Instruction Manual - Page 23
settings to help you learn more about your camcorder. Getting Started DC IN terminal CHG (charge) indicator Charging the Battery Pack The camcorder can be powered with a battery pack or directly using the compact power adapter. Charge the battery pack before use. For approximate charging times - Canon HG20 | VIXIA HG20 / VIXIA HG21 Instruction Manual - Page 24
hold it pressed down. 2 Slide the battery pack down and then pull it out. IMPORTANT • Turn off the camcorder before connecting or disconnecting the compact power adapter. After pressing ON/OFF to turn off the camcorder, important data is updated on the hard disk. Be sure to wait until the indicator - Canon HG20 | VIXIA HG20 / VIXIA HG21 Instruction Manual - Page 25
] is not set to [ Off ] ( 98). Otherwise, replace the battery. Accessories Fasten the grip belt. Adjust the grip belt so that you can reach panel 180 degrees to use the wireless controller from the front of the camcorder. NOTES • The wireless controller may not work properly when the remote - Canon HG20 | VIXIA HG20 / VIXIA HG21 Instruction Manual - Page 26
the picture when recording with the self timer. - To allow the camcorder to be operated with the wireless controller from the front. 180° NOTES and viewfinder* screen: The screens are produced using extremely high-precision manufacturing techniques, with more than 99.99% of the battery pack. 26 - Canon HG20 | VIXIA HG20 / VIXIA HG21 Instruction Manual - Page 27
recording mode (the button's light is off). You can access the menus and change settings to your preference. Even in flexible recording mode, the camcorder can help you with the settings. For example, you can use the Special Scene recording programs ( 45) to set at once all the optimal - Canon HG20 | VIXIA HG20 / VIXIA HG21 Instruction Manual - Page 28
screens, this is indicated by the icon . Press to display/hide the joystick guide. The functions that appear on the joystick guide will change depending on the operating mode. Using the Menus Many of the camcorder's functions can be adjusted from the menus that open after pressing the FUNC - Canon HG20 | VIXIA HG20 / VIXIA HG21 Instruction Manual - Page 29
Selecting an Option from the Setup Menus 1 Press FUNC. . 2 Select ( , ) the icon and press to open the setup menus. You can also hold FUNC. pressed down for more than 1 second or press MENU on the wireless controller to open directly the setup menus screen. 3 Select ( menu. ) the tab of the - Canon HG20 | VIXIA HG20 / VIXIA HG21 Instruction Manual - Page 30
way. 3 Select ( ) [OK] and press to start the clock and close the setup screen. IMPORTANT • When you do not use the camcorder for about 3 months, the built-in rechargeable lithium battery may discharge completely and the date and time setting may be lost. In such case, recharge the built-in lithium - Canon HG20 | VIXIA HG20 / VIXIA HG21 Instruction Manual - Page 31
Cards Compatible for Use with the Camcorder You can use commercially available SDHC (SD high capacity) memory cards and SD memory cards with this camcorder. However, depending on its Speed SD/SDHC memory cards. When you buy a new memory card, look for the Speed Class logo on the package. 31 - Canon HG20 | VIXIA HG20 / VIXIA HG21 Instruction Manual - Page 32
cards Capacity 64 MB or less 128 MB or more Over 2 GB SD Speed Class Not applicable Not compatible or higher or higher Recording Inserting a memory card facing the wrong direction can cause a malfunction of the camcorder. NOTES To remove the memory card: Push the memory card once to release - Canon HG20 | VIXIA HG20 / VIXIA HG21 Instruction Manual - Page 33
HDD] or [Mem. Card] Initialization method [Yes]* [OK] FUNC. * Press to cancel the complete initialization while it is in progress. All recordings will be erased and the recording media can be used without any problem the camcorder using the compact power adapter to initialize the hard disk. While - Canon HG20 | VIXIA HG20 / VIXIA HG21 Instruction Manual - Page 34
permanent data loss or damage to the hard disk/ memory card. - Do not subject the camcorder to vibrations or strong impacts. - Canon shall not be liable for any loss or corruption of data. NOTES • About the Power Save mode: To save power when the camcorder is powered by a battery pack, the camcorder - Canon HG20 | VIXIA HG20 / VIXIA HG21 Instruction Manual - Page 35
DVD Burner that contain scenes recorded in MXP mode cannot be played back on AVCHD-compatible DVD players or Blu-ray Disc players (as of June 2008). Use the DVD Burner to play back such discs ( 85). • The camcorder uses a variable bit rate (VBR) to encode video so the actual recording times - Canon HG20 | VIXIA HG20 / VIXIA HG21 Instruction Manual - Page 36
value Recording mode → Recording media ↓ 60 GB Hard disk 120 GB Hard disk 4 GB Memory card 8 GB Memory card 16 GB Memory card 32 GB Memory card MXP* FXP* XP+ SP LP 1,080 resolution. Zooming mode: In addition to the optical zoom, digital zoom is also available ( 93). W T W Zoom out 36 - Canon HG20 | VIXIA HG20 / VIXIA HG21 Instruction Manual - Page 37
energy when you are using a battery pack. Additionally, when you open the LCD panel, the camcorder is ready to start recording in the mode dial while the camcorder is in standby mode will reactivate the camcorder in the operating mode selected. Reviewing and Deleting the Last Scene - Canon HG20 | VIXIA HG20 / VIXIA HG21 Instruction Manual - Page 38
on the joystick guide, repeatedly push the joystick ( ) toward [Next] to display it. 2 Push the joystick ( ) toward . The camcorder plays back the last scene (but without sound) and returns to record pause mode. Deleting a Scene After Recording It After recording a scene: 1 Review the scene as - Canon HG20 | VIXIA HG20 / VIXIA HG21 Instruction Manual - Page 39
screen. ADJUSTING THE VOLUME 1 During playback, press to display the joystick guide. 2 Adjust ( ) the volume. IMPORTANT • Observe the following precautions so may result in permanent data loss. - Do not subject the camcorder to vibrations or strong impacts. - Do not open the memory card slot cover - Canon HG20 | VIXIA HG20 / VIXIA HG21 Instruction Manual - Page 40
the Index Screen Selection Use the tabs on top of the index screen to switch between playback of the scenes and photos recorded on the hard disk and those recorded on the memory card. After creating a playlist ( 58), you can switch between the original movies and the playlist you edited to your - Canon HG20 | VIXIA HG20 / VIXIA HG21 Instruction Manual - Page 41
List of Recordings 1 Select the original movies index screen. Select the (hard disk) or (memory card) tab ( 40). 2 Open the list of still image from the first scene recorded on that day. Below it will appear the number of scenes recorded ( ) and the total recording time for the same day. 3 - Canon HG20 | VIXIA HG20 / VIXIA HG21 Instruction Manual - Page 42
white, a thumbnail showing a still image from the first scene recorded on that date will be displayed next to the calendar. Below it will appear the number of scenes recorded ( ) and the total recording time for the same day. • You can select ( ) the year or month field and change ( ) the year or - Canon HG20 | VIXIA HG20 / VIXIA HG21 Instruction Manual - Page 43
interval FUNC. Selecting Recordings from the Index Screen • mode: Select the (hard disk) or (memory card) tab ( 40). • mode: Move the zoom your selection (up to 100). Total number of scenes selected Selected scenes You can select in advance a number of original movies or photos from the - Canon HG20 | VIXIA HG20 / VIXIA HG21 Instruction Manual - Page 44
deleting them ( 82). • Observe the following precautions while the ACCESS indicator is on or flashing (while scenes are being deleted). - Do not subject the camcorder to vibrations or strong impacts. - Do not open the memory card slot cover. - Do not disconnect the power source or turn off the - Canon HG20 | VIXIA HG20 / VIXIA HG21 Instruction Manual - Page 45
FUNC. NOTES • [ Night] - Moving subjects may leave a trailing afterimage. - Picture quality may not be as good as in other modes. [ Portrait] The camcorder uses a large aperture, achieving a focus on the subject while blurring other distracting details. [ Night] Use this mode to record in dimly lit - Canon HG20 | VIXIA HG20 / VIXIA HG21 Instruction Manual - Page 46
. In such case, adjust the focus manually. • [ Fireworks] - To avoid camcorder shake, we recommend using a tripod. blur the background in a portrait; use high aperture values (smaller lens opening) to get to the recording program icon. 1 If the joystick guide appears on the screen, press to hide it. - Canon HG20 | VIXIA HG20 / VIXIA HG21 Instruction Manual - Page 47
of values available for selection will vary depending on the initial zoom position. • When setting a numeric value (aperture or shutter speed), the number displayed will flash if the aperture or shutter speed is not appropriate for the recording conditions. In such case, select a different value - Canon HG20 | VIXIA HG20 / VIXIA HG21 Instruction Manual - Page 48
movies), press PHOTO fully (when recording photos) or turn off the camcorder to cancel the self timer. At times, backlit subjects may appear [ Fireworks]. Manual Exposure Adjustment 1 Press guide. to display the joystick If [Exposure] does not appear on the joystick guide, repeatedly push the - Canon HG20 | VIXIA HG20 / VIXIA HG21 Instruction Manual - Page 49
them, you can have the camcorder automatically correct for the backlight manually. • Reflective surfaces • Subjects with low contrast or without vertical lines • Fast moving subjects • Through wet windows • Night scenes POINTS TO CHECK Adjust the zoom before you start the procedure. 1 Press guide - Canon HG20 | VIXIA HG20 / VIXIA HG21 Instruction Manual - Page 50
more than 2 seconds. • appears. • Push the joystick ( ) toward [Focus] again to return the camcorder to autofocus. • If you operate the zoom or joystick ( ), changes to "MF" and the camcorder returns to manual focus. White Balance The white balance function helps you to accurately reproduce colors - Canon HG20 | VIXIA HG20 / VIXIA HG21 Instruction Manual - Page 51
NOTES • When you select the custom white balance: - Set the custom white balance in a sufficiently illuminated place. - Turn off the digital zoom ( 93). - Reset the white balance when the lighting conditions change. - Depending on the light source, may keep flashing. The result will still be better - Canon HG20 | VIXIA HG20 / VIXIA HG21 Instruction Manual - Page 52
look. [ Art] Select this effect to add "flavor" to your recordings. * Only these digital effects are available in mode. 1 Press guide. to display the joystick If does not appear on the joystick guide, repeatedly push the joystick ( ) toward [Next] to display it. 2 Push the joystick ( ) toward - Canon HG20 | VIXIA HG20 / VIXIA HG21 Instruction Manual - Page 53
sound will be recorded normally. • The camcorder retains the last setting used even if you turn off the digital effects or change the recording program. On- ). About the Data Code With every scene or photo recorded, the camcorder keeps a data code (date/time of recording, information about the - Canon HG20 | VIXIA HG20 / VIXIA HG21 Instruction Manual - Page 54
to save the setting and hide the joystick guide. • The audio level selected will be locked and the audio level adjustment bar will disappear from the indicator. • During manual adjustment, press and push the joystick ( ) toward [ MIC] to return the camcorder to automatic audio adjustment. 54 TO - Canon HG20 | VIXIA HG20 / VIXIA HG21 Instruction Manual - Page 55
-100 Directional Stereo Microphone or an optional VL-5 Video Light. For details about how to attach and use the accessories, refer also to the instruction manual of the each accessory. * * Only the optional VL-5 Video Light can be used in mode. 1 Pull out the viewfinder. 2 Lift and rotate the - Canon HG20 | VIXIA HG20 / VIXIA HG21 Instruction Manual - Page 56
video accessories bearing this logo to ensure compatibility with the mini advanced shoe. Attach the optional DM-100 Directional Stereo Microphone to the mini advanced shoe. Refer to Using the Mini Advanced Shoe ( 55). appears. For details about using the microphone, refer to the instruction manual - Canon HG20 | VIXIA HG20 / VIXIA HG21 Instruction Manual - Page 57
using the video light, refer to the instruction manual of the VL-5. Dividing Scenes You can divide scenes (original scenes only) in order to leave out the best parts and later cut out the rest. 1 Select the original movies index screen. Select the (hard disk) or (memory card) tab ( 40). 2 Select - Canon HG20 | VIXIA HG20 / VIXIA HG21 Instruction Manual - Page 58
). - Scenes that were not recorded with this camcorder. • Scenes cannot be divided within 0.5 seconds avoid this, you can use the supplied software ImageMixer 3 to divide and edit scenes. 43). 1 Select the original movies index screen. Select the (hard disk) or (memory card) tab ( 40). 2 Select ( - Canon HG20 | VIXIA HG20 / VIXIA HG21 Instruction Manual - Page 59
add scenes to the playlist if they were recorded or edited using another device or if there is not enough space available on the hard disk or memory card. Deleting Scenes from the Playlist Deleting scenes from the playlist will not affect your original recordings. Options [All Scenes] Deletes all - Canon HG20 | VIXIA HG20 / VIXIA HG21 Instruction Manual - Page 60
Index Screen ( 43). 1 Select the index screen of original movies recorded on the hard disk. Select the tab ( 40). 2 Select ( , ) the scene you want to . • Scenes that were edited using the supplied software ImageMixer 3 and written back to the camcorder cannot be copied to the memory card. You may - Canon HG20 | VIXIA HG20 / VIXIA HG21 Instruction Manual - Page 61
Set the mode dial to . 2 Turn on the camcorder. By default, photos are recorded on the hard disk. You can also set the memory card as the the camcorder. - Do not change the position of the mode dial. NOTES • If the subject is not suitable for autofocus, turns yellow. Adjust the focus manually ( - Canon HG20 | VIXIA HG20 / VIXIA HG21 Instruction Manual - Page 62
last setting used even if you set the camcorder to mode. Approximate number of photos available on a memory card Default value Memory card Photo quality1 → Photo size ↓ LW 1920x1080 L 2048x1536 M 1440x1080 SW 848x4802 S 640x480 128 MB 512 MB 1 GB 50 75 150 315 470 925 670 1,000 - Canon HG20 | VIXIA HG20 / VIXIA HG21 Instruction Manual - Page 63
option or immediately after recording it, if [Photo Review Time] is set to [ Off]. While reviewing the photo immediately after recording: 1 Push the joystick ( ) toward . 2 Select ( ) [Yes] and press . 1 Set the mode dial to . 2 Turn on the camcorder. 3 Push the joystick ( ) to move between photos - Canon HG20 | VIXIA HG20 / VIXIA HG21 Instruction Manual - Page 64
to the index screen of the photos recorded on the memory card or change the number of photos displayed per page ( 40). 2 Select ( , ) a photo. recorded with this camcorder. - Images edited on or uploaded from a computer. - Images whose file names have been changed. 1 Press guide. to display the - Canon HG20 | VIXIA HG20 / VIXIA HG21 Instruction Manual - Page 65
a Single Photo 1 Select ( ) the photo you want to delete. 2 Press guide. to display the joystick 3 Push the joystick ( ) toward . 4 Select ( Select the photo index screen. Move the zoom lever toward W and then select the (hard disk) or (memory card) tab ( 40). 2 Select ( , ) the photo you - Canon HG20 | VIXIA HG20 / VIXIA HG21 Instruction Manual - Page 66
see enlarged. To cancel the magnification, move the zoom lever toward W until the frame disappears. 1 Press guide. to display the joystick If does not appear on the joystick guide, push the joystick ( ) toward [Next] to display it. 2 Push the joystick ( ) toward . • Repeatedly push the joystick - Canon HG20 | VIXIA HG20 / VIXIA HG21 Instruction Manual - Page 67
will not fire in the following cases: - When you manually adjust the exposure in (auto) mode. - During auto to the left, is relatively dark. Pixel Count Shadows Highlights Drive Mode: Continuous Shooting and Exposure Bracketing Take a series of and high speed (approx. 5 photos/second). 67 - Canon HG20 | VIXIA HG20 / VIXIA HG21 Instruction Manual - Page 68
record photos even while the camcorder is set to mode. number of photos that can be recorded with the current quality/size setting. While recording, or in record pause mode, press PHOTO to capture the photo. NOTES • Photos cannot be recorded simultaneously while the digital zoom or a digital - Canon HG20 | VIXIA HG20 / VIXIA HG21 Instruction Manual - Page 69
Appropriate for standard shooting conditions, including backlit scenes. The camcorder divides the picture into several areas and the light is Quality] Desired photo quality* FUNC. * The number displayed at the bottom indicates the approximate number of photos that can be recorded with the current - Canon HG20 | VIXIA HG20 / VIXIA HG21 Instruction Manual - Page 70
erase all recordings, including protected photos. Copying Photos You can copy photos only from the hard disk to the memory card. Copying a Single Photo 1 Select to view the photos recorded on the hard disk. Select the tab ( 40) and move the zoom lever toward T to return to single photo - Canon HG20 | VIXIA HG20 / VIXIA HG21 Instruction Manual - Page 71
on the hard disk. Move the zoom lever toward W and then select the (hard disk) tab ( Do not subject the camcorder to vibrations or strong impacts Manual exposure adjustment and automatic backlight correction ( 48) • Manual focus adjustment ( 49) • White balance ( 50) • Image effects ( 51) • Digital - Canon HG20 | VIXIA HG20 / VIXIA HG21 Instruction Manual - Page 72
set the desired number of copies as a print order ( 76). Canon printers: SELPHY printers of the CP, DS and ES series and PIXMA printers marked with the PictBridge logo. Connecting the Camcorder to the Printer 1 Select the media that contains the photos you want to print. Select the (hard disk) or - Canon HG20 | VIXIA HG20 / VIXIA HG21 Instruction Manual - Page 73
[NR] and [Vivid+NR]. [ ] (Number of copies) Select 1-99 copies. NOTES Print setting options and [Default] settings vary depending on the printer model. For details, refer to the printer's instruction manual. Printing after Changing the Print Settings 1 Press guide. to display the joystick 2 Push - Canon HG20 | VIXIA HG20 / VIXIA HG21 Instruction Manual - Page 74
(paper size, paper type and page layout) Number of copies Print effect Date printing 3 In the camcorder's screen. Solve the problem referring to the error message list ( 113) and to the printer's instruction manual. [x photos/sheet]: Printing multiple photos on the same sheet When using Canon - Canon HG20 | VIXIA HG20 / VIXIA HG21 Instruction Manual - Page 75
from the beginning. • Other printers or if the error still persists with a Canon printer: If printing does not resume automatically, disconnect the USB cable and turn off the camcorder. After a short while, turn on the camcorder and restore the USB connection. IMPORTANT • You may not be able to - Canon HG20 | VIXIA HG20 / VIXIA HG21 Instruction Manual - Page 76
Order) Set the print orders before connecting the supplied USB cable to the camcorder. Marking Single Photos with Print Orders 1 Open the photo order. The number of copies appears in orange. 4 Set ( ) the number of copies desired and press . To cancel the print order, set the number of copies to - Canon HG20 | VIXIA HG20 / VIXIA HG21 Instruction Manual - Page 77
2 Open the print menu. FUNC. [ Menu] [ Print] • The print menu appears. • If there are no photos marked with print orders, [No print orders have been set] appears. • Depending on the connected printer, you may be able to change some print settings ( 73). 3 Select ( , . ) [Print] and - Canon HG20 | VIXIA HG20 / VIXIA HG21 Instruction Manual - Page 78
such as a TV, VCR, or computer. Terminals on the Camcorder HDMI OUT Terminal* Access: Open the rear terminal cover. The HDMI OUT terminal offers a high-quality digital connection that combines audio and video in a single convenient cable. COMPONENT OUT Terminal* Access: Open the front terminal cover - Canon HG20 | VIXIA HG20 / VIXIA HG21 Instruction Manual - Page 79
be used to connect the camcorder to a TV are listed in falling order of picture quality. Connection Type: Digital Quality: High definition Output only Connect to a high-definition TV (HDTV) with an HDMI input terminal. HDMI IN (HDMI mini-connector) HTC-100 HDMI Cable (optional) (standard HDMI - Canon HG20 | VIXIA HG20 / VIXIA HG21 Instruction Manual - Page 80
on the camcorder: - [AV/headphones] to [ AV] ( 96). - [TV Type] according to the TV set (widescreen or 4:3), if the TV cannot automatically detect and change the aspect ratio ( 97) STV-250N Stereo Video Cable (supplied) Yellow White Red VIDEO AUDIO L R Connection Type: Digital data - Canon HG20 | VIXIA HG20 / VIXIA HG21 Instruction Manual - Page 81
, change the aspect ratio of the TV manually. About the HDMITM connection The HDMI (High-Definition Multimedia Interface) connection ( ) is a convenient alldigital connection using a single cable for both video and audio. When you connect the camcorder to an HDTV equipped with an HDMI terminal - Canon HG20 | VIXIA HG20 / VIXIA HG21 Instruction Manual - Page 82
software refer to PIXELA ImageMixer 3 SE Installation Guide. Saving your Recordings without a Computer The following options are also available: • Use the optional DW-100 DVD Burner to create high-definition (AVCHD) discs of your movies and Photo DVDs of your photos ( 82). • Connect the camcorder - Canon HG20 | VIXIA HG20 / VIXIA HG21 Instruction Manual - Page 83
AVCHD Camcorder 1 Turn on the camcorder and set it to mode to create high- definition discs of your movies or mode to create Photo DVDs of your photos. • Power the camcorder using the compact power adapter camcorder to the DVD Burner using the supplied USB cable time and number of discs - Canon HG20 | VIXIA HG20 / VIXIA HG21 Instruction Manual - Page 84
not disconnect the USB cable. - Do not disconnect the power source or turn off the camcorder or the DVD Burner. - Do not change the position of the mode dial. • For important information on handling your discs, refer to DW-100 Cautions on handling. Playing back high-definition (AVCHD) discs created - Canon HG20 | VIXIA HG20 / VIXIA HG21 Instruction Manual - Page 85
Back AVCHD Discs Using the DW-100 DVD Burner You can use the optional DW-100 DVD Burner and the camcorder also to play back high-definition (AVCHD) discs -Video specifications (standard definition). Play back your Photo DVDs using standard DVD players. If your computer has a DVD drive, you can play - Canon HG20 | VIXIA HG20 / VIXIA HG21 Instruction Manual - Page 86
the photos ( 88). 1 Install the supplied Digital Video Software. Refer to the installation guide (separate leaflet included with the CD-ROM). 2 Set the camcorder to mode. 3 Select the media that contains the photos you want to transfer. • Select the (hard disk) or (memory card) tab ( 40) and - Canon HG20 | VIXIA HG20 / VIXIA HG21 Instruction Manual - Page 87
computer's instruction manual. • Users of Windows Vista, Windows XP and Mac OS X: Your camcorder is equipped with the standard Picture Transfer Protocol (PTP) allowing you to transfer photos (JPEG only) simply by connecting the camcorder to a computer using the supplied USB cable, without - Canon HG20 | VIXIA HG20 / VIXIA HG21 Instruction Manual - Page 88
with Transfer Orders] Transfers photos marked with transfer orders ( 89). Manual Transfer Options You can select the photo(s) to transfer. [ Select and FUNC. to return to the transfer menu. NOTES When the camcorder is connected to the computer and the photo selection screen is displayed, press - Canon HG20 | VIXIA HG20 / VIXIA HG21 Instruction Manual - Page 89
can set transfer orders for up to 998 photos. Selecting Photos to Transfer (Transfer Order) Set the transfer orders before connecting the camcorder to the computer. Marking Single Photos with Transfer Orders 1 Open the photo selection screen. FUNC. [ Transfer Orders] appears on the screen. 2 Select - Canon HG20 | VIXIA HG20 / VIXIA HG21 Instruction Manual - Page 90
Additional Information This chapter contains troubleshooting advice, screen messages, handling - Recording Modes Menu item Recording programs Light metering mode White balance Image effects Digital effects Drive mode Setting options [ Programmed AE], [ Shutter-Priority AE], [ Aperture-Priority AE - Canon HG20 | VIXIA HG20 / VIXIA HG21 Instruction Manual - Page 91
Menu item Setting options Recording mode [ High Quality 24 Mbps], [ High Quality 17 Mbps], [ High Quality 12 Mbps], [ Standard Play 7 Mbps], [ Long Play 5 Mbps] z - 35 Simultaneous recording [ Simultaneous Recording Off], [ 1920x1080], z - 68 [ 848x480] Photo size/quality [ Super Fine], [ - Canon HG20 | VIXIA HG20 / VIXIA HG21 Instruction Manual - Page 92
41 Menu item Setting options [Rec Media for Movies] [HDD], [Mem. Card] [Rec Media for Photos] [HDD], [Mem. Card] [Frame Rate] [ 60i ( Review Time]* [ Off], [ 2 sec], [ 4 sec], [ 6 sec], [ 8 sec], [ 10 sec] z z 33 zz z- - z z 48 zz - zz - z - 54 -z- * Option available only when the drive - Canon HG20 | VIXIA HG20 / VIXIA HG21 Instruction Manual - Page 93
and outlines are emphasized to help you focus manually ( 49). • Using the focus assist hard disk or memory card. • If you press DISP. while reviewing a photo it will continue to be displayed indefinitely. Press PHOTO halfway to return to the normal display. / Camera Setup 2 Menu item [Digital - Canon HG20 | VIXIA HG20 / VIXIA HG21 Instruction Manual - Page 94
Normal AF]. [Focus Priority]: When the focus priority is activated, the camcorder records a photo only after the focus has been adjusted automatically. You can insufficient lighting. • The setting will not change even if you set the camcorder to mode. mode with [ PF24] frame rate mode As low as - Canon HG20 | VIXIA HG20 / VIXIA HG21 Instruction Manual - Page 95
distortions in due to high audio recording levels. • . / Playback Setup Menu item Setting options [Rec Media for Photos] [HDD], [Mem. Card] [Photo Capture Quality] [ Super Fine], [ Fine to use when connecting the camcorder to an external device using the supplied USB cable. [ DVD Burner]: To - Canon HG20 | VIXIA HG20 / VIXIA HG21 Instruction Manual - Page 96
- z - 55 - -z- - zz - - - * Option not available when the camcorder is connected to an HDTV using the HDMI cable. [Font Size]: Changes the size of the font for the menu and other screens. • to use when connecting the camcorder to a high-definition TV using the component video connection. - Canon HG20 | VIXIA HG20 / VIXIA HG21 Instruction Manual - Page 97
of the playback. You can also adjust the volume using the joystick guide ( 39). [Demo Mode]: The demonstration mode displays the camcorder's main features. It starts automatically when the camcorder is powered with the compact power adapter if you leave it turned on for more than 5 minutes. • To - Canon HG20 | VIXIA HG20 / VIXIA HG21 Instruction Manual - Page 98
the camcorder, the self-timer countdown, etc. [Power Saving Mode]: In order to save power when the camcorder is powered by a battery Refer to the TV's instruction manual. • Correct operation of the HDMI-CEC function cannot be guaranteed even when connecting the camcorder to compatible TV sets. - Canon HG20 | VIXIA HG20 / VIXIA HG21 Instruction Manual - Page 99
[Memory Card Info] - [Battery Info] - [HDMI Status] - Setting options zzzz - zzzz - zzzz - zzzz - [HDD Info]/[Memory Card Info]: Displays a screen where you can verify how much of the hard disk or the memory card is currently in use ( total recording time and total number of photos) and how - Canon HG20 | VIXIA HG20 / VIXIA HG21 Instruction Manual - Page 100
Additional Information [Battery Info]: Displays a screen where you can verify the battery charge (as a percentage) and the remaining recording time ( , mode) or playback time ( , mode). [HDMI Status]: Displays a screen where you can verify the standard of the - Canon HG20 | VIXIA HG20 / VIXIA HG21 Instruction Manual - Page 101
FIRST" box before going on to the more detailed problems and solutions. Consult your dealer or a Canon Service Center if the problem persists. CHECK THIS FIRST Power supply Is the battery charged? Is the compact power adapter correctly connected to the camcorder? ( 23) Recording Did you turn the - Canon HG20 | VIXIA HG20 / VIXIA HG21 Instruction Manual - Page 102
/Stop will not start recording. - You cannot record while the camcorder is writing previous recordings on the hard disk/memory card (while the ACCESS indicator is on or flashing). - The recording media is full or it already contains the maximum number of scenes. Delete some recordings ( 44, 65) or - Canon HG20 | VIXIA HG20 / VIXIA HG21 Instruction Manual - Page 103
MXP or FXP mode, the maximum number of scenes in the playlist may be camcorder has malfunctioned. Consult a Canon Service Center. Even after stopping recording, the ACCESS indicator does not go off. - The scene is being recorded on the hard disk/memory card. This is not a malfunction. The camcorder - Canon HG20 | VIXIA HG20 / VIXIA HG21 Instruction Manual - Page 104
compact power adapter or the battery pack is faulty. Consult a Canon Service Center. The manually ( 53). Noise can be heard. - If the camcorder is moved suddenly while recording, sound from the hard disk may be recorded. The hard disk's rotation can be heard faintly. Occasionally, the camcorder - Canon HG20 | VIXIA HG20 / VIXIA HG21 Instruction Manual - Page 105
is turned off. This is not a malfunction. The camcorder vibrates. - When recording onto the hard disk or playing back recordings from it, the camcorder may vibrate occasionally. This is not a malfunction. Memory Card and Accessories Cannot insert the memory card. - The memory card was not - Canon HG20 | VIXIA HG20 / VIXIA HG21 Instruction Manual - Page 106
Cable and then restore the connection or turn the camcorder off and then on again. The camcorder is connected using the optional HTC-100 HDMI Cable, Refer to the instruction manual of the connected TV. The computer doesn't recognize the camcorder even though the camcorder is connected correctly. - Canon HG20 | VIXIA HG20 / VIXIA HG21 Instruction Manual - Page 107
rated Speed Class 2 or higher. Cannot access the HDD - There is a problem with the hard disk. Cannot communicate with the battery pack. Continue using this battery pack? - You attached a battery pack that is not recommended by Canon for use with this camcorder. Cannot copy - The total size of the - Canon HG20 | VIXIA HG20 / VIXIA HG21 Instruction Manual - Page 108
Cannot enter standby mode now - The camcorder cannot enter standby mode if the remaining battery charge is too low. Cannot play back - There is a problem with the hard disk/memory card. Cannot play back due to high temperature - The camcorder has exceeded its operational temperature ( down before - Canon HG20 | VIXIA HG20 / VIXIA HG21 Instruction Manual - Page 109
a computer. Initialize the memory card with this camcorder ( 33). Cannot record Cannot access the HDD - There is a problem with the hard disk. Cannot record Check the memory card - There is a problem with the memory card. Change the battery pack - Battery pack is exhausted. Replace or charge the - Canon HG20 | VIXIA HG20 / VIXIA HG21 Instruction Manual - Page 110
error - The folder and file numbers have reached their maximum value. Set [Photo Numbering] to [Reset] ( 98) camcorder to flexible recording mode. button's blue light is on). Press HDD error - There is a problem with the hard disk. Initialize the hard disk ( 33). HDD is full - The hard disk - Canon HG20 | VIXIA HG20 / VIXIA HG21 Instruction Manual - Page 111
Do not disconnect the power source. - The camcorder is updating the hard disk/memory card. Do not disconnect the compact power adapter or remove the battery pack. Temperature too high. Turn off the camcorder and wait. - The camcorder has exceeded its operational temperature. Disconnect the compact - Canon HG20 | VIXIA HG20 / VIXIA HG21 Instruction Manual - Page 112
off, then on again. - The lens cover did not open completely when you set the camcorder to a recording mode. Turn the camcorder off and then on again. If the problem persists, contact a Canon Service Center. This photo could not be deleted - Protected photos ( ) cannot be deleted. Remove the - Canon HG20 | VIXIA HG20 / VIXIA HG21 Instruction Manual - Page 113
the USB cable. When you are printing using the button, check the print settings. - You attempted to print from a memory card that contains a large number of photos. Reduce the number of photos. File error - You attempted to print a photo that was recorded with another camcorder, has a different - Canon HG20 | VIXIA HG20 / VIXIA HG21 Instruction Manual - Page 114
such case, turn off the printer, replace the battery and turn it back on. Incompatible paper size - The paper settings of the camcorder conflict with the printer's settings. Ink absorber full - Select [Continue] to resume printing. Consult a Canon Service Center (refer to the list included with the - Canon HG20 | VIXIA HG20 / VIXIA HG21 Instruction Manual - Page 115
, disconnect the USB cable and turn off the printer. After a while, turn the printer back on and reconnect the USB cable. Check the printer instruction manual. • If you cannot solve the problem even after consulting this list and the printer's instruction manual, contact the closest Canon Service - Canon HG20 | VIXIA HG20 / VIXIA HG21 Instruction Manual - Page 116
is on. Always turn the camcorder off before removing the battery pack or compact power adapter. • Do not turn off the camcorder while the ACCESS indicator is on or flashing or while the camcorder is in standby mode. While data is being written onto the hard disk, disconnecting the power source or - Canon HG20 | VIXIA HG20 / VIXIA HG21 Instruction Manual - Page 117
cold, recording/ playback may stop in order to prevent hard disk damage. In such case, a warning will appear on the screen. • Do not use the camcorder at high altitudes. To prevent hard disk damage, do not turn on or use the camcorder at altitudes higher than 3,000 m (9,800 ft.) above sea - Canon HG20 | VIXIA HG20 / VIXIA HG21 Instruction Manual - Page 118
on the battery life, the correct time may not be displayed. Use the time shown on the screen as an approximation. Regarding the use of non-Canon battery packs • For your safety, battery packs that are not genuine Canon battery packs will not be charged even if you attach them to this camcorder or to - Canon HG20 | VIXIA HG20 / VIXIA HG21 Instruction Manual - Page 119
. • Do not leave memory cards in places subject to high humidity and high temperature. • Do not disassemble, bend, drop, or subject battery: Connect the compact power adapter to the camcorder and leave it connected for 24 hours with the camcorder off. Lithium Button Battery WARNING! • The battery - Canon HG20 | VIXIA HG20 / VIXIA HG21 Instruction Manual - Page 120
physically damaging it to prevent the leakage of private data. If giving the camcorder to another person, initialize the built-in hard disk or memory card using the [Complete Initialization] option ( 33). Fill it the screen when the temperature changes suddenly. Wipe it with a soft dry cloth. 120 - Canon HG20 | VIXIA HG20 / VIXIA HG21 Instruction Manual - Page 121
. Power Sources You can use the compact power adapter to operate the camcorder and to charge battery packs in any country with power supply between 100 and 240 V AC, 50/60 Hz. Consult a Canon Service Center for information on plug adapters for overseas use. Playback on a TV Screen You can only - Canon HG20 | VIXIA HG20 / VIXIA HG21 Instruction Manual - Page 122
Strap WS-20 Wrist Strap WL-D88 Wireless Controller CG-800 Battery Charger BP-807**, BP-808, BP-819, BP-827 Battery Pack WD-H37 II Wide-converter CA-570 Compact Power Adapter TL-H37 Tele-converter HTC-100 HDMI Cable DTC-100 D Terminal Cable TV/HDTV VCR/DVD recorder FS-H37U Filter Set CTC-100 - Canon HG20 | VIXIA HG20 / VIXIA HG21 Instruction Manual - Page 123
minute). You can only use and charge these battery packs with camcorders and chargers compatible with Intelligent System. CG-800 Battery Charger Use the battery charger to charge the battery packs. It plugs directly into a power outlet without a cable. Charging Times The charging times given in the - Canon HG20 | VIXIA HG20 / VIXIA HG21 Instruction Manual - Page 124
surroundings, when using the brighter screen settings, etc. Using the hard disk Battery pack BP-807 BP-808 BP-819 BP-827 Recording mode→ Usage 95 min. 60 min. 130 min. 200 min. 120 min. 265 min. 295 min. 180 min. 385 min. 95 min. 60 min. 130 min. 200 min. 120 min. 265 min. 295 min. 180 min. 385 - Canon HG20 | VIXIA HG20 / VIXIA HG21 Instruction Manual - Page 125
filters help you to control difficult lighting conditions. HTC-100 HDMI Cable Use this cable to connect the camcorder to an external device using an all-digital connection, allowing you to enjoy playback at the highest quality. This cable sends both video and audio signals. VL-5 Video Light This - Canon HG20 | VIXIA HG20 / VIXIA HG21 Instruction Manual - Page 126
Microphone This highly sensitive, super-directional microphone attaches to the camcorder's mini camcorder bag with padded compartments and plenty of space for accessories. This mark identifies genuine Canon video accessories. When you use Canon video equipment, we recommend Canon-brand accessories - Canon HG20 | VIXIA HG20 / VIXIA HG21 Instruction Manual - Page 127
Product Codes Provided Accessories CA-570 Compact Power Adapter BP-807 Battery Pack WL-D88 Wireless Controller CTC-100 Component Cable STV-250N Stereo Video Cable IFC-400PCU USB Cable Optional Accessories BP-808 Battery Pack BP-819 Battery Pack BP-827 Battery Pack CG-800 Battery Charger TL-H37 Tele- - Canon HG20 | VIXIA HG20 / VIXIA HG21 Instruction Manual - Page 128
480 pixels Simultaneous recording: 1920 x 1080, 848 x 480 pixels 1080/60i2 Recording Media Built-in hard disk: 120 GB, SD or SDHC memory card (not included) 60 GB Maximum Recording Time (approximate figures) Built-in hard disk: MXP mode: 11 hr. 5 min. FXP mode: 15 hr. 45 min. XP+ mode: 21 hr - Canon HG20 | VIXIA HG20 / VIXIA HG21 Instruction Manual - Page 129
belt) Weight (camcorder body only) ∅ battery pack), 8.4 V DC (compact power adapter) 3.8 W (LCD screen, normal brightness, recording on the hard disk lb.) CA-570 Compact Power Adapter Power supply Rated output / consumption Operating temperature Dimensions Weight 100 - 240 V AC, 50/60 Hz 8.4 - Canon HG20 | VIXIA HG20 / VIXIA HG21 Instruction Manual - Page 130
scenes 57 Drive mode 67 Drop sensor 99 DVD authoring 82 E EASY mode 27 Error messages 107 Exposure 48 F Fireworks (recording program 45 Flash 66 Flexible recording 27 Focus Assist functions 49 Focus priority 94 Manual 49 Frame rate 47, 92 FUNC. menu 28, 90 H Hard disk precautions - Canon HG20 | VIXIA HG20 / VIXIA HG21 Instruction Manual - Page 131
51 Image stabilizer 94 Index screen 38, 39, 64 Initialization (hard disk/memory card) . .33 J Joystick 28 Joystick guide 28 L Language 30 LCD screen 26 Light metering mode 69 M Magnifying photos 65 Maintenance 120 Manual exposure adjustment 48 Markers 93 Memory card 118 MIC terminal 56 - Canon HG20 | VIXIA HG20 / VIXIA HG21 Instruction Manual - Page 132
program 45 Sunset (recording program 45 T Telephoto 36 Timeline 42 Transfer order 89 Transferring to a computer Movies 82 Photos 86 Tripod 117 Troubleshooting 101 Tv (recording program 46 U USB terminal 78 V Viewfinder 35 Volume 39, 97 W White balance 50 Wide angle 36 Wind screen 94 - Canon HG20 | VIXIA HG20 / VIXIA HG21 Instruction Manual - Page 133
for a particular purpose. The sole warranty with respect to such non-Canon brand items is given by the manufacturer or producer thereof. If the Equipment contains a hard disk drive, Canon USA recommends that data stored on that drive be duplicated or backed up to prevent its loss in the event of - Canon HG20 | VIXIA HG20 / VIXIA HG21 Instruction Manual - Page 134
or that cause abnormally frequent service problems; iii) repairs or services performed by any party other than a Canon Service Facility; iv) defective batteries or any exposure to water, sand or dirt; v) shipping (claim must be presented to the shipper); (b) Any serial number on the video equipment - Canon HG20 | VIXIA HG20 / VIXIA HG21 Instruction Manual - Page 135
, 10 Metropolis Drive, Hunghom, Kowloon, Hong Kong For support concerning Pixela ImageMixer 3 SE, please call Pixela customer support (details in the PIXELA ImageMixer 3 SE Installation Guide). Pour le support technique concernant Pixela ImageMixer 3 SE, veuillez appeler le service clientèle de
-
 1
1 -
 2
2 -
 3
3 -
 4
4 -
 5
5 -
 6
6 -
 7
7 -
8
-
9
-
10
-
11
-
12
-
13
-
14
-
15
-
16
-
17
-
18
-
19
-
20
-
21
-
22
-
23
-
24
-
25
-
26
-
27
-
28
-
29
-
30
-
31
-
32
-
33
-
34
-
35
-
36
-
37
-
38
-
39
-
40
-
41
-
42
-
43
-
44
-
45
-
46
-
47
-
48
-
49
-
50
-
51
-
52
-
53
-
54
-
55
-
56
-
57
-
58
-
59
-
60
-
61
-
62
-
63
-
64
-
65
-
66
-
67
-
68
-
69
-
70
-
71
-
72
-
73
-
74
-
75
-
76
-
77
-
78
-
79
-
80
-
81
-
82
-
83
-
84
-
85
-
86
-
87
-
88
-
89
-
90
-
91
-
92
-
93
-
94
-
95
-
96
-
97
-
98
-
99
-
100
-
101
-
102
-
103
-
104
-
105
-
106
-
107
-
108
-
109
-
110
-
111
-
112
-
113
-
114
-
115
-
116
-
117
-
118
-
119
-
120
-
121
-
122
-
123
-
124
-
125
-
126
-
127
-
128
-
129
-
130
-
131
-
132
-
133
-
134
-
135
 |
 |

English
HD Camcorder
Instruction Manual
Français
Caméscope HD
Manuel d'instruction
Español
Videocámara HD
Manual de Instrucciones
PUB. DIM-879