Canon LASER CLASS 810 Getting Started Guide - Page 21
Specify the IP Address Settings
 |
View all Canon LASER CLASS 810 manuals
Add to My Manuals
Save this manual to your list of manuals |
Page 21 highlights
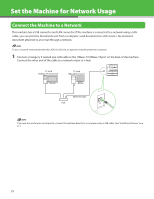
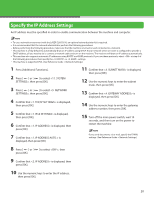
Specify the IP Address Settings An IP address must be specified in order to enable communication between the machine and computer. - To use a network environment with the LASER CLASS 810, an optional network printer kit is required. - It is recommended that the network administrator perform the following procedures. - Before performing the following procedure, make sure that the machine is turned on and connected to a network. - This machine is set by default to automatically draw an IP address using DHCP. If your network server or router is configured to provide a DHCP address, all you need to do is connect a network cable and turn on the machine. The machine will draw an IP address automatically. - This machine also supports automatic IP addresses using BOOTP and RARP protocols. If you use these protocols, select at step 6 of the following procedures, then specify the or settings. - This machine is supported IPv6. (See Reference Guide > Network Settings.) 1 Press [Additional Functions]. 2 Press [ ] or [ ] to select , then press [OK]. 3 Press [ ] or [ ] to select , then press [OK]. 4 Confirm that is displayed, then press [OK]. 5 Confirm that is displayed, then press [OK]. 6 Confirm that is displayed, then press [OK]. 7 Confirm that is displayed, then press [OK]. 11 Confirm that is displayed, then press [OK]. 12 Use the numeric keys to enter the subnet mask, then press [OK]. 13 Confirm that is displayed, then press [OK]. 14 Use the numeric keys to enter the gateway address number, then press [OK]. 15 Turn off the main power switch, wait 10 seconds, and then turn on the power to restart the machine. If you send documents via e-mail, specify the E-MAIL settings. (See Reference Guide > Network Settings.) 8 Press [ ] or [ press [OK]. ] to select , then 9 Confirm that is displayed, then press [OK]. 10 Use the numeric keys to enter the IP address, then press [OK]. 20
-
 1
1 -
2
-
3
-
4
-
5
-
6
-
7
-
8
-
9
-
10
-
11
-
12
-
13
-
14
-
15
-
 16
16 -
 17
17 -
 18
18 -
 19
19 -
 20
20 -
 21
21 -
 22
22 -
 23
23 -
 24
24 -
 25
25 -
 26
26 -
27
-
28
-
29
-
30
-
31
-
32
-
33
-
34
-
35
-
36
-
37
-
38
 |
 |
