Canon LV-7245 User Manual
Canon LV-7245 Manual
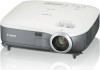 |
View all Canon LV-7245 manuals
Add to My Manuals
Save this manual to your list of manuals |
Canon LV-7245 manual content summary:
- Canon LV-7245 | User Manual - Page 1
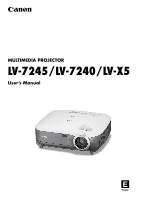
MULTIMEDIA PROJECTOR LV-7245/LV-7240/LV-X5 User's Manual E English - Canon LV-7245 | User Manual - Page 2
manual carefully before using your Canon LV-7245/LV-7240/LV-X5 projector and keep the manual handy for future reference. Your serial number is located on the bottom of your projector NO USER-SERVICEABLE PARTS INSIDE. REFER SERVICING TO QUALIFIED SERVICE PERSONNEL. This symbol warns the user that - Canon LV-7245 | User Manual - Page 3
CUSTOMERS IN THE US Hg LAMP(S) INSIDE THIS PRODUCT CONTAIN MERCURY AND MUST BE RECYCLED OR DISPOSED OF ACCORDING TO LOCAL, STATE OR FEDERAL LAWS. Federal Communication Commission Notice Multimedia Projector, Model : LV-7245E,LV-7245U,LV-7240E,LV-7240U,LV-X5E and LV-X5U This device complies with Part - Canon LV-7245 | User Manual - Page 4
the doctor immediately. If a lamp explodes, its shards may scatter inside the projector. Ask the Canon service representative to clean and check the inside of the projector and replace the lamp. DISPOSAL OF WASTE LAMP Dispose of the mercury lamp of the projector according to the local regulation - Canon LV-7245 | User Manual - Page 5
instructions are to ensure the long life of your projector enough to support the projector and the projector. If something should fall into your projector, disconnect it immediately and have the object removed by a qualified service personnel. 3. Do not place any liquids on top of your projector - Canon LV-7245 | User Manual - Page 6
fans continue to work for 30 seconds after the projector is turned off). * While the lamp is lighted. Lamp Replacement • To replace the lamp, follow all instructions provided on page 49. • Be sure to replace the lamp when the message "Replace with the new lamp." appears. If you continue to use the - Canon LV-7245 | User Manual - Page 7
Table of Contents Important Information i 1. Introduction 1 ᕡ What's in the Box? ...1 ᕢ Introduction to the Projector 2 ᕣ Part Names of the Projector 4 Attaching the Supplied Carrying Handle (LV-7245/LV-7240 only 5 Top Features ...6 Terminal Panel Features 7 ᕤ Part Names of the Remote Control - Canon LV-7245 | User Manual - Page 8
Picture...29 ᕣ Enlarging and Moving a Picture 29 ᕤ Using the Remote Mouse Receiver (LV-7245/LV-7240 only 30 5. Using On-Screen Menu 31 ᕡ Using the Menus ...31 or Replacing the Filter 47 ᕢ Cleaning the Cabinet and the Lens 48 ᕣ Replacing the Lamp 49 7. Appendix 52 ᕡ Troubleshooting ...52 ᕢ - Canon LV-7245 | User Manual - Page 9
original box and packing materials if you ever need to ship your projector. Projector AUTO PC COMPUTER-1 COMPUTER-2 S-VIDEO POWEWRARLNAIMNPGREPLACE VIDEO +VOL -VOL Quick Start Guide Important Information For LV-7245/LV-7240 only CD-ROM User's manual Warranty Remote mouse - Canon LV-7245 | User Manual - Page 10
ceiling must be strong enough to support the projector and the installation must be in projector quickly after the conference or class. • Low level operation noise • Short focal length lens • 130W lamp (110W Quiet mode) : LV-X5 180W lamp (150W Quiet mode) : LV-7240 190W lamp (150W Quiet mode) : LV - Canon LV-7245 | User Manual - Page 11
PC using a USB connection (LV-7245/LV-7240). • You can control the projector with a PC or control system using the PC Control port. • The contemporary cabinet design is light, compact, easy to carry, and complements any office, boardroom or auditorium. About this user's manual The fastest way to - Canon LV-7245 | User Manual - Page 12
VOL -VOL Ventilation (inlet) / Filter Cover (See page 47) Do not block this vent. Troubles or fire can result. Built- R L AUDIO IN R MONO AUDIO OUT ANALOG IN-1 AUDIO IN SERVICE PORT ANALOG IN-2 Remote sensor (See page 10) Terminal Panel (See projector is in standby mode. (See page 20) 4 - Canon LV-7245 | User Manual - Page 13
Tilt Foot (See page 23) Adjustable Tilt Foot Lever (See page 23) 1. Introduction Lamp Cover (See page 49) Adjustable Tilt Foot Lever (See page 23) For LV-7245/LV-7240 only Attaching the supplied carrying handle You can carry the projector by attaching the supplied carrying handle securely to the - Canon LV-7245 | User Manual - Page 14
52 for more details. 3. WARNING Indicator If this light blinks red rapidly, it indicates that an error has occurred, the lamp cover is not attached properly or the projector has overheated. If this light remains orange, it indicates that you have pressed a cabinet key while the Key lock is enabled - Canon LV-7245 | User Manual - Page 15
output of component equipment such as a DVD player. This connector also supports Scart output signal. See page 15 for more details. AUDIO IN Mini . 5. SERVICE PORT (DIN 8 Pin) Use this port to connect a PC or control system to control the projector via an optional RS-232C serial cable (LV-CA34). - Canon LV-7245 | User Manual - Page 16
restore the image and sound. 6. PAGE ̆/̄ Button (Not available on LV-X5) Use these buttons to operate your computer with the supplied remote mouse receiver 3. OFF Button You can use this button to turn your projector off. NOTE: To turn off the projector, press the OFF button twice. 4. D. ZOOM (+) (-) - Canon LV-7245 | User Manual - Page 17
. VOL IMAGE FREEZE RD-426E 12 16 15 18 20 21 19 1. Introduction 20. INFO. Button Provides the information on the current signal and projector settings. See page 45. 21. FREEZE Button This button will freeze a picture. Press again to resume motion. 15. COMPUTER-1/-2 Button Press this button to - Canon LV-7245 | User Manual - Page 18
signal operates by line-of-sight up to a distance of about 7 m (22 feet) and within a 60-degree angle of the remote sensor on the projector cabinet. • The projector will not respond if there are objects between the remote control and the sensor, or if strong light falls on the sensor. Weak batteries - Canon LV-7245 | User Manual - Page 19
(29 inches) from the wall or screen. The largest the image can be is 300" when the projector is about 10 m (393 inches) from the wall or screen. Use the drawing below as a guide. Screen Size (Unit: cm/inch) 609.6(W)ן457.2(H) / 240(W)ן180(H) 300" Screen Size 487.7(W)ן365.8(H) / 192(W)ן144 - Canon LV-7245 | User Manual - Page 20
from behind the screen (Rear). When the projector is hung from the ceiling or projector projects an image from behind the screen, the image must be inverted vertically or horizontally. See page 40. • When hanging the projector from the ceiling, optional brackets (part No. LV-CL10) are required. 12 - Canon LV-7245 | User Manual - Page 21
so heat can dissipate. Do not cover the vents on the side or the front of the projector. Reflecting the Image Using a mirror to reflect your projector's image enables you to enjoy a much larger image. Contact your dealer if you need a mirror system. If you're using a mirror sys- tem and - Canon LV-7245 | User Manual - Page 22
: The COMPUTER 1 connector supports Plug & Play (DDC2). ANALOG IN-1 ANALOG IN-2 VIDEO IN L AUDIO IN R ANALOG IN-1 AUDIO IN ANALOG IN-2 S-VIDEO IN MONO L AUDIO IN R AUDIO OUT MONO SERVICE PORT AUDIO IN VGA cable (supplied) To mini D-Sub 15-pin connector on the projector. It is recommended - Canon LV-7245 | User Manual - Page 23
equipment such as DVD player Female ANALOG IN-1 Projector VIDEO IN L AUDIO IN R ANALOG IN-1 AUDIO IN ANALOG IN-2 S-VIDEO IN MONO L AUDIO IN R AUDIO OUT SERVICE PORT MONO AC IN To ANALOG 1 input Commercially available Scart cable LV-CA35 Before connections: An exclusive Scart adapter - Canon LV-7245 | User Manual - Page 24
IN MONO L AUDIO IN R AUDIO OUT ANALOG IN-1 AUDIO AUDIO IN ANALOG IN-2 SERVICE PORT MONO (MONITOR OUT) AC IN VGA cable (supplied) VGA cable (not supplied) You can connect a separate, external monitor to your projector to simultaneously view on a monitor the RGB analog image you're projecting - Canon LV-7245 | User Manual - Page 25
IN VIDEO IN L AUDIO IN R ANALOG IN-1 AUDIO IN ANALOG IN-2 S-VIDEO IN MONO L AUDIO IN R AUDIO OUT SERVICE PORT MONO AC IN Optional 15-pin - to - RCA (female) ן3 cable (LV-CA32) Component video RCAן3 cable (not supplied) Audio Equipment AUDIO IN LR Y Cb Cr DVD player LR Component - Canon LV-7245 | User Manual - Page 26
ANALOG IN-1 AUDIO IN ANALOG IN-2 S-VIDEO IN MONO L AUDIO IN R AUDIO OUT SERVICE PORT MONO S-VIDEO IN AUDIO IN AC IN VCR/ Laser disc player L R VIDEO Turn on the projector and the VCR or laser disc player. NOTE: Refer to your VCR or laser disc player owner's manual for more information about - Canon LV-7245 | User Manual - Page 27
the wall outlet under any one of the following circumstances. Doing so can cause damage to the projector: • While the Hour Glass icon appears. • While the cooling fans are running. The cooling fans continue to work for 30 seconds after the projector is turned off. • While the lamp is lighted. 19 - Canon LV-7245 | User Manual - Page 28
ZOOM • The POWER indicator will light orange. See the Power Indicator section on page 52 for more details. LAMP REPLACE WARNING POWER AC IN 2. Press the POWER button on the projector cabinet or the POWER button on the remote control for a minimum of 2 seconds. The POWER indicator will turn - Canon LV-7245 | User Manual - Page 29
not turn on to protect the internal system. Please wait for the projector's internal components to cool down. • When the lamp reaches its end of usable life, the projector will not turn on. If this happens, replace the lamp. • If the lamp fails to light, and if the WARNING indicator flashes on and - Canon LV-7245 | User Manual - Page 30
Operation) NOTE: Turn on the computer or VCR connected to the projector. Using the cabinet buttons Press any one of the COMPUTER-1/-2, VIDEO Control Press any one of the COMPUTER-1/-2, VIDEO or S-VIDEO buttons. LAMP REPLACE WARNING POWER VIDEO S-VIDEO COMPUTER-1 COMPUTER-2 VOL + AUTO PC - Canon LV-7245 | User Manual - Page 31
Adjustable Tilt Foot Lever to lock the Adjustable tilt foot. There is approximately 10 degrees of up and down adjustment for the 4 front of the projector. 3 CAUTION Do not use the tilt-foot for purposes other than originally intended. Misuses such as gripping the tilt-foot or hanging on the - Canon LV-7245 | User Manual - Page 32
Zoom Use the ZOOM lever to finely adjust the image size on the screen. NOTE: Digital Zoom can cause result in a blurry image because zooming is made electronically. 3. Projecting an Image (Basic Operation) ZOOM FOCUS ZOOM FOCUS AC IN Focus Use - Canon LV-7245 | User Manual - Page 33
on a flat surface. Note that the vertical keystone angle can be corrected between 30 degrees upward and 30 degrees downward of projector tilt from level. NOTE: Auto and Manual keystone correction angle could be less than 30 degrees depending on some kinds of signal and aspect ratios. NOTE: The Auto - Canon LV-7245 | User Manual - Page 34
5. Press the MENU button to close the menu. 3. Projecting an Image (Basic Operation) NOTE: You can save the changes using the Keystone Save feature when you turn off the projector. See page 38. 26 - Canon LV-7245 | User Manual - Page 35
adjustment operation cannot optimize the RGB signal, try to adjust Horizontal/Vertical Position Clock and Tracking manually. See pages 44 and 45. ᕦ Turning Up or Down Volume Increase volume Decrease volume L- the speaker and the AUDIO OUT jack (Stereo mini) on the projector can be adjusted. 27 - Canon LV-7245 | User Manual - Page 36
are running. (The cooling fans continue to work for 30 seconds after the projector is turned off) • While the lamp is lighted. FOCUS ZOOM VOL+ VOL- AC IN ᕨ After Use Preparation: Make sure that the projector is turned off. 1. Unplug the power cord. 2. Disconnect any other cables. 3. Retract - Canon LV-7245 | User Manual - Page 37
4. Convenient Features ³ Turning off the Image and Sound Press the NO SHOW button to turn off the image and sound for a short period of time. Press again to restore the image and sound. OFF POWER NO SHOW D.ZOOM PAGE MENU BACK · Freezing a Picture Press the FREEZE button to freeze a picture. - Canon LV-7245 | User Manual - Page 38
4. Convenient Features ᕤ Using the Remote Mouse Receiver (LV-7245/LV-7240 only) The remote mouse receiver enables you to operate your computer's mouse functions from the remote control. It is a great convenience for clicking through - Canon LV-7245 | User Manual - Page 39
: The on-screen menu may not be displayed correctly while interlaced motion video image is projected. 1. Press the MENU button on the remote control or projector cabinet to display the Menu. OFF POWER NO SHOW D.ZOOM PAGE MENU BACK 2. Press the SELECT or button on the remote control or the - Canon LV-7245 | User Manual - Page 40
4. Use the SELECT or button on the remote control or the projector cabinet to select the item you want to adjust or set. OFF selected item on or off by using SELECT or button on the remote control or the projector cabinet. The on-screen slide bar will show you the amount of increase or decrease. - Canon LV-7245 | User Manual - Page 41
the item is selected. Slide bar Indicates settings or the direction of adjustment. Key symbol Indicates the Key Lock is enabled. Thermometer symbol Indicates the lamp is forcibly being cooled down because the internal temperature is too high. 33 - Canon LV-7245 | User Manual - Page 42
Presentation, Cinema, Video, sRGB User Base setting Standard, Presentation, Normal, Wide zoom, Cinema, True size Setup Off timer Lamp mode Language Menu color select Menu display time No signal , Dansk Color, Monochrome Manual, 5 sec, 15sec, 45 sec Blue, Black, Canon logo None / Rear, - Canon LV-7245 | User Manual - Page 43
5. Using On-Screen Menu Information Page1 Page2 Remaining lamp time, Lamp counter, Filter usage, Projector usage, BIOS version, Firmware version, Data version Source index, Horizontal frequency, Vertical frequency, Sync polarity Input signal type, Video type, Sync type, Interlace Factory default - Canon LV-7245 | User Manual - Page 44
There are 5 factory presets optimized for various types of images, or you can set user adjustable settings. Standard Select this to project an image with a similar quality to that an image from a sRGBcompatible digital camera. An image is projected in the display mode conforming to the sRGB - Canon LV-7245 | User Manual - Page 45
customize each gamma or color. To do so, first select "User" and press the OK button, and then proceed the following steps. Selecting Base Setting [Base setting] This feature allows you to use white balance or gamma values as reference data to optimize for various types of images. You can select - Canon LV-7245 | User Manual - Page 46
[Keystone adjustment] You can correct vertical distortion manually from the menu when "Auto keystone" is turned off. You can save the changes using the Keystone save feature when you turn off the projector. Saving Vertical Keystone Correction [Keystone save] This option enables you to save your - Canon LV-7245 | User Manual - Page 47
). Quiet mode Select this mode to increase the lamp life (80% Brightness). NOTE: If the projector is overheated in Normal mode, there may be a case where the Lamp mode automatically changes to Quiet mode to protect the projector. When the projector is in Quiet mode, the picture brightness decreases - Canon LV-7245 | User Manual - Page 48
Language] You can choose one of 21 languages for on-screen instructions. Selecting Menu Color [Menu color select] You can choose option allows you to select how long the projector waits after the last touch of a button to turn off the menu. The preset choices are "Manual", "5 sec", "15 sec", and " - Canon LV-7245 | User Manual - Page 49
set for your projector to avoid operation by an unauthorized user using the Menu. When a password is set, turning on the projector will display the and press the OK button. NOTE: • A password must be four to 10 digits in length. • When you want to cancel registering the password, press the MENU - Canon LV-7245 | User Manual - Page 50
image at this time, press the MENU button to display the Password input screen. Type in the correct password and press the OK button. The projector will display an image. NOTE: • The password disable mode is maintained until the main power is turned off (by setting the main power switch to - Canon LV-7245 | User Manual - Page 51
some component signals that the projector is unable to detect. If this is the case, select "COMPONENT". Select "Scart" in Computer 1 for the European Scart signal. [VIDEO & S-VIDEO system select] This feature enables you to select composite video standards manually. Normally select "Auto". When you - Canon LV-7245 | User Manual - Page 52
may not be available depending on your video equipment connected to the projector. Setting Auto PC adjustment [Auto PC adjustment] This feature sets the adjustment mode so that the RGB image can be automatically or manually adjusted for noise and stability. You can automatically make adjustment in - Canon LV-7245 | User Manual - Page 53
If the Remaining lamp time reaches 0 hours, the projector will not turn on regardless of whether the lamp mode is set to Normal or Quiet. BIOS version Firmware version Data version Model LV-7245/LV-7240 LV-X5 Lamp life(H) Normal Quiet 2000 3000 3000 4000 Replacement lamp LV-LP24 LV-LP25 45 - Canon LV-7245 | User Manual - Page 54
hours in Quiet mode) of service. If this happens, press the INFO. button on the remote control for ten seconds to reset the lamp clock back to zero. When the lamp time clock is reset to zero, the LAMP REPLACE indicator goes out. Do this only after replacing the lamp. * LV-X5: 3100 hours (up to 4100 - Canon LV-7245 | User Manual - Page 55
This section describes the simple maintenance procedures you should follow to clean the filter and replace the lamp. ᕡ Cleaning or Replacing the Filter The air-filter sponge keeps dust and dirt from getting inside the projector and should be cleaned after every 100 hours of operation (more often in - Canon LV-7245 | User Manual - Page 56
filter replacement. NOTE: When you replace the lamp, it is also wise to replace the filter. The filter comes in the same package with your replacement lamp. 4. Turn on the projector. 5. Reset the Filter IN R MONO AUDIO OUT ANALOG IN-1 AUDIO IN SERVICE PORT ANALOG IN-2 ACACININ FOCUS 48 - Canon LV-7245 | User Manual - Page 57
NOTE: Lamp life for LV-X5 is 3000 hours in Normal mode and 4000 hours in Quiet mode. The projector will turn off and go into standby mode after 3100 (up to 4100 hours in Quiet mode) hours of service. A lamp may burn out before the LAMP REPLACE indicator blinks. To replace the lamp: Optional lamp and - Canon LV-7245 | User Manual - Page 58
of electrical shock. Do not attempt to circumvent this interlock. 4. Insert a new lamp until the lamp is plugged into the socket. CAUTION Do not use a lamp other than the replacement lamp LV-LP24 (LV-7245/LV-7240) or LV-LP25 (LV-X5). This may be ordered from your dealer. Secure it in place with the - Canon LV-7245 | User Manual - Page 59
Quiet mode) of service, the projector cannot turn on and the menu is not displayed. If this happens, press the INFO. button on the remote control for ten seconds to reset the lamp clock back to zero. When the lamp time clock is reset to zero, the LAMP REPLACE indicator goes out. * LV-X5: 3100 hours - Canon LV-7245 | User Manual - Page 60
Appendix ᕡ Troubleshooting This section helps you resolve problems you may encounter while setting up or using the projector. Indicator On, Lamp error Lamp fails to light. Wait a full 0.5 sec Off) minute and then turn on again. Green Re-firing the lamp (The projector is cool- The projector is - Canon LV-7245 | User Manual - Page 61
* hours : Quiet mode). If there is insufficient ventilation around the projector or if the room where you're presenting is particularly warm, move the projector to a cooler location. * LV-X5: 3100 hours (up to 4100 hours in Quiet mode). • The lamp may fail to light. Wait a full minute and then turn - Canon LV-7245 | User Manual - Page 62
more details, refer to your computer's owner's manual. • Non-standard signal output from the LCD screen when the projector display is in use. Each notebook PC has a different way of deactivate/reactivate the local LCD other than those supported by your Macintosh and the projector, changing the DIP - Canon LV-7245 | User Manual - Page 63
* native, up to UXGA with scaling technology Manual zoom and manual focus F1.7 - 2.0 f=21.6 - 25.9 mm LV-7245 : 190W DC lamp (150W Quiet mode) LV-7240: 180W DC lamp (150W Quiet mode) LV-X5: 130W DC lamp (110W Quiet mode) LV-7245: 2500 lm LV-7240: 2100 lm LV-X5: 1500 lm 85% 21" to 300" 0.7 m to 10 - Canon LV-7245 | User Manual - Page 64
/ Rear, Ceiling mounted 11.6" (W)ן3.7" (H)ן10.2" (D) 294mm (W)ן93mm (H)ן260mm (D) (not including protrusions) approx. 7 lbs / 3 kg LV-7245/LV-7240: 35 dB (Normal mode), 30dB (Quiet mode) LV-X5: 33 dB (Normal mode), 28dB (Quiet mode) Operational Temperatures : 41° to 95°F (5° to 35°C), 20% to - Canon LV-7245 | User Manual - Page 65
57 Unit: mm (inch) 112.5 (4.4) 64.6 (2.5) Lens center 294 (11.6) Lens center 71.5 (2.8) 20.3 (0.8) FOCUS ZOOM LAMP REPLACE WARNING POWER VIDEO S-VIDEO COMPUTER-1 COMPUTER-2 VOL VOL - + AUTO PC 260 (10.2) VIDEO IN L AUDIO IN R ANALOG IN-1 AUDIO IN ANALOG IN-2 S-VIDEO IN - Canon LV-7245 | User Manual - Page 66
) Red Green or Sync on Green Blue Ground Ground Red Ground Green Ground Blue Ground No Connection Sync Signal Ground Scart Sync Bi-directional DATA (SDA)* Horizontal Sync or Composite Sync Vertical Sync Data Clock* YCbCr Signal Cr Y Cb Cr Ground Y Ground Cb Ground * Only ANALOG-1 input connector - Canon LV-7245 | User Manual - Page 67
happen, change the refresh rate or resolution on your PC. Refer to Display Properties help section of your PC for procedures. UXGA (1600 x 1200) is supported for separate sync signal only. 59 - Canon LV-7245 | User Manual - Page 68
list of the PC Control Codes if needed. Cable Connection Communication Protocol Baud rate 19200 bps Data length 8 bits Parity No parity Stop bit One bit X on/off None Communications procedure GND of PC To TxD of PC NOTE: Pins 2, 3, 5, 6 and 8 are used inside the projector. 7. Appendix 60 - Canon LV-7245 | User Manual - Page 69
service personnel, check the following list to be sure repairs are needed, you may also refer to the "Troubleshooting" section in your user's manual. This checklist below will help us solve your problem Lamp counter (lamp operation hours) was cleared after lamp are supported by the projector. Image - Canon LV-7245 | User Manual - Page 70
problem in detail. 7. Appendix Information on application and environment where your projector is used Projector Model number: Serial No.: Date of purchase: Lamp operating time (hours): Lamp Video adapter: Other: DVD player Signal cable Canon standard or other manufacturer's cable? Model - Canon LV-7245 | User Manual - Page 71
Boulevard Manuel Avila Camacho, No. 138 PB, Pisos 15, 16 y 17Col. Lomas de Chapultepec, CP 11000, Mexico D. F., Mexico CANON EUROPA N. V. P. O. Box 2262, 1180 EG Amstelveen, The Netherlands CANON COMMUNICATION & IMAGE FRANCE S. A. 102, Avenue du General de Gaulle, 92250 La Garenne Colombes, France
-
 1
1 -
 2
2 -
 3
3 -
 4
4 -
 5
5 -
 6
6 -
 7
7 -
8
-
9
-
10
-
11
-
12
-
13
-
14
-
15
-
16
-
17
-
18
-
19
-
20
-
21
-
22
-
23
-
24
-
25
-
26
-
27
-
28
-
29
-
30
-
31
-
32
-
33
-
34
-
35
-
36
-
37
-
38
-
39
-
40
-
41
-
42
-
43
-
44
-
45
-
46
-
47
-
48
-
49
-
50
-
51
-
52
-
53
-
54
-
55
-
56
-
57
-
58
-
59
-
60
-
61
-
62
-
63
-
64
-
65
-
66
-
67
-
68
-
69
-
70
-
71
 |
 |
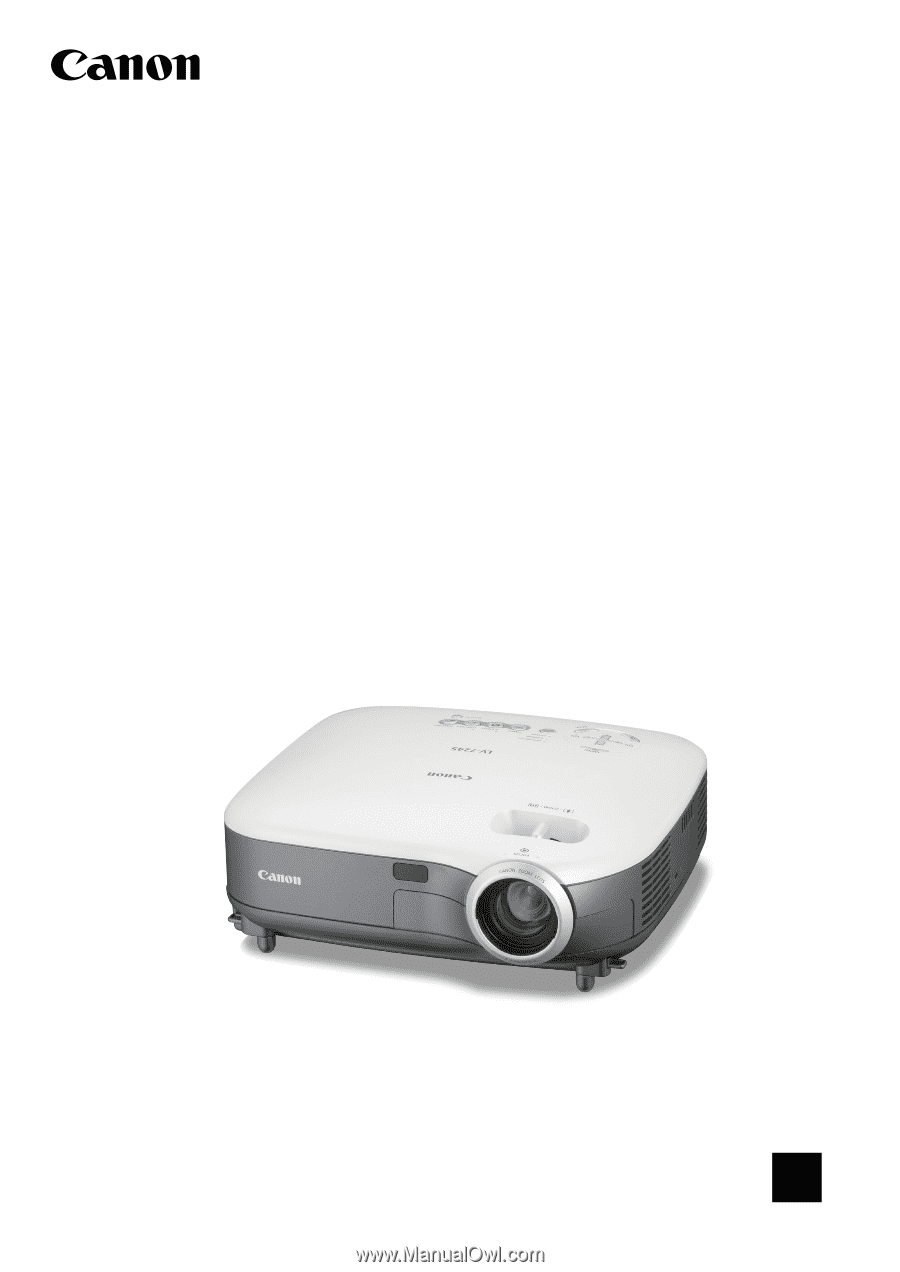
MULTIMEDIA PROJECTOR
LV-7245/LV-7240/LV-X5
User’s Manual
E
English