Canon LV-7575 LV-7575_inst_manual.pdf
Canon LV-7575 Manual
 |
View all Canon LV-7575 manuals
Add to My Manuals
Save this manual to your list of manuals |
Canon LV-7575 manual content summary:
- Canon LV-7575 | LV-7575_inst_manual.pdf - Page 1
MULTIMEDIA PROJECTOR LV-7575 User's Manual - Canon LV-7575 | LV-7575_inst_manual.pdf - Page 2
to operate improperly, read this manual again, check operations and cable connections and try the solutions in the "Troubleshooting" section in the end of this booklet. If the problem still persists, contact the dealer where you purchased the projector or the service center. CAUTION RISK OF ELECTRIC - Canon LV-7575 | LV-7575_inst_manual.pdf - Page 3
service personnel under the following conditions: a. When the power cord or plug is damaged or frayed. b. If liquid has been spilled into the projector. c. If the projector has been exposed to rain or water. d. If the projector does not operate normally by following the operating instructions - Canon LV-7575 | LV-7575_inst_manual.pdf - Page 4
the instructions. If such changes or modifications should be made, you could be required to stop operation of the equipment. Canon U.S.A., Inc. One Canon Plaza, authority, approved WEEE scheme or your household waste disposal service. Your cooperation in the correct disposal of this product will - Canon LV-7575 | LV-7575_inst_manual.pdf - Page 5
26 AUTO PC ADJUSTMENT 26 NAME OF EACH PART OF PROJECTOR 7 MANUAL PC ADJUSTMENT 27 SETTING-UP PROJECTOR 8 PICTURE IMAGE SELECT 29 21 LAMP REPLACEMENT 48 22 LAMP REPLACE COUNTER 49 22 22 TROUBLESHOOTING 50 22 MENU TREE 52 22 COMPATIBLE COMPUTER SPECIFICATIONS 55 23 - Canon LV-7575 | LV-7575_inst_manual.pdf - Page 6
System This projector has the Multi-Scan System to conform to almost all computer output signals quickly. There is no need for a troublesome manual adjustment of frequency and other settings. ◆ One-Touch Auto PC Adjustment Incoming computer video signals are recognized and the best adjustment is - Canon LV-7575 | LV-7575_inst_manual.pdf - Page 7
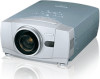
CABINET LAMP COVER CARRYING HANDLE When attaching the Network Imager (optional) to the projector, remove the these parts. Refer to the user's manual of the optional Network Imager. AIR INTAKE VENTS This projector is equipped with cooling fans for protecting from overheating. Pay attention to the - Canon LV-7575 | LV-7575_inst_manual.pdf - Page 8
plug into any other type of power system. If you are not sure of the type of power being supplied, consult your authorized dealer or service station. Connect the projector with all peripheral equipment before turning it on. (See pages 12-14 for connection.) CAUTION For safety, unplug the AC power - Canon LV-7575 | LV-7575_inst_manual.pdf - Page 9
POSITIONING PROJECTOR PREPARATION ● This projector is designed to project on a flat projection surface. ● Projector can be focused from 1.4 m (4.6')-14.7 m (48.2'). ● Refer to the figure below to adjust the screen size. 3.6 m (11.8') 1.4 m (4.6') 100" 40" 76" 31" 7.3 m (24.0') 200" 153" A ROOM - Canon LV-7575 | LV-7575_inst_manual.pdf - Page 10
PREPARATION ADJUSTABLE FEET Projection angle can be adjusted up to 10.5 degrees with the ADJUSTABLE FEET. 1 Lift the front of the projector and pull the FEET LOCK LATCHES in each side of the projector. 2 Release the FEET LOCK LATCHES to lock the ADJUSTABLE FEET and rotate the ADJUSTABLE FEET to a - Canon LV-7575 | LV-7575_inst_manual.pdf - Page 11
or malfunctions may result. ● When carrying the projector, use a suitable carrying case. ● Do not transport the projector by courier or any other transport service in an unsuitable transport case. This may cause damage to the projector. To transport the projector by courier or any other transport - Canon LV-7575 | LV-7575_inst_manual.pdf - Page 12
CONNECTING PROJECTOR TERMINALS OF PROJECTOR This projector has input and output terminals on its back for connecting computers and video equipment. Refer to the figures on pages 12-14 and connect properly. COMPUTER AUDIO INPUT 1/ AUDIO MONITOR OUTPUT JACK This terminal is switchable and can be used - Canon LV-7575 | LV-7575_inst_manual.pdf - Page 13
CONNECTING PROJECTOR CONNECTING TO COMPUTERS Cables used for connection (✽ = Cables or adapters not supplied with this projector.) • VGA Cable (HDB 15 pin) • Control Cable for PS2 Port ✽, or ADB Port ✽ • DVI-Digital Cable (for Single Link T.M.D.S.) ✽ • USB Cable • BNC Cable ✽ • Audio Cables - Canon LV-7575 | LV-7575_inst_manual.pdf - Page 14
CONNECTING PROJECTOR CONNECTING TO VIDEO EQUIPMENT Cables used for connection (✽ = Cables not supplied with this projector.) • Video Cable (RCA x 1 or RCA x 3) ✽ • BNC Cable ✽ • S-VIDEO Cable ✽ • Audio Cable (RCA x 2) ✽ • Audio Cable (Mini Plug [stereo]) ✽ • Scart Cable ✽ Video Source (Example) - Canon LV-7575 | LV-7575_inst_manual.pdf - Page 15
BEFORE OPERATION REMOTE CONTROL OPERATION Left Side LASER POINTER (DRAG ON) INDICATOR Lights red while the laser beam is emitted from the Laser Light Window. Lights green when dragged to the "ON" position. (p.45) MUTE BUTTON Used to mute the sound. (p.23) ON 1234 ALL OFF SWITCH When using the - Canon LV-7575 | LV-7575_inst_manual.pdf - Page 16
, carefully wipe the case clean and install new batteries. ● Danger of explosion if battery is incorrectly replaced. ● Dispose of used batteries according to batteries manufacturers instructions and local rules. - Canon LV-7575 | LV-7575_inst_manual.pdf - Page 17
BEFORE OPERATION TOP CONTROLS AND INDICATORS This projector has CONTROL BUTTONS (TOP CONTROLS) and INDICATORS on its top. LAMP MODE INDICATOR Lights when the Lamp mode is set to "Silent" mode. (p.41) WARNING TEMP. INDICATOR Blinks red when the internal temperature of the projector is too high. (pp - Canon LV-7575 | LV-7575_inst_manual.pdf - Page 18
BEFORE OPERATION ON-SCREEN MENU HOW TO OPERATE ON-SCREEN MENU You can control and adjust this projector with On-Screen Menu. Refer to the relevant pages to operate each adjustment. REMOTE CONTROL UNIT 1. DISPLAY MENU Press the MENU button to display the On-Screen Menu. 2. MOVING POINTER Move - Canon LV-7575 | LV-7575_inst_manual.pdf - Page 19
BEFORE OPERATION MENU BAR FOR PC SOURCE Press the MENU button when connecting to the PC input source. GUIDE WINDOW Shows the selected item of On-Screen Menu. PC SYSTEM MENU Used to select a computer system. (See pages 24-25.) IMAGE SELECT MENU Used - Canon LV-7575 | LV-7575_inst_manual.pdf - Page 20
and Lamp mode Lamp mode status If the projector is locked with a PIN code, a PIN code Input Dialog Box appears. Enter the PIN code as instructed below. To Enter a PIN code Select a number by pressing the POINT LEFT/RIGHT button and fix the number with the OK button. The number changes - Canon LV-7575 | LV-7575_inst_manual.pdf - Page 21
BASIC OPERATION TURNING OFF THE PROJECTOR 1 Press the POWER button on the top control or on the remote control unit, and "Power off?" appears on the screen. 2 Press the POWER button again to turn off the projector. The LAMP indicator lights bright and the READY indicator turns off. After the - Canon LV-7575 | LV-7575_inst_manual.pdf - Page 22
BASIC OPERATION ADJUSTING SCREEN ZOOM ADJUSTMENT 1 Press the ZOOM button on the top control or ZOOM ▲/▼ buttons on the remote control unit. "Zoom" appears on the screen. 2 Press the ZOOM ▲ button or POINT UP button to make the image larger, and press the ZOOM ▼ button or POINT DOWN button to - Canon LV-7575 | LV-7575_inst_manual.pdf - Page 23
BASIC OPERATION PICTURE FREEZE FUNCTION Press the FREEZE button on the remote control unit to freeze the picture on the screen. To cancel the FREEZE function, press the FREEZE button again or press any other button. NO SHOW FUNCTION Press the NO SHOW button on the remote control unit to black out - Canon LV-7575 | LV-7575_inst_manual.pdf - Page 24
COMPUTER INPUT SELECTING INPUT SOURCE DIRECT OPERATION Select an INPUT source by pressing the INPUT button on the top control or the INPUT 1, INPUT 2, or INPUT 3 buttons on the remote control unit. If the projector cannot reproduce proper image, select a correct input source with the MENU - Canon LV-7575 | LV-7575_inst_manual.pdf - Page 25
Make sure the connection of a computer and the projector is set correctly. (See "TROUBLESHOOTING" on page 50.) PC SYSTEM MENU PC SYSTEM Menu icon Displays system being selected. Mode 1 The User preset adjustment in MANUAL PC ADJUSTMENT. The Adjusted data can be stored in the Mode 1-10. SVGA 1 PC - Canon LV-7575 | LV-7575_inst_manual.pdf - Page 26
setting can be done just by selecting Mode in PC SYSTEM Menu (p.25). See MANUAL PC ADJUSTMENT on pages 27-28. NOTE: • Fine sync, Total dots, Adjustment function. When the image is not provided properly with this function, manual adjustments are required. (See pages 27-28.) • Auto PC Adjustment - Canon LV-7575 | LV-7575_inst_manual.pdf - Page 27
to precisely adjust several parameters to match with those special signal formats. This projector has 10 independent memory areas to store those parameters manually adjusted, which allows you to recall setting for a specific computer whenever you use it. Note: The PC ADJUST Menu cannot be operated - Canon LV-7575 | LV-7575_inst_manual.pdf - Page 28
COMPUTER INPUT Reset To reset the adjusted parameters, select Reset and press the OK button. A confirmation box appears. Select [Yes]. All the adjustments return to their previous figures. To store adjustment data. This Mode has parameters being stored. Mode free To clear adjusted parameters - Canon LV-7575 | LV-7575_inst_manual.pdf - Page 29
COMPUTER INPUT PICTURE IMAGE SELECT IMAGE LEVEL SELECT DIRECT OPERATION Select an image level from among Standard, High contrast, and Custom by pressing the IMAGE button on the top control or on the remote control unit. Standard Normal picture level preset on this projector. High contrast Picture - Canon LV-7575 | LV-7575_inst_manual.pdf - Page 30
COMPUTER INPUT PICTURE SCREEN ADJUSTMENT PICTURE SCREEN SELECT This projector has a picture screen resize function, which enables you to display the desirable image size. 1 Press the MENU button to display the On-Screen Menu. Press the POINT LEFT/RIGHT buttons to move the red frame pointer to - Canon LV-7575 | LV-7575_inst_manual.pdf - Page 31
VIDEO INPUT SELECTING INPUT SOURCE DIRECT OPERATION Select an INPUT source by pressing the INPUT button on the top control or the INPUT 1, INPUT 2, or INPUT 3 buttons on the remote control unit. If the projector cannot reproduce proper image, select a correct input source with the MENU OPERATION ( - Canon LV-7575 | LV-7575_inst_manual.pdf - Page 32
an incoming video signal, and adjusts itself to optimize its performance. When the Video System is 1035i or 1080i, select the system manually. COMPONENT VIDEO SIGNAL FORMAT If the projector cannot reproduce proper video image, select a specific component video signal format from among 480i, 575i - Canon LV-7575 | LV-7575_inst_manual.pdf - Page 33
VIDEO INPUT PICTURE IMAGE SELECT IMAGE LEVEL SELECT DIRECT OPERATION Select an image level from among Standard, Cinema, Custom by pressing the IMAGE button on the top control or on the remote control unit. Standard Normal picture level preset on this projector. Cinema Picture level adjusted for - Canon LV-7575 | LV-7575_inst_manual.pdf - Page 34
VIDEO INPUT PICTURE SCREEN ADJUSTMENT PICTURE SCREEN SELECT This projector has a picture screen resize function, which enables you to customize the image size. 1 Press the MENU button to display the On-Screen Menu. Press the POINT LEFT/RIGHT buttons to move the red frame pointer to the SCREEN - Canon LV-7575 | LV-7575_inst_manual.pdf - Page 35
PICTURE IMAGE PICTURE IMAGE ADJUSTMENTS 1 Press the MENU button to display the On-Screen Menu. Press the POINT LEFT/RIGHT buttons to move the red frame pointer to the IMAGE ADJUST Menu icon. 2 Press the POINT UP/DOWN buttons to move the red frame pointer to the desired item and then press the OK - Canon LV-7575 | LV-7575_inst_manual.pdf - Page 36
PICTURE IMAGE COLOR SELECTION MODE (continued) COLOR M. Return to the COLOR MANAGEMENT POINTER. (If you press the MENU button on the top control or the remote control unit, it returns to the COLOR MANAGEMENT POINTER and you will need to reselect and readjust the color.) MENU Return to the IMAGE - Canon LV-7575 | LV-7575_inst_manual.pdf - Page 37
parameters, select Reset and press the OK button. A confirmation box appears. Select [Yes]. All the adjustments return to their previous figures. Store To store manually preset image, move the red frame pointer to the Store icon and press the OK button. The Image Level Menu appears. Move the red - Canon LV-7575 | LV-7575_inst_manual.pdf - Page 38
SETTING SETTING MENU This projector has Setting menu that allows you to set up the other various functions described as follows: 1 Press the MENU button to display the On-Screen Menu. Press the POINT LEFT/RIGHT buttons to move the red frame pointer to the Setting Menu icon. 2 Press the POINT DOWN - Canon LV-7575 | LV-7575_inst_manual.pdf - Page 39
SETTING Logo This function allows you to customize the screen logo with Logo select, Capture, and Logo PIN code lock functions. Logo select This function decides the start-up display as follows: User . . . the image you captured Default . the factory-set logo Off . . . . count-down only Capture - Canon LV-7575 | LV-7575_inst_manual.pdf - Page 40
SETTING Ceiling When this function is "On," the picture is top/bottom and left/right reversed. This function is used to project the image from a ceilingmounted projector. Ceiling Rear When this function is "On," the picture is left/right reversed. This function is used to project the image to a - Canon LV-7575 | LV-7575_inst_manual.pdf - Page 41
SETTING On start When this function is "On," the projector is automatically turned on just by connecting the AC power cord to an AC outlet. NOTE: • Be sure to turn the projector off properly (see "TURNING OFF THE PROJECTOR" on page 21). If the projector is turned off in the incorrect sequence, such - Canon LV-7575 | LV-7575_inst_manual.pdf - Page 42
SETTING USB This Projector has a USB port for interactive operation between the projector and computers. Set the mode by following the steps below. Wireless Mouse mode Select " " when controlling a computer with the remote control unit of this projector. Projector mode: " " Not used. Security Key - Canon LV-7575 | LV-7575_inst_manual.pdf - Page 43
SETTING PIN code lock This function prevents the projector from being operated by an unauthorized person and provides the following settings for security options. Off . . . . the projector is not locked with the PIN code. On1 . . . requires to enter the PIN code every time turning on the projector. - Canon LV-7575 | LV-7575_inst_manual.pdf - Page 44
SETTING Lamp counter This function is used to reset the Lamp replacement counter. When replacing the projection lamp, reset the Lamp replacement counter with this function. See page 49 for operation. Factory default This function returns all setting values except for the User logo, Key lock, PIN - Canon LV-7575 | LV-7575_inst_manual.pdf - Page 45
APPENDIX WIRELESS MOUSE Remote control unit is not only able to operate this projector but also functions as a wireless mouse for most personal computers. The MOUSE POINTER, DRAG ON/OFF button, and two CLICK buttons are used for wireless mouse operation. The Wireless mouse function is available - Canon LV-7575 | LV-7575_inst_manual.pdf - Page 46
above checks, the cooling fans or internal circuits may be malfunctioning. Contact the service station. When both of the Warning Temp. and Ready indicators are blinking: When the projector detects an internal problem, it shuts down automatically and both the Warning Temp. and Ready indicators start - Canon LV-7575 | LV-7575_inst_manual.pdf - Page 47
projector is being operated. As a rough guide, under a normally clean operating environment, the noticed, contact your authorized dealer or service station for proper cleaning. CLEANING PROJECTION from an AC outlet. 2 Apply a non-abrasive camera lens cleaner to a dry soft cleaning cloth. Avoid - Canon LV-7575 | LV-7575_inst_manual.pdf - Page 48
APPENDIX LAMP REPLACEMENT When the projection lamp of this projector reaches its end of life, the LAMP REPLACE indicator lights orange. If this indicator lights orange, replace the projection lamp with a new one promptly. TOP CONTROL This indicator lights orange when the projection lamp reaches - Canon LV-7575 | LV-7575_inst_manual.pdf - Page 49
projector has cooled down. (Follow carefully the instructions in the LAMP REPLACEMENT section of this manual.) Continuous use of the lamp with the immediately and open the window or door for ventilation. Contact an authorized service station for a checkup of the unit and replacement of the lamp. - Canon LV-7575 | LV-7575_inst_manual.pdf - Page 50
APPENDIX TROUBLESHOOTING Before calling your dealer or service center for assistance, check the items below appear, disconnect the projector from your computer and check your computer monitor's display. A problem may be noticed with your graphics controller rather than with the projector. (When you - Canon LV-7575 | LV-7575_inst_manual.pdf - Page 51
used to operate this projector. Do not attempt to open the cabinet. If the problem still persists after following all operating instructions, contact the sales dealer where you purchased the projector or the service center. Specify the model number and explain the difficulty. We will advise you how - Canon LV-7575 | LV-7575_inst_manual.pdf - Page 52
APPENDIX Computer Input/Video Input Input Input 1 Input 2 Input 3 MENU TREE RGB (PC analog) RGB (Scart) RGB (PC digital) RGB (AV HDCP) Monitor out Video Y, Pb/Cb, Pr/Cr RGB Video Y, Pb/Cb, Pr/Cr S-Video Go to System (1) Go to System (2) Go to System (3) Go to System (1) Go to System (2) Go to - Canon LV-7575 | LV-7575_inst_manual.pdf - Page 53
Video Input System (2) Auto PAL SECAM NTSC NTSC 4.43 PAL-M PAL-N System (3) Auto 1080i 1035i 720p 575p 480p 575i 480i Image Select Standard Cinema Custom 1 Custom 10 Screen Normal Wide Computer Input/Vide Input Image Adjust Contrast Brightness Color Tint Color management Auto picture - Canon LV-7575 | LV-7575_inst_manual.pdf - Page 54
APPENDIX Computer Input/Vide Input Setting Language Keystone Background Display Logo Ceiling Rear Anamorphic Simple menu Menu position Power management On start Lamp mode Remote Control USB Security Lamp counter Factory default Quit English German French Italian Spanish Portuguese Dutch Swedish - Canon LV-7575 | LV-7575_inst_manual.pdf - Page 55
APPENDIX COMPATIBLE COMPUTER SPECIFICATIONS Basically this projector can accept a signal from all computers with V-, H-Frequency mentioned below, and less than 140 MHz of Dot Clock. ON-SCREEN DISPLAY VGA 1 VGA 2 VGA 3 VGA 4 VGA 5 VGA 6 VGA 7 MAC LC13 MAC 13 480i 575i 480p 575p SVGA 1 SVGA 2 SVGA 3 - Canon LV-7575 | LV-7575_inst_manual.pdf - Page 56
APPENDIX When a input signal is digital from DVI terminal, refer to the chart below. ON-SCREEN DISPLAY D-VGA D-480p D-575p D-SVGA D-XGA D-WXGA1 D-WXGA2 D-WXGA3 D-WXGA5 ✳ D-SXGA1 RESOLUTION 640 x 480 720 x 480 (Progressive) 768 x 575 (Progressive) 800 x 600 1024 x 768 1366 x 768 1360 x 768 1376 x - Canon LV-7575 | LV-7575_inst_manual.pdf - Page 57
again to turn on the projector. If the projector is turned off again, disconnect the AC power cord and contact the dealer or the service center for service and checkup. Do not leave the projector on. It may cause electric shock or a fire hazard. ✽ The projector is in the Power management mode - Canon LV-7575 | LV-7575_inst_manual.pdf - Page 58
mm x 193 mm (2.0" x 1.4" x 7.6") : 160 g (0.35 lbs) (including batteries) : Class II Laser (Max. Output: 1mW/Wave length: 650±20nm) User's Manual (CD-ROM) Quick Start Guide AC Power Cord Wireless/Wired Remote Control Transmitter and Batteries VGA Cable USB Cable Control Cable for Serial Port Lens - Canon LV-7575 | LV-7575_inst_manual.pdf - Page 59
CONFIGURATIONS OF TERMINALS COMPUTER INPUT-1 TERMINALS (ANALOG) Terminal: HDB15-PIN Pin Configuration 54 32 1 10 9 8 7 6 15 14 13 12 11 1 Red Input 2 Green Input 3 Blue Input 4 Sense 2 5 Ground (Horiz.sync.) 6 Ground (Red) 7 Ground (Green) 8 Ground (Blue) 9 +5V Power 10 Ground (Vert. sync.) 11 - Canon LV-7575 | LV-7575_inst_manual.pdf - Page 60
the projector. To the sales and service engineers: Referring to the attached lens replacement and installation manual, replace or install the lens ). The projector supports all commands defined by PJLink Class 1 and is verified conformance with PJLink Standard Class 1. CANON Projector Input Input1 - Canon LV-7575 | LV-7575_inst_manual.pdf - Page 61
Unit : mm (inch) 60.6 (2.39) 10.5° 91.5 (3.60) DIMENSIONS 319.0 (12.6) 142.0 (5.59) 168.0 (6.61) APPENDIX 429.5 (16.8) 141.5 (5.57) 115.5 (4.55) 117.0 (4.61) 134.0 (5.28) 230.0 (9.06) Screw Holes for Ceiling Mount Screw: M6 Depth: 10.0 (0.393) 95.0 (3.74) 147.0 (5.79) 114.0 (4.49) 61 - Canon LV-7575 | LV-7575_inst_manual.pdf - Page 62
APPENDIX While the projector is locked with the PIN code.... Put on the label below (supplied) in a prominent place of the projector's body while it is locked with a PIN code. 62 - Canon LV-7575 | LV-7575_inst_manual.pdf - Page 63
-ku, Tokyo 146-8501, Japan CANON U.S.A., INC. One Canon Plaza, Lake Success, NY 11042, U.S.A. CANON CANADA, INC. 6390 Dixie Road Mississauga, Ontario L5T 1P7 Canada CANON LATIN AMERICA, INC. 703 Waterford Way Suite 400 Miami, Florida 33126 U.S.A. CANON MEXICANA, S. de R.L. de C.V. Boulevard Manuel
-
 1
1 -
 2
2 -
 3
3 -
 4
4 -
 5
5 -
 6
6 -
 7
7 -
8
-
9
-
10
-
11
-
12
-
13
-
14
-
15
-
16
-
17
-
18
-
19
-
20
-
21
-
22
-
23
-
24
-
25
-
26
-
27
-
28
-
29
-
30
-
31
-
32
-
33
-
34
-
35
-
36
-
37
-
38
-
39
-
40
-
41
-
42
-
43
-
44
-
45
-
46
-
47
-
48
-
49
-
50
-
51
-
52
-
53
-
54
-
55
-
56
-
57
-
58
-
59
-
60
-
61
-
62
-
63
 |
 |

LV-7575
User’s Manual
MULTIMEDIA PROJECTOR