Canon LV-WX300USTI User Manual
Canon LV-WX300USTI Manual
 |
View all Canon LV-WX300USTI manuals
Add to My Manuals
Save this manual to your list of manuals |
Canon LV-WX300USTI manual content summary:
- Canon LV-WX300USTI | User Manual - Page 1
ENGLISH MULTIMEDIA PROJECTOR User's Manual - Canon LV-WX300USTI | User Manual - Page 2
the world. HDMI, the HDMI Logo, and High-Definition Multimedia Interface are trademarks or registered trademarks of HDMI Licensing LLC in United States and other countries. All other product names used in this manual are the properties of their respective owners and are acknowledged. Copyright - Canon LV-WX300USTI | User Manual - Page 3
Installation Location Turn on Altitude Mode when located in high altitude areas The projector can only be installed upright or inverted. When installation damage to the projector. In the meantime, the delayed heat radiating will also affect the service life of the projector. The shutdown - Canon LV-WX300USTI | User Manual - Page 4
on page 52 for clear and safe instructions for this procedure. Before replacing the Always request service from the Canon Customer Support Center. Additionally, with ceilingmounted projectors, the manual This manual is intended for end users and describes how to install and operate the DLP projector - Canon LV-WX300USTI | User Manual - Page 5
55 USING THE PHYSICAL LOCK ...56 Using the Kensington® Lock ...56 Using the Security Bar ...56 TROUBLESHOOTING ...57 TIPS FOR TROUBLESHOOTING ...57 LED MESSAGES ...58 IMAGE PROBLEMS...58 LAMP PROBLEMS ...59 REMOTE CONTROL PROBLEMS ...59 AUDIO PROBLEMS ...59 HAVING THE PROJECTOR SERVICED ...59 - iv- - Canon LV-WX300USTI | User Manual - Page 6
SPECIFICATIONS ...60 PRODUCT SPECIFICATIONS...60 INSTALLATION DISTANCE VS. PROJECTION SIZE...61 Installation Distance and Size Table ...61 TIMING MODE TABLE ...62 PROJECTOR DIMENSIONS ...64 APPENDIX I...66 COMMUNICATION ...66 - v- - Canon LV-WX300USTI | User Manual - Page 7
accidents. If your projector does not seem to be operating properly, read this manual again, check operations and cable connections, and try the solutions in the "Troubleshooting" section in the user's manual. If the problem still persists, contact the Canon Customer Support Center. THIS SYMBOL - Canon LV-WX300USTI | User Manual - Page 8
careful that children do not stare directly into the beam. • Install the projector in a proper position. Otherwise it may result in a fire hazard. • Do not cover the ventilation slots on the projector. Heat build-up can reduce the service life of your projector, and can also be dangerous. • If the - Canon LV-WX300USTI | User Manual - Page 9
. Do not install the projector near the ventilation duct of air-conditioning equipment. This projector should be operated using only the type of power source indicated on the marking label. If you are not sure of the type of power supplied, contact the Canon Customer Support Center or local power - Canon LV-WX300USTI | User Manual - Page 10
supplied with this projector meets the requirements contact your electrician. Ground THE SOCKET-OUTLET SHOULD BE INSTALLED NEAR THE EQUIPMENT AND EASILY ACCESSIBLE. For the U.S. and household waste disposal service or visit http://www.canon-europe.com/weee, or http://www.canon-europe.com/battery - Canon LV-WX300USTI | User Manual - Page 11
Federal Communication Commission Notice Multimedia Projector, Model: LV-WX300UST/LV-WX300USTi This device complies with Part 15 of the FCC Rules. Operation is subject to the following two conditions: (1) This device may not cause harmful interference, - Canon LV-WX300USTI | User Manual - Page 12
or bundled. • Do not use a damaged power cord. If your power cord is damaged, contact the Canon Customer Support Center. • Do not use any power cord other than the type that is included with this projector. • Be sure to connect the ground wire of the power cord to ground. Failure to do so - Canon LV-WX300USTI | User Manual - Page 13
and the outlet. Precautions for Installation Pay attention to the following points regarding installation and handling of the projector. Failure to do so or repair is required, contact the Canon Customer Support Center. • Do not disassemble or modify the projector (including consumable parts) or the - Canon LV-WX300USTI | User Manual - Page 14
to the following points regarding installation and handling of the projector. • Do not place any heavy objects on top of the projector or sit/stand on the projector be performed. For details of maintenance costs, contact the Canon Customer Support Center. Precautions on the lamp This projector uses - Canon LV-WX300USTI | User Manual - Page 15
a while, the lamp may have ruptured. In this case, never attempt to replace the lamp by yourself. Always request service from the Canon Customer Support Center. Additionally, with ceiling-mounted projectors, the lamp may fall out when you open the lamp cover or while you are attempting to replace it - Canon LV-WX300USTI | User Manual - Page 16
the air intake and exhaust vents are separated from the wall by more than 50 cm (1.6'). Failure to do so could cause a malfunction. • Do not install the projector in a location that is damp, or where there is a lot of dust, oily smoke or tobacco smoke. Doing so could cause contamination of optical - Canon LV-WX300USTI | User Manual - Page 17
unpack the projector and check that the following items are included: LV-WX300UST LV-WX300USTI REMOTE CONTROL (WITH ONE 3V CR2025 BATTERY) POWER CORD (1.8 M / 5.9') COMPUTER CABLE (1.8 M / 5.9') (MINI D-SUB 15-PIN / MINI D-SUB 15-PIN) Warranty Card CD-ROM (THIS USER'S MANUAL) IMPORTANT - Canon LV-WX300USTI | User Manual - Page 18
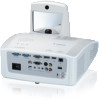
Views of Projector Parts Front-right View 12 34 ITEM 1. 2. 3. 4. 5. LABEL Lamp cover IR receiver Lens Focus ring Function keys 6. Interactive Camera 7. See Top view-On-screen Display (OSD) buttons and LEDs. 13 Interactive function use *Not Available in LV-WX300UST Reflects images - 12- - Canon LV-WX300USTI | User Manual - Page 19
Optimizes image size, position, and resolution Navigates and changes settings in the OSD Navigates in the OSD Quick Menu - For Keystone Turns the projector On or Off Amber Flashing Green Flashing Lamp error Error code Power on, Power off Cooling, Error code Red Over Temperature SEE PAGE: 25 - Canon LV-WX300USTI | User Manual - Page 20
an AUDIO cable to an audio amplifier Connect the Microphone for use Connect the USB cable to PC(for Interactive function) *not available in LV-WX300UST Connect the USB cable from a computer Connect the POWER cable 20 Connect the RGB cable from a computer or components device Connect the RGB - Canon LV-WX300USTI | User Manual - Page 21
ITEM LABEL DESCRIPTION SEE PAGE: 16. HDMI 2 Connect the HDMI cable from a HDMI device* 17. VIDEO Connect the composite cable from a video device 18. HDMI 1 Connect the HDMI cable from a HDMI device* 19. RJ - 45 Connect a LAN cable from Ethernet * It is necessary to turn the 3D setting - Canon LV-WX300USTI | User Manual - Page 22
position 23 Contact your dealer for information on mounting the projector on a ceiling Warning: The ceiling attachment (part No.: LV-WL02) is required in order to mount the projector on the wall. Make sure to ask the Canon Customer Support Center if you want to install the Wall Attachment. - 16- - Canon LV-WX300USTI | User Manual - Page 23
is obstructed, you can bounce the signal off certain reflective surfaces such as projector screens. 3. The buttons and keys on the projector have the same functions as the corresponding buttons on the remote control. This user's manual describes the functions based on the remote control. - 17- - Canon LV-WX300USTI | User Manual - Page 24
bottom Down cursor Left cursor Menu DESCRIPTION SEE PAGE: Navigates and changes settings in the OSD 25 Changes settings in the OSD Turns the projector On or Off 20 Navigates and changes settings in the OSD 25 Increase volume 24 Decrease volume Mutes the built-in speaker Freeze/unfreezes - Canon LV-WX300USTI | User Manual - Page 25
the cover. Caution: 1. Only use a 3V lithium battery (CR2025). 2. Dispose of used batteries according to local ordinance regulations. 3. Remove the battery when not using the projector for prolonged periods. - 19- - Canon LV-WX300USTI | User Manual - Page 26
projector splash screen displays and connected devices are detected. See Setting an Access Password (Security Lock) on page 21 if security lock is enabled. 4. If more than one input device is connected, press the SOURCE button of the remote and use ▲▼ to scroll among devices. (Component is supported - Canon LV-WX300USTI | User Manual - Page 27
and prevent unauthorized use of the projector. When enabled, the password must be entered after you power on the projector. (See Navigating the OSD on place. Without the password, you will not be able to use the projector. If you lose the password, contact your reseller for information on clearing - Canon LV-WX300USTI | User Manual - Page 28
the Security Lock is enabled. Enter the password in the order you set it at step 5. In case you forget the password, please contact the service center. Service center will validate the owner and help reset the password. - 22- - Canon LV-WX300USTI | User Manual - Page 29
Level Take note of the following when setting up the projector: The projector table or stand should be level and sturdy. Position the projector so that it is perpendicular to the screen. Ensure the cables are in a safe location. You could trip over them. To adjust the angle of - Canon LV-WX300USTI | User Manual - Page 30
Adjusting the Focus and Keystone 1. Use the Image-focus control (on the projector only) to sharpen the projected image 2. Use the KEYSTONE buttons on the remote control to correct keystone distortion (wider top or bottom) effect. 3. The keystone - Canon LV-WX300USTI | User Manual - Page 31
lets you make image adjustments and change various settings. Navigating the OSD You can use the remote control cursor buttons or the projector keypad to navigate and make changes to the OSD. 4 6 1 14 2 2 6 3 5 2 1 1 2 3 5 1. To enter the OSD, press the MENU button. 2. There are five - Canon LV-WX300USTI | User Manual - Page 32
Language Set the OSD language to your preference before continuing. 1. Press the MENU button. Press the cursor ◄► button to navigate to Installation I. 2. Press the cursor ▲▼ button until Language is highlighted. 3. Press the cursor ◄► button until the language you want is highlighted. 4. Press the - Canon LV-WX300USTI | User Manual - Page 33
OSD Menu Overview Use the following illustration to quickly find a setting or determine the range for a setting. MAIN MENU SUB MENU Image Image Mode Brilliant Color Brightness Contrast Sharpness Gamma Advanced Reset Computer Horizontal Position Vertical Position Tracking Total Dots Auto - Canon LV-WX300USTI | User Manual - Page 34
MAIN MENU SUB MENU Installation I Language Blank Screen Image Flip H/V Aspect Test Pattern Keystone Advanced Reset Security Lock Wall Color Presentation Timer D-Zoom Timer Preset Time Timer Reset SETTINGS English, Français, Deutsch, Español, Português Italiano, - Canon LV-WX300USTI | User Manual - Page 35
MAIN MENU SUB MENU SETTINGS Installation II Auto Search Auto Power Off (min.) Direct Power On Fan Mode Lamp Mode Advanced OSD Menu Setting Peripheral Test Reset Lamp Time Low Power Mode 3D RS232 Network Setting Factory Reset Status Active Source Video Information Lamp Time (Power Saver - Canon LV-WX300USTI | User Manual - Page 36
Image Menu Press the MENU button to open the OSD menu. Press the cursor ◄► button to move to the Image Menu. Press the cursor ▲▼ button to move up and down in the Image menu. Press ◄► to change values for settings. ITEM Image Mode Brilliant Color Brightness Contrast Sharpness Gamma Advanced Reset - Canon LV-WX300USTI | User Manual - Page 37
Advanced Feature Press the Menu button to open the OSD menu. Press ◄► to move to the Image menu. Press ▼▲ to move to the Advanced menu and then press OK or ►. Press ▼▲ to move up and down in the Advanced menu. ITEM DESCRIPTION Color Space Color Temperature Color Manager Press the cursor ◄► - Canon LV-WX300USTI | User Manual - Page 38
Color Manager Press OK / ► to enter the Color Manager sub menu. ITEM Red Green Blue Cyan Magenta Yellow White DESCRIPTION Select to enter the Red Color Manager. Press the ◄► buttons to adjust the Hue, Saturation, and Gain. Select to enter the Green Color Manager. Press the ◄► buttons to adjust the - Canon LV-WX300USTI | User Manual - Page 39
Computer Menu Press the MENU button to open the OSD menu. Press the cursor ◄► button to move to the Computer menu. Press the cursor ▲▼ button to move up and down in the computer menu. Press ◄► to change values for settings. ITEM DESCRIPTION Horizontal Position Press the cursor ◄► button to adjust - Canon LV-WX300USTI | User Manual - Page 40
Video Menu Press the MENU button to open the OSD menu. Press the cursor ◄► button to move to the Video menu. Press the cursor ▲▼ button to move up and down in the Video menu. Press ◄► to change values for settings. ITEM Video AGC Video Saturation Video Tint Film Mode Video Overscan Closed - Canon LV-WX300USTI | User Manual - Page 41
Audio Press OK / ► to enter the Audio sub menu. ITEM Volume Mute DESCRIPTION Press the ◄► buttons to enter and adjust the audio volume. Press the ◄► buttons to enter and turn on or off the speaker. - 35- - Canon LV-WX300USTI | User Manual - Page 42
from four Image Flip H/V methods: Press the cursor ◄► button to adjust the video aspect ratio. Press◄► button to select different test pattern for projector installation check. Press the cursor ◄► button to adjust the display keystone. Press OK / ► to the Advanced menu. See Advanced Feature on - Canon LV-WX300USTI | User Manual - Page 43
Advanced Feature Press the Menu button to open the OSD menu. Press ◄► to move to the Installation I menu. Press ▲▼ to move to the Advanced menu and then press OK or ►. Press ▲▼ to move up and down in the Advanced menu. Press ◄► to - Canon LV-WX300USTI | User Manual - Page 44
Menu Press the MENU button to open the OSD menu. Press the cursor ◄► button to move to the Installation II menu. Press the cursor ▲▼ button to move up and down in the Installation II menu. ITEM Auto Search Auto Power Off (min.) Direct Power On Fan Mode Lamp Mode Advanced Factory Reset - Canon LV-WX300USTI | User Manual - Page 45
◄► to move to the Installation II menu. Press ▲▼ to values for setting. ITEM DESCRIPTION OSD Menu Setting Peripheral Test Reset Lamp Time Low Power Mode 3D RS232 Network setting select RS232 (remote) or Network (LAN) mode depending on projector connection method. Press OK / ► to enter the Network - Canon LV-WX300USTI | User Manual - Page 46
Press ◄► button to select OSD background translucent level. Press ◄► button to select OSD timeout delay. Peripheral Test ITEM Remote Control Test Color Test USB Test DESCRIPTION Press OK / ► to test the IR remote controller for diagnostic. Press OK / ► to select different colors on screen. Press - Canon LV-WX300USTI | User Manual - Page 47
Reset Lamp Time Please refer to Resetting the Lamp on page 54 to reset the lamp hour counter. 3D ITEM 3D 3D Sync Invert 3D Format DESCRIPTION Press ◄► to select Off, DLP-Link or IR. Press ◄► to turn 3D Sync Invert On or Off. Press ◄► to enable or disable 3D Format. - 41- - Canon LV-WX300USTI | User Manual - Page 48
Network Setting ITEM Network State DHCP IP Address Subnet Mask Gateway DNS Apply DESCRIPTION Displays the network connection status. Press ◄► to turn DHCP On or Off. Note: If you select DHCP Off, complete the IP Address, Subnet Mask, Gateway, and DNS fields. Enter a valid IP address if DHCP is - Canon LV-WX300USTI | User Manual - Page 49
of Extron Electronics, Inc. of the United States. * AMX is a registered trademark of AMX LLC of the United States. Supported External Devices This projector is supported by the specified commands of the Crestron Electronics controller and related software (ex, RoomView ® ). http://www.crestron.com - Canon LV-WX300USTI | User Manual - Page 50
LAN RJ45 1. Connect an RJ45 cable to RJ45 ports on the projector and the PC (Laptop). 2. On the PC (Laptop), select Start → Control Panel → Network and Internet. - 44- - Canon LV-WX300USTI | User Manual - Page 51
3. Right-click on Local Area Connection, and select Properties. 4. In the Properties window, select the Networking tab, and select Internet Protocol (TCP/IP). 5. Click Properties. - 45- - Canon LV-WX300USTI | User Manual - Page 52
the following IP address and fill in the IP address and Subnet mask, then click OK. 7. Press the Menu button on the projector. 8. Select Installation II → Advanced → Network Setting → Network State → Connect 9. After getting into Network Setting, input the following: DHCP: Off IP Address: 10. 10 - Canon LV-WX300USTI | User Manual - Page 53
Network Configuration User Password Admin Password IP Address IP ID Port Projector Name Location Assigned To DHCP (Enabled) IP Address Subnet Mask Default Gateway DNS Server Enabled New Password Confirm Enabled New Password Confirm 15 3 5 10 10 - Canon LV-WX300USTI | User Manual - Page 54
way, so called "RS232 by TELNET" for LAN/RJ45 interface. Quick Start-Guide for "RS232 by TELNET" Check and get the IP-Address on OSD of the projector. Make sure that laptop/PC can access the web-page of the projector. Make sure that "Windows Firewall" setting to be disabled in case of - Canon LV-WX300USTI | User Manual - Page 55
("Enter" key pressed) (ttt.xxx.yyy.zzz: IP-Address of the projector) If Telnet-Connection ready, and user can have RS232 command input, then be workable. How to have TELNET enabled in Windows VISTA / 7 By default installation for Windows VISTA, "TELNET" function is not included. But end-user can have - Canon LV-WX300USTI | User Manual - Page 56
Telnet utility directly after TELNET connection ready 5. Limitation 1 for Telnet-Control: there is only one connection for Telnet-Control in one projector Limitation 2 for Telnet-Control: there is less than 50 bytes for successive network payload for Telnet-Control application. Limitation 3 for - Canon LV-WX300USTI | User Manual - Page 57
the menu items to the factory default values (except Language and Security Lock). Status Press the cursor ▲▼ button to move up and down in the Installation II menu. Select the Status sub menu and press OK / ► to enter the Status sub menu. ITEM DESCRIPTION Active Source Video Information Lamp Time - Canon LV-WX300USTI | User Manual - Page 58
parts No.LV-LP41 Warning: If illumination suddenly stops, either when you turn the projector on or after it has been on for a while, the lamp may have ruptured. In this case, never attempt to replace the lamp by yourself. Always request service from the Canon Customer Support Center. Additionally - Canon LV-WX300USTI | User Manual - Page 59
securing the lamp. 4. Lift the module handle up. 5. Pull firmly on the module handle to remove the lamp. 6. Reverse steps 1 to 5 to install the new lamp. While installing, align the lamp module with the connector and ensure it is level to avoid damage. Note: The lamp must sit securely in place and - Canon LV-WX300USTI | User Manual - Page 60
hour counter to zero. Refer to the following: 1. Press the MENU button to open the OSD menu. 2. Press the cursor ◄► button to move to the Installation II menu. Press the cursor button to move down to Advanced. 3. Press the cursor ▼▲ button to move down to Reset Lamp Time. 4. Press the cursor - Canon LV-WX300USTI | User Manual - Page 61
to remove dust and grime will help ensure trouble-free operation. Cleaning the Projector Mirror: When cleaning the projector's lens, use a commonly available air blower or lens cleaning paper. The lens surface is easily damaged, so do not use a hard cloth or tissues. Caution: 1. - Canon LV-WX300USTI | User Manual - Page 62
Using the Physical Lock Using the Kensington® Lock If you are concerned about security, attach the projector to a permanent object with the Kensington slot and a security cable. Note: Contact your vendor for details on purchasing a suitable Kensington security cable. Using the Security - Canon LV-WX300USTI | User Manual - Page 63
parts. For example, if you replace batteries and the problem remains, put the original batteries back and go to the next step. Keep a record of the steps you take when troubleshooting: The information may be useful when calling for technical support or for passing on to service personnel. - 57- - Canon LV-WX300USTI | User Manual - Page 64
AC power cord and wait for one (1) minute before restarting the projector. If the Power or Lamp LEDs are still blinking or any other situation that isn't listed in the chart above, please contact your service center. Image Problems Problem: No image appears on the screen 1. Verify the settings on - Canon LV-WX300USTI | User Manual - Page 65
5. Have the projector serviced. Problem: The sound is distorted 1. Check the audio cable connection. 2. Test the source audio output with other speakers. 3. Have the projector serviced. Having the Projector Serviced If you are unable to solve the problem, you should have the projector serviced. Pack - Canon LV-WX300USTI | User Manual - Page 66
device Type Display Size / Aspect ratio LV-WX300UST / LV-WX300USTi 1 chip DLP system Time division color extraction, sequential display DMD x1 0.65 type / 16:10 device Number dots (=Total number dots) Projection lens Operation 1,024,000 Zoom: fixed, focus: manual Projectio n lens Focal length - Canon LV-WX300USTI | User Manual - Page 67
Distance vs. Projection Size Installation Distance and Size Table Diagonal Distance Image Width Image height H 80" 282.3+/-20mm 1723mm 1077mm 280+/-50mm WXGA 16:10 87" 340.3+/-20mm 97" 421.4+/- - Canon LV-WX300USTI | User Manual - Page 68
can display several resolutions. The following table outlines the resolutions that can be displayed by the projector. SIGNAL RESOLUTION HORIZONTAL VERTICAL FREQUENCY FREQUENCY COMPOSITE (KHZ) (HZ) NTSC - 15.734 60.0 O PAL/SECAM - 15.625 50.0 O 720 x 400 37.9 85.04 - 640 - Canon LV-WX300USTI | User Manual - Page 69
-3D and 3D signal with Frame Sequential format It means the timing can support non-3D and 3D signal with Top-Bottom format It means the timing can support 3D signal with Frame Packing format. There 3D timing showing depend the EDID file and display card. It is possible that user cannot - Canon LV-WX300USTI | User Manual - Page 70
Projector Dimensions(LV-WX300UST) - 64- - Canon LV-WX300USTI | User Manual - Page 71
122.6mm 374.5mm Projector Dimensions(LV-WX300USTi) - 65- - Canon LV-WX300USTI | User Manual - Page 72
the Header code, command code, data code and end code. Most of the commands are structured except some for the compatibility issue with other projectors. HEX ASCII Header code 7Eh '~' Command code Data code Command Data Command Data End code 0Dh CR Command transfer using RS232(remote) and - Canon LV-WX300USTI | User Manual - Page 73
Remote Command The remote commands simulate the code send from IR remote handset. Button's name UP arrow DOWN arrow LEFT arrow RIGHT arrow POWER EXIT INPUT AUTO KEYSTONE+ KEYSTONEMENU STATUS MUTE ZOOM+ ZOOMBLANK FREEZE VOLUME+ VOLUMEEnter ASCII ~ r U CR ~ r D CR ~ r L CR ~ r R CR ~ r P CR ~ r E - Canon LV-WX300USTI | User Manual - Page 74
Query Command ITEM Software Version Power State Input Select Lamp Hours Brightness Contrast Color (Video) Tint (Video) Scaling Color Temperature Projection Mode Sharpness Volume Freeze Status Mute Status Blank Status ASCII ~ q V CR ~ q P CR ~ q S CR ~ q L CR ~ q B CR ~ q C CR ~ q R CR ~ q N CR ~ q - Canon LV-WX300USTI | User Manual - Page 75
, Melville, New York 11747, U.S.A. For all inquires concerning this product, call toll free in the U.S. 1-800-OK-CANON CANADA CANON CANADA INC. HEADQUARTERS 6390 Dixie Road, Mississauga, Ontario L5T 1P7, Canada CANON CANADA INC. MONTREAL BRANCH 5990, Côte-de-Liesse, Montréal Québec H4T 1V7, Canada
-
 1
1 -
 2
2 -
 3
3 -
 4
4 -
 5
5 -
 6
6 -
 7
7 -
8
-
9
-
10
-
11
-
12
-
13
-
14
-
15
-
16
-
17
-
18
-
19
-
20
-
21
-
22
-
23
-
24
-
25
-
26
-
27
-
28
-
29
-
30
-
31
-
32
-
33
-
34
-
35
-
36
-
37
-
38
-
39
-
40
-
41
-
42
-
43
-
44
-
45
-
46
-
47
-
48
-
49
-
50
-
51
-
52
-
53
-
54
-
55
-
56
-
57
-
58
-
59
-
60
-
61
-
62
-
63
-
64
-
65
-
66
-
67
-
68
-
69
-
70
-
71
-
72
-
73
-
74
-
75
 |
 |

ENGLISH
MULTIMEDIA PROJECTOR
User’s Manual