Canon MultiPASS C560 Quick Start Guide - Page 5
Install, MultiPASS, Software
 |
View all Canon MultiPASS C560 manuals
Add to My Manuals
Save this manual to your list of manuals |
Page 5 highlights
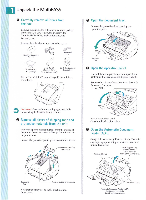
Install the MultiPASS Software Your MultiPASS comes with a Setup program that makes installing the MultiPASS software easy and fast. You install the MultiPASS software from the Canon Creative for MultiPASS CD-ROM. Important! The MultiPASS must be plugged in and connected to your computer. If you have a previous version of the MultiPASS Desktop Manager installed, you must remove it. See your online MultiPASS Desktop Manager Software Guide for details. Windows® NT Users: Administrator Privileges are required to install and remove the MultiPASS Desktop Manager software. Note Stand-alone Fax Users: If you plan to use the MultiPASS as a stand-alone fax machine, see the online Stand-alone Fax Manual for instructions on how to program your name and fax number. Then select your Receive mode based on how you set up your phone connection in Step IEL Start up your system in this order: 1. Make sure your computer is turned off. 2. Be sure the MultiPASS is plugged in and connected to the computer. 3. Make sure the Canon Creative CD is NOT yet inserted in your CD drive. 4. Now turn on the computer. 5. If any Windows applications start automatically, close them before you start installation. This is very important. Make sure NO programs are running, including any virus protection program. Make sure Windows starts. Click Cancel if you see a screen similar to these: "New Hardware Found", "Update Device Driver Wizard", or "Add New Hardware Wizard". Make sure you return to the Windows 98, Windows 95, or Windows NT 4.0 desktop. When you see the Windows desktop, follow these steps. Insert the Canon Creative CD into your CD drive. (This CD contains all the device software for your MultiPASS, including the MultiPASS Printer and Fax drivers, MultiPASS ODBC, and ScanGearTh for MultiPASS.) Setup starts automatically. / If Setup does not start automatically, from the Note taskbar, click Start and then Run. You see the Run screen. 2. Follow the on-screen instructions to finish installation. • Be sure to wait for Windows to complete each operation. Some operations may take awhile; if you hear your computer working, wait for it to finish. • Normally you click Next or Finish to move from one screen to the next. • Be sure to read each screen carefully. When specifying your fax information, you must enter a fax heading and specify a Receive mode. Select your Receive mode based on how you set up your phone connection in Step Ei. • Be sure to complete Printer Driver Installation, Product Registration, and Canon Creative Installation. When installation is complete, the Setup program determines whether or not your computer needs to be restarted. The next time you start your e Nootte computer, you may see the "New Hardware Found" screen. Wait a few seconds while the system updates itself; the screen will disappear. Rue 000 ot polprr FIo ht,i1 If anything is displayed in the Open box, replace it - by typing X:\SETUP (where X: is your CD drive). Then click OK. The next time you start your system, double-click on the Canon Creative Launcher icon on your desktop. From here you can install the Canon Creative software, run the software programs after they are installed, register the Multi PASS, view the online manuals, and find out how to order supplies and get help from Canon.
-
 1
1 -
 2
2 -
 3
3 -
 4
4 -
 5
5 -
 6
6 -
 7
7 -
 8
8
 |
 |
