Canon PIXMA MG5721 Getting Started Guide - Page 1
Canon PIXMA MG5721 Manual
 |
View all Canon PIXMA MG5721 manuals
Add to My Manuals
Save this manual to your list of manuals |
Page 1 highlights
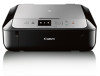
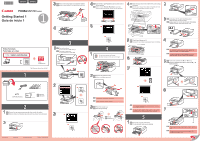
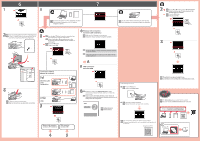
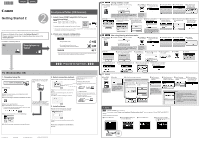
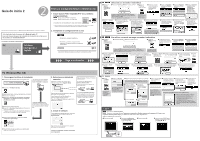
ENGLISH ESPAÑOL Getting Started 1 Guía de inicio 1 1 3 EN Remove the orange tape and protective material. ES Retire la cinta naranja y el material de protección. 4 EN Use the left or right Function button to select one of the two options. ES Utilice el botón Función (Function) izquierdo o derecho para seleccionar una de las dos opciones. 4 EN Insert and push down the ink tank firmly until it snaps into place. 2 ES Introduzca y empuje hacia abajo el depósito de tinta firmemente hasta que encaje en su sitio. a b 4 5 a 3 EN Load paper with the print side facing down. Letter size paper can also be loaded. ES Cargue papel con el lado de impresión hacia abajo. También se puede cargar papel tamaño Carta. a b Video Tutorials Tutoriales en vídeo 3 1 EN Turn on the printer. Do not connect a USB cable yet. ES Encienda la impresora. No conecte aún un cable USB. Setup Configuración RMC (Regulatory Model Code): K10426 1 Back Parte posterior a b b 4 1 EN Do not touch this part until it stops! ES ¡No toque esta pieza hasta que se detenga! a b 2 EN Remove the protective wrap. ES Retire el envoltorio protector. 5 EN Check that all lamps are lit. 4 ES Compruebe que todas las lámparas están encendidas. 6b a 7 EN Do not press the paper guide too tightly against the edge of the paper, or the paper may jam. ES No presione la guía del papel demasiado contra el borde del papel, ya que el papel puede atascarse. 5 EN Push in the cassette until ] and [ line up. ES Empuje el cassette hacia dentro hasta que ] y [ estén alineados. CD-ROM (Windows) 2 EN Manuals ES Manuales 2 1 EN Remove the tape and packing materials from outside the printer. ES Retire la cinta y los materiales de protección del exterior de la impresora. 3 2 a b a b QT6-0650-V01 XXXXXXXX © CANON INC. 2015 PRINTED IN XXXXXXXX b b EN Remove the orange tape completely. ES Retire totalmente la cinta naranja. 3 EN Pull off the orange cap. ES Quite la tapa naranja. a EN Slowly. ES Lentamente. a b a b EN If an error message appears, make sure the ink tanks are installed correctly. ES Si aparece un mensaje de error, asegúrese de que los depósitos de tinta están instalados correctamente. 5 1 EN Pull out the cassette until it stops. ES Tire del cassette hasta que se detenga. 6 a b 7 a (A) b EN Printing with the paper output tray (A) closed, causes an error. ES Si imprime con la bandeja de salida del papel (A) cerrada, provocará un error.
-
 1
1 -
 2
2 -
 3
3 -
 4
4
 |
 |