Canon PIXMA MP240 Getting Started - Page 4
Tire de la cinta protectora naranja D y retire el material protector E.
 |
View all Canon PIXMA MP240 manuals
Add to My Manuals
Save this manual to your list of manuals |
Page 4 highlights
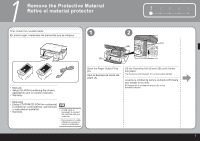
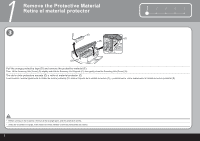
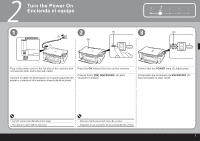
1 Remove the Protective Material Retire el material protector 3 (E) (B) 12345 (C) (D) Pull the orange protective tape (D) and remove the protective material (E). Then, lift the Scanning Unit (Cover) (B) slightly and fold the Scanning Unit Support (C), then gently close the Scanning Unit (Cover) (B). Tire de la cinta protectora naranja (D) y retire el material protector (E). A continuación, levante ligeramente la Unidad de lectura (cubierta) (B), doble el Soporte de la unidad de lectura (C) y, posteriormente, cierre suavemente la Unidad de lectura (cubierta) (B). • Before turning on the machine, remove all the orange tapes and the protective sheets. • Antes de encender el equipo, retire todas las cintas naranja y láminas protectoras del mismo. 2
-
 1
1 -
 2
2 -
 3
3 -
 4
4 -
 5
5 -
 6
6 -
 7
7 -
 8
8 -
 9
9 -
 10
10 -
11
-
12
-
13
-
14
-
15
-
16
-
17
-
18
-
19
-
20
-
21
-
22
-
23
-
24
-
25
-
26
-
27
-
28
-
29
-
30
-
31
-
32
-
33
-
34
-
35
-
36
 |
 |
