Canon PIXMA MP500 MP500 Easy Setup Instructions - Page 2
Install the software. - driver mac
 |
View all Canon PIXMA MP500 manuals
Add to My Manuals
Save this manual to your list of manuals |
Page 2 highlights
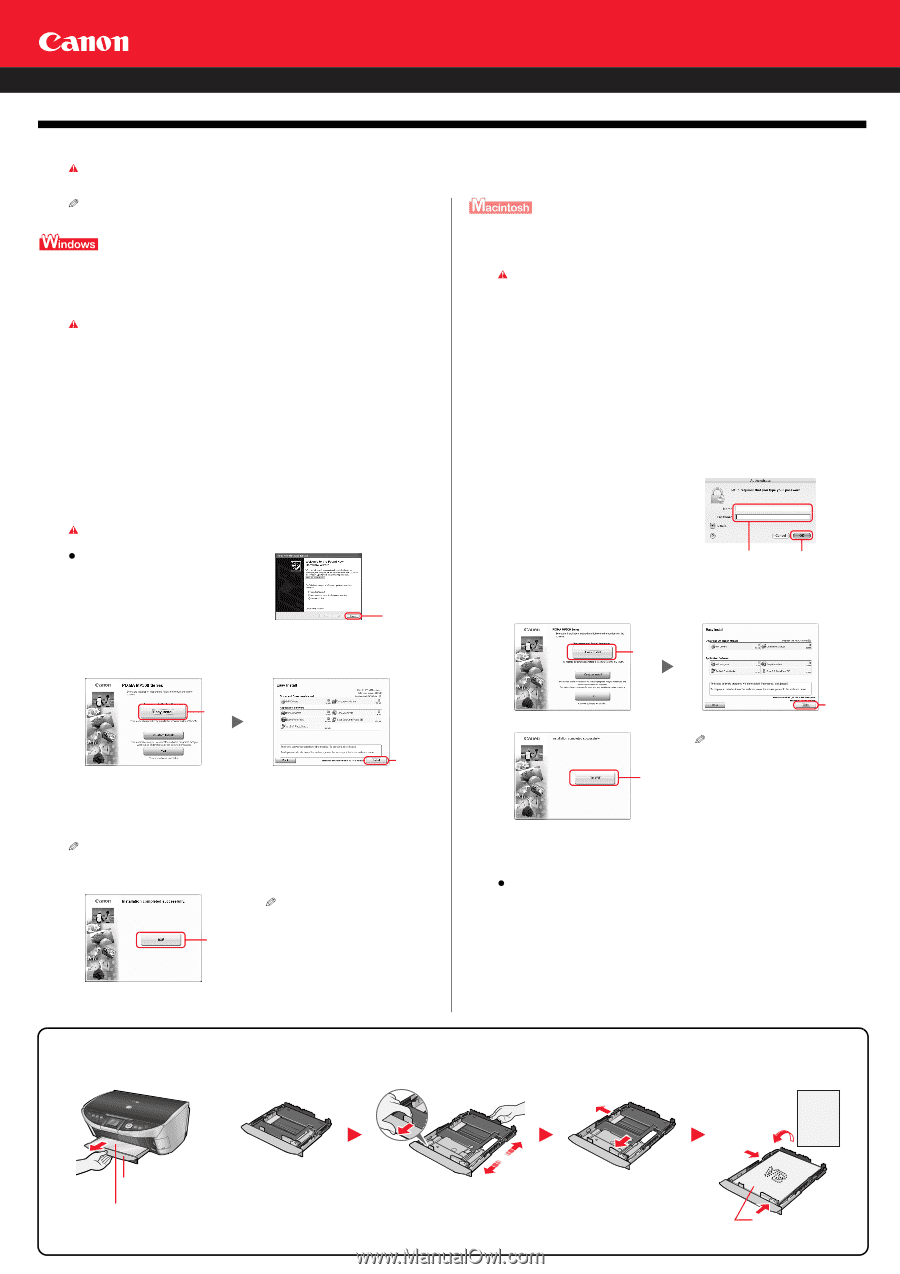
Install the software. Select Easy Install in order to install the application software, On-screen Manual and MP drivers. Select Custom Install in order to choose the options you would like to install. This sheet explains Easy Install Only. IMPORTANT Temporarily close any open applications, including anti-virus software. Computer security programs can be re-started after software installation. • A printer cable is not included. You must purchase a USB cable (less than 10 ft./3 m) to connect your machine to a computer. The following software programs are included on the Setup CD-ROM: MP Drivers Easy-WebPrint ArcSoft PhotoStudio On-screen Manual Easy-PhotoPrint MP Navigator ScanSoft OmniPage SE IMPORTANT • Do not connect the USB cable until Step 3, "Connect the USB cable." • You must log on as an administrator or have administrative privileges in order to install the software in Windows® XP or Windows 2000. • If you have an earlier version of the MultiPASS Suite software installed on your computer, uninstall this version before installing the new version. For instructions on uninstallation, see the guides for that version of MultiPASS Suite. Step 1: Prepare the Setup CD-ROM and get ready to install. 1 Turn off the machine. 1. Press the [ON/OFF]. 2. Be sure [COPY] stops flashing and all the lamps on the Operation Panel are off. 2 Turn ON your computer, and start Windows. 3 Insert the Setup CD-ROM into the CD-ROM drive. • The setup program should run automatically. If the installer in the CD-ROM does not run automatically, click [Start] and select [My Computer], then double-click the CD-ROM icon. IMPORTANT If the following screen appears, the USB cable is connected. z Perform the following steps. 1. Press [ON/OFF] to turn off the machine. 2. Disconnect the USB cable. 3. Click [Cancel]. Click Step 2: Install the software. 1 Click [Easy Install], then click [Install]. • To read descriptions of the software programs, set the mouse on the item. The following software programs are included on the Setup CD-ROM: MP Drivers Easy-PhotoPrint On-screen Manual ArcSoft PhotoStudio MP Navigator ScanSoft OmniPage SE IMPORTANT Do not connect the machine to Mac® OS 9 or Mac OS X Classic environments since they are not supported. Step 1: Connect the USB cable. • Make sure the machine is turned ON. Step 2: Prepare the Setup CD-ROM. 1 Turn ON your computer, and start Mac OS X. 2 Insert the Setup CD-ROM into the CD-ROM drive. • The setup program should automatically run. If the setup program does not automatically run, doubleclick [Setup] on the Setup CD-ROM, or click [Setup] on the Setup CD-ROM and click [File] menu and then select [Open]. Step 3: Enter the name and password for an Administrator Account. 1 Enter the name for Administrator. 2 Enter the password and then click [OK]. Enter Click Step 4: Install the software. 1 Click [Easy Install], then click [Install]. • To read descriptions of the software programs, set the mouse on the item. Click Click Click Step 3: Connect the USB cable. 1 When the [Printer Connection] appears, connect the machine to the computer with the USB cable. 2 Turn on the machine. • In Windows 2000, the machine may not be set as the default printer. 3 Click [Exit]. If prompted to, restart your computer. Click US Only When the Registration Screen appears, follow on screen instructions to register your product. You will need you product serial number, which is located on the inside of the machine. Refer to "2 Install the Print Head." You now have completed installation of the software. Click 2 Click [Restart] to restart your computer. Click US Only When the Registration Screen appears, follow on screen instructions to register your product. You will need you product serial number, which is located on the inside of the machine. Refer to "2 Install the Print Head." * When connecting from Mac OS X v.10.3.3 or earlier: Restarting the computer while connected to the machine may cause the machine not to be detected. To resolve this, either unplug the USB cable then plug it back in again, or turn the machine OFF then back ON again. z Perform the following to make sure the driver has been installed correctly. 1. Select [Applications] from the [Go] menu. 2. Double-click the [Utilities] folder, then the [Printer Setup Utility] ([Print Center] when using Mac OS X v.10.2.x) icon. If the printer is displayed in the [Printer List], the printer driver is installed. If the printer is not displayed in the [Printer List], click [Add] in the [Printer List] and select [USB] from the pop-up menu. Select [MP500] from the [Product] list and click [Add]. You now have completed installation of the software. Cassette Loading You can load paper in both the Auto Sheet Feeder and Cassette. 1 Prepare to load paper. 2 Adjust the size of the Cassette. When loading A5- or larger sized paper, adjust the size of the Cassette. AB A5 4" x 6" (101.6 x 152.4) (1) Pull out the Cassette from the 5" x 7" (127 x 177.8) bottom of the machine. Credit-card-size (2) Remove the Cover of the Cassette. A4 8.5" x 11" (Letter) B5 Load the paper into the Cassette with the print side facing DOWN.
-
 1
1 -
 2
2
 |
 |