Canon PIXMA MP750 PIXMA MP750/780 Quick Start Guide - Page 21
Document Output Slot, Paper Output Tray
 |
View all Canon PIXMA MP750 manuals
Add to My Manuals
Save this manual to your list of manuals |
Page 21 highlights
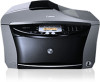
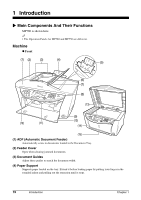
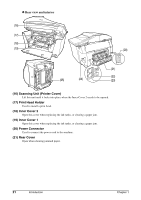
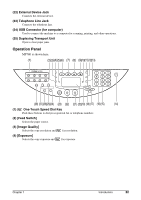
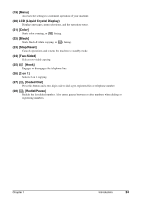
(5) Auto Sheet Feeder Load paper here with the side to print onto facing up. Automatically feeds one sheet at a time from the Paper Support. (6) Document Tray Open to load a document. Once loaded, the document is fed one page at a time. Load the document with the side you want to scan facing up. (7) Document Output Slot Documents scanned from the Document Tray are delivered here. (8) Document Cover Covers the Platen Glass. Open this cover when loading a document on the Platen Glass. (9) Direct Print Port (for digital camera) Used to connect a PictBridge- or Canon Bubble Jet Direct-compatible digital camera or digital video camcorder to the machine when printing images directly from the camera. For details, see page 33. (10) Paper Output Tray Printouts are output to this tray. Open the tray before you start copying or printing, by pressing the Open Button. If closed, the tray will automatically open when the machine starts to copy or print. When not being used, keep it closed in the machine. (11) Scanning Unit Lever Pull forward to open the Scanning Unit. (12) Operation Panel Displays the operating status of the machine. It is also used to change or check the settings of each function. For details, see page 22. (13) Platen Glass Used to load a document to be processed. (14) Open Button Press this button to open the Paper Output Tray accommodated in the machine. (15) Cassette Load paper here with the side to print onto facing down. Chapter 1 Introduction 20
-
 1
1 -
2
-
3
-
4
-
5
-
6
-
7
-
8
-
9
-
10
-
11
-
12
-
13
-
14
-
15
-
 16
16 -
 17
17 -
 18
18 -
 19
19 -
 20
20 -
 21
21 -
 22
22 -
 23
23 -
 24
24 -
 25
25 -
 26
26 -
27
-
28
-
29
-
30
-
31
-
32
-
33
-
34
-
35
-
36
-
37
-
38
-
39
-
40
-
41
-
42
-
43
-
44
-
45
-
46
-
47
-
48
-
49
 |
 |