Canon PIXMA MP750 PIXMA MP750/780 Easy Setup Instructions - Page 1
Canon PIXMA MP750 Manual
 |
View all Canon PIXMA MP750 manuals
Add to My Manuals
Save this manual to your list of manuals |
Page 1 highlights
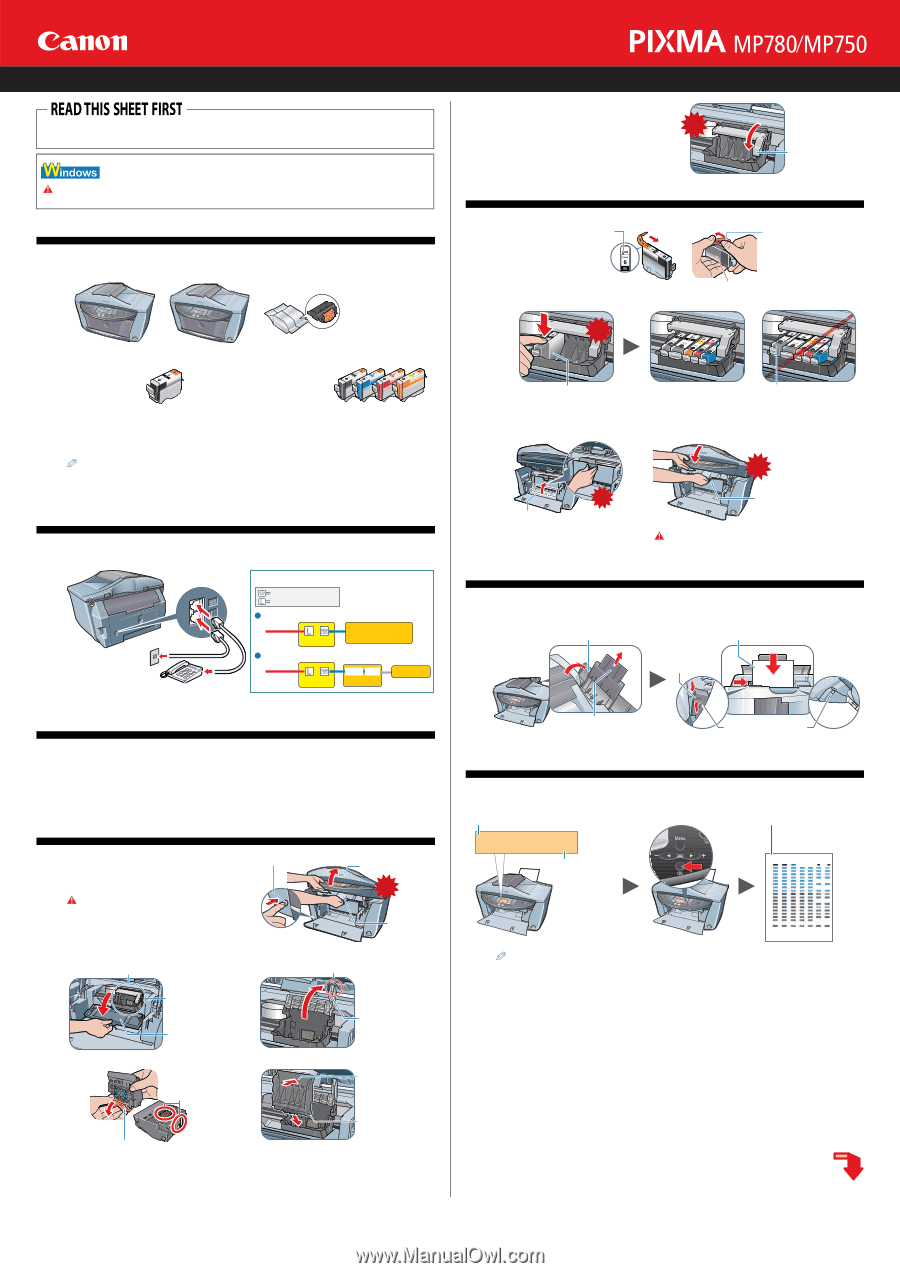
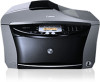
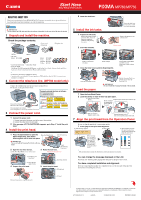
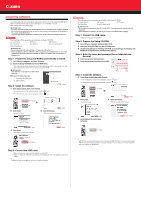
Start Here Easy Setup Instructions Thank you for purchasing the Canon PIXMA MP780/750. To prepare your machine for use, please follow these Easy Setup Instructions before referring to any other documentation. IMPORTANT Do not connect the USB cable until after the software is installed. See the rear side of this sheet for details. 1 Unpack and install the machine. Check the package contents. • Machine • Power cord • Print head • Telephone line MP780 MP750 • Ink tanks Black BCI-3eBK Black BCI-6BK Cyan BCI-6C Magenta BCI-6M Yellow BCI-6Y • Easy Setup Instructions • Quick Start Guide • Setup CD-ROM The Setup CD-ROM contains the MP Drivers, as well as the User's Guide, Software Guide and Photo Application Guide in electronic format. Please read these guides. • In this sheet, illustrations of MP780 are shown. • A printer cable is not included. You must purchase a USB cable (less than 16 3/8 ft.) to connect your machine to a computer. 2 Connect the telephone line. (MP780 model only) Connect the telephone line and any necessary external device. For details, see the Quick Start Guide. Connect external devices as follows: External device jack Telephone line jack Telephone or answering machine Telephone line Machine Telephone or answering machine Connect the telephone Built-in computer modem and telephone line cord to the wall jack. You can connect an external Telephone Machine line LINE TEL Computer Telephone device (telephone or answering machine) if necessary. 3 Connect the power cord. 1 Connect the power cord. 1. Connect one end of the power cord to the rear of the machine. 2. Connect the other end to the AC outlet. 2 If the message appears, go to Step 4, "Install the print head." 4 Install the print head. 1 Press the Open Button to open the Press the Open Button. Paper Output Tray. Then lift the Scanning Unit until it locks into place. Lift the Scanning Unit. Click IMPORTANT Be sure to hold the Scanning Unit firmly with one hand. 2 Open the two Inner Covers. 3 (2) The Print Head Holder moves to the center. Raise the lock lever. Pull the Scanning Unit Lever. Touch only the lock lever! (3) Install the print head here. (1) Open the two Inner Covers. 4 Prepare the print head. Do not touch! Remove the protective cap and discard it. Raise this securely. 5 Insert the print head. (2) Push back. (1) Insert. 6 Lower the lock lever. 5 Install the ink tanks. 1 Prepare the ink tanks. Remove the orange-colored protective film. If it is not removed completely, problems with printing may occur. 2 Insert the ink tanks. Click Click Lower the lock lever until you hear a click as it locks into place. Remove the protective cap and discard it. Do not touch! Push it in until locks into place. Good example 3 Close the Inner Covers and the Scanning Unit. Bad example: Tank 6BK is not fully inserted. Make sure to press it down firmly. Click Click Close the two Inner Covers. 6 Load the paper. Pull the Scanning Unit Lever towards you to close the Scanning Unit. IMPORTANT Be sure to hold the Scanning Unit firmly with one hand. 1 Open the Auto Sheet Feeder. 2 Load two sheets or more of letter-size plain paper. (1) Open the Auto Sheet Feeder. Load the paper with the print side face up. Pinch and adjust the paper guide to the width of the stack. (2) Pull out the Paper Support until it stops. Ensure the paper stack does not exceed the paper limit mark. 7 Align the print head from the Operation Panel. Be sure to align the print head to ensure print quality. 1 Press [OK] to start print head alignment. (1) This message appears. (2) Press [OK]. ALIGN PRINT HEAD PRESS [OK] If this message does not appear after closing the Scanning Unit, see "Aligning The Print Head Automatically" in the Quick Start Guide. (3) The machine will print the print head position pattern and automatically align the print head. If the printed pattern matches the illustration, print head alignment is complete. You can change the language displayed on the LCD. For details, see "Selecting The Language For The LCD" in the Quick Start Guide. You have completed installation and alignment. If you are connecting the machine to a computer for use, see the rear side of this sheet for instructions on installing the software. © 2004 Canon U.S.A., Inc., Canon and BCI are registered trademarks and PIXMA is a trademark of Canon Inc. All other products and brand names are registered trademarks or trademarks of their respective owners. Specifications subject to change without notice. HT7-0029-000-V.1.0 xx2004A © CANON INC. 2004 PRINTED IN CHINA
-
 1
1 -
 2
2
 |
 |