Canon PIXMA MP750 PIXMA MP750/780 Easy Setup Instructions - Page 2
Install the software. - driver
 |
View all Canon PIXMA MP750 manuals
Add to My Manuals
Save this manual to your list of manuals |
Page 2 highlights
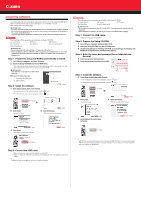
Install the software. Select Easy Install in order to install the application software, electronic manual and MP drivers. Select Custom Install in order to choose the options you would like to install. This sheet explains Easy Install Only. IMPORTANT • If you have an earlier version of the MultiPASS Suite software installed on your computer, uninstall this version before installing the new version. For instructions on uninstallation, see the guides for that version of MultiPASS Suite. • Close any open software applications, including virus checkers, prior to installing the software. The following software programs are included on the Setup CD-ROM: On-screen Manual MP Drivers MP Navigator Easy-PhotoPrint Easy-WebPrint ScanSoft OmniPage SE Presto! PageManager IMPORTANT • Do not connect the USB cable until Step 3, "Connect the USB cable." • Before installing the software in Windows 2000, you must log on as Administrator or a user with Administrator privileges, and before installing the software in Windows XP, you must log on as Administrator. Step 1: Prepare the Setup CD-ROM and Get Ready to Install. 1 Turn ON your computer, and start Windows. 2 Insert the Setup CD-ROM into the CD-ROM drive. • The setup program should automatically run. If the setup program does not automatically run, click [My Computer], then double-click [setup] on the Setup CD-ROM. IMPORTANT If the following screen appears, the USB cable is connected. z Perform the following steps. 1. Disconnect the USB cable. 2. Click [Cancel]. Step 2: Install the software. 1 Click [Easy Install], then click [Install]. • To read descriptions of the software programs, click the • To read restrictions of the software programs, click the icon. icon. Click Click 2 Click [Yes]. • Installation begins. Click 3 Click [Continue]. • Follow the displayed instructions. Click 4 Click [Exit]. • If prompted to, restart your computer. Click The following software programs are included on the Setup CD-ROM: On-screen Manual MP Drivers MP Navigator Easy-PhotoPrint ScanSoft OmniPage SE IMPORTANT • Do not connect the machine to Mac OS 9 or Mac OS X Classic environments since they are not supported. • Before installing the software, you must log on as a user with Administrator privileges. Step 1: Connect the USB cable. • Make sure the machine is turned ON. Step 2: Prepare the Setup CD-ROM. 1 Turn ON your computer, and start Mac OS X. 2 Insert the Setup CD-ROM into the CD-ROM drive. 3 Double-click [Setup] on the Setup CD-ROM, or click [Setup] on the Setup CD- ROM and click [File] menu and then select [Open]. Step 3: Enter the name and password for an Administrator Account. 1 Enter the name for Administrator. 2 Enter the password and then click [OK]. Enter Click Step 4: Install the software. 1 Click [Easy Install], then click [Install]. • To read descriptions of the software programs, click the • To read restrictions of the software programs, click the icon. icon. Click 2 Click [Yes]. • Installation begins. Click 3 Click [Continue]. • Follow the displayed instructions. Click Click 4 Click [Restart] to restart your computer. Click Click Step 3: Connect the USB cable. • Make sure both your machine and the computer are turned ON. • When you connect the USB cable, the computer will automatically detect and configure any necessary settings. In Windows 2000, the machine may not be set as the default printer. [MP780 FAX] is shown in the Name list, but you cannot add [MP780 FAX]. You can fax the document with the current print settings applied to it using the computer's internal modem. You cannot send faxes from your computer via the machine.
-
 1
1 -
 2
2
 |
 |
