Canon PIXMA MX340 MX340 series Getting Started - Page 14
Open the Ink Cartridge Locking Cover, Remove the Black FINE Cartridge
 |
View all Canon PIXMA MX340 manuals
Add to My Manuals
Save this manual to your list of manuals |
Page 14 highlights
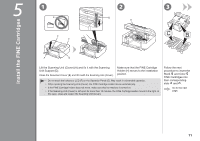
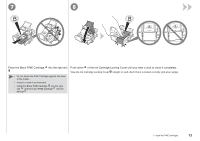
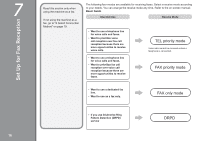
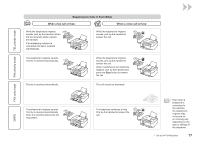
4 5 6 L K I J Open the Ink Cartridge Locking Cover on the right side. Pinch (I) firmly and pull up the cover. Remove the Black FINE Cartridge from its package. Pull the orange protective tape (J) in the direction of the arrow and remove it carefully. • Handle the FINE Cartridges carefully. Do not drop or apply excessive pressure to them. • Be sure to use the supplied FINE Cartridges. • Be careful not to stain your hands or surrounding work area with ink on the removed protective tape. • Do not touch the Electrical Contacts (K) or Print Head Nozzles (L) on a FINE Cartridge. The machine may not print properly if you touch them. 12 5 Install the FINE Cartridges
-
 1
1 -
2
-
3
-
4
-
5
-
6
-
7
-
8
-
 9
9 -
 10
10 -
 11
11 -
 12
12 -
 13
13 -
 14
14 -
 15
15 -
 16
16 -
 17
17 -
 18
18 -
 19
19 -
20
-
21
-
22
-
23
-
24
-
25
-
26
-
27
-
28
-
29
-
30
-
31
-
32
-
33
-
34
-
35
-
36
-
37
-
38
-
39
-
40
-
41
-
42
-
43
-
44
-
45
-
46
-
47
-
48
-
49
-
50
-
51
-
52
-
53
-
54
-
55
-
56
-
57
-
58
-
59
-
60
-
61
-
62
-
63
-
64
-
65
-
66
-
67
-
68
-
69
-
70
-
71
-
72
-
73
-
74
-
75
 |
 |
I
4
6
5
K
L
J
1±
5
Install the FINE Cartridges
Open the Ink Cartridge Locking Cover
on the right side.
Pinch (I) firmly and pull up the cover.
Remove the Black FINE Cartridge
from its package.
Pull the orange protective tape (J) in the direction
of the arrow and remove it carefully.
Handle the FINE Cartridges carefully. Do not drop or apply excessive pressure to them.
Be sure to use the supplied FINE Cartridges.
Be careful not to stain your hands or surrounding work area with ink on the removed protective
tape.
Do not touch the Electrical Contacts (K) or Print Head Nozzles (L) on a FINE Cartridge. The
machine may not print properly if you touch them.
•
•
•
•