Canon PIXMA SELPHY CP710 SELPHY CP710/CP510 User Guide - Page 33
Connecting to a Camera for Printing
 |
View all Canon PIXMA SELPHY CP710 manuals
Add to My Manuals
Save this manual to your list of manuals |
Page 33 highlights
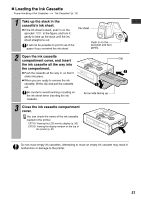
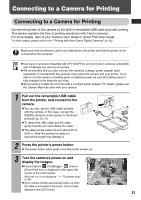
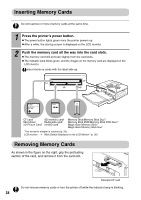
Connecting to a Camera for Printing Connecting to a Camera for Printing Connect the printer to the camera by the built-in retractable USB cable and start printing. This section explains the flow of printing operations with Canon cameras*. For more details, refer to your Camera User Guide or Direct Print User Guide. *In other cases, please refer to the "Printing with Non-Canon Digital Cameras" (p. 66). Make sure that the memory card is not inserted into the printer and that the printer is not connected to the computer. z Use Canon cameras compatible with CP710/CP510, and non-Canon cameras compatible with PictBridge can also be connected. z We recommend that you also connect the camera's compact power adapter (sold separately or included with the camera) when using the camera with your printer. If you wish to run the camera on battery pack or batteries power, be sure that battery pack is fully charged or the batteries are fresh. z Some camera models do not come with a compact power adapter. For details, please see the System Map that came with your camera. 1 Pull out the retractable USB cable from the printer, and connect to the camera. z You can also use the USB cable included with the camera. In this case, connect the DIGITAL terminal on the camera to the direct print port (p. 20, 21). z To retract the USB cable, pull the cable gently towards you and release the cable. z The cable can be pulled out up to about 25 cm (9.8 in.). Note that pulling the cable out beyond this length may damage it. 2 Press the printer's power button. z The power button lights green once the printer powers up. 3 Turn the camera's power on and display the images. z Check that the (PictBridge) / (Canon Direct Print) icon is displayed in the upper left corner of the LCD monitor. When the icon is not displayed "Troubleshooting" (p. 58) z Some camera models automatically power up when the cable is connected to the printer. The icon then displays on the LCD monitor. 31
-
 1
1 -
2
-
3
-
4
-
5
-
6
-
7
-
8
-
9
-
10
-
11
-
12
-
13
-
14
-
15
-
16
-
17
-
18
-
19
-
20
-
21
-
22
-
23
-
24
-
25
-
26
-
27
-
 28
28 -
 29
29 -
 30
30 -
 31
31 -
 32
32 -
 33
33 -
 34
34 -
 35
35 -
 36
36 -
 37
37 -
 38
38 -
39
-
40
-
41
-
42
-
43
-
44
-
45
-
46
-
47
-
48
-
49
-
50
-
51
-
52
-
53
-
54
-
55
-
56
-
57
-
58
-
59
-
60
-
61
-
62
-
63
-
64
-
65
-
66
-
67
-
68
-
69
 |
 |
