Canon PIXMA iP3000 iP3000 Easy Setup Instructions - Page 2
Macintosh, Printer Driver Installation and Print Head Alignment, Windows, Cassette Loading - software
 |
View all Canon PIXMA iP3000 manuals
Add to My Manuals
Save this manual to your list of manuals |
Page 2 highlights
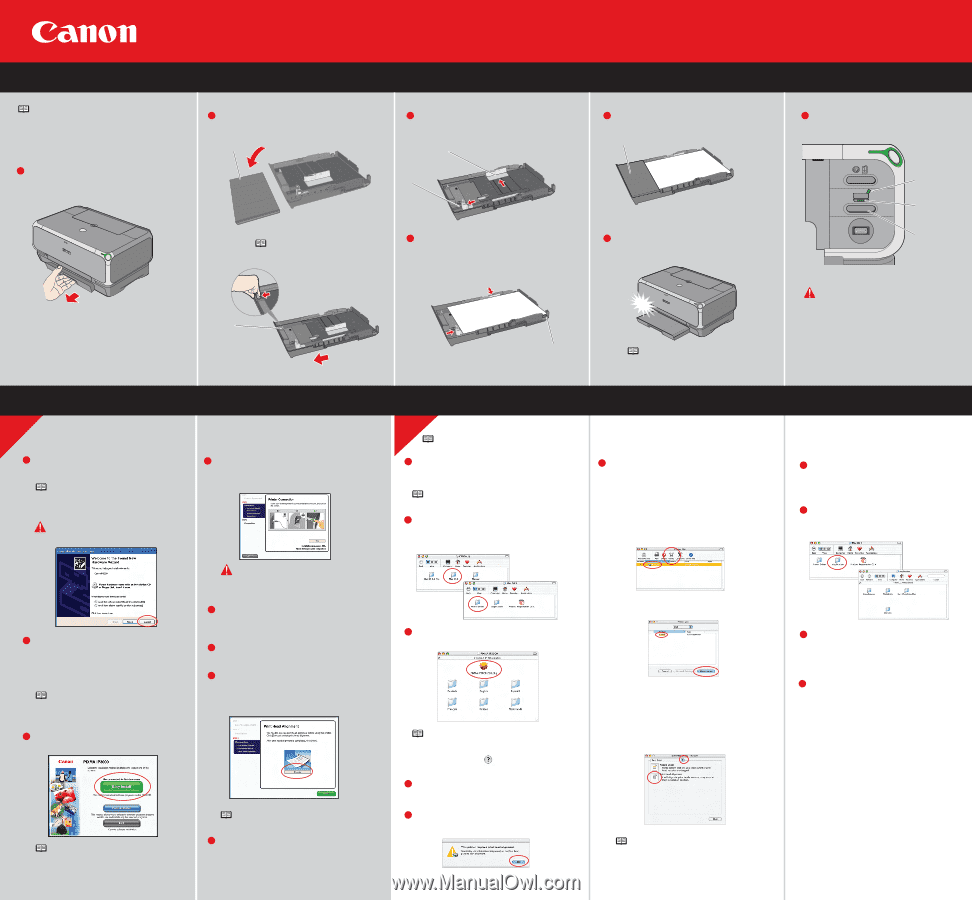
6 Cassette Loading NOTE: Loading paper in the cassette provides additional paper handling flexibility. For additional information visit the electronic User's Guide. 1 Pull out the cassette from the bottom of the printer. 2 Remove the top cover of the cassette. Top Cover 3 Slide the long edge paper guide to the left and the short edge paper guide toward you. Long Edge Guide Short Edge Guide 5 Replace the top cover of the cassette. Top Cover NOTE: For letter-size (8.5" x 11") paper, push the cassette release lever and extend the tray. 4 Load paper so that the top right corner touches the inside corner of the cassette. Adjust paper guides to the edges of paper. 6 Insert cassette completely into the printer until it clicks into place. Cassette Release Lever click Top Right Corner NOTE: For letter-size (8.5" x 11") paper, the front edge of the cassette will extend beyond the bottom of the printer. 7 Windows® Printer Driver Installation and Print Head Alignment Windows 1 Be sure to TURN THE PRINTER OFF before continuing. NOTE: For Windows® XP or Windows 2000, log on to Windows as a member of the Administrators group before continuing. IMPORTANT: If you see the Found New Hardware Wizard, click Cancel. 4 When the "Printer Connection" window appears, TURN THE PRINTER ON. The software will begin identifying the printer port being used. 7 Macintosh® Printer Driver Installation and Print Head Alignment Macintosh NOTE: For Mac OS 9.x printer driver instructions, refer to the "Appendix" of the Quick Start Guide. 1 Turn on your Mac and your printer and insert the "Setup Software & User's Guide" CD-ROM. NOTE: Log on as an Administrator before continuing. 6 Start the print head alignment procedure. a. Double-click the Macintosh HD icon, then Applications folder. Double-click the Utilities folder, then the Printer Setup Utility icon. 2 Double-click the CD-ROM icon, then the Mac OS X folder, then the Printer Driver folder. b. When the Printer List screen appears, select PIXMA iP3000, then click the Utility icon. 7 Ensure that the auto sheet feeder lamp is lit. If not, press the paper feed switch. Auto Sheet Feeder Lamp Cassette Feeder Lamp Paper Feed Switch IMPORTANT: To successfully complete the next step, Software Installation, ensure 8.5" x 11" paper is loaded in the Auto Sheet Feeder (top paper feeder). 7 Click Quit to exit the BJ Printer Utility. Print head alignment is now complete. 8 Access your CD-ROM again. From the Application folder on the CD-ROM, doubleclick on the software to be installed. 2 Close any open software applications including anti-virus, computer security and other software. Then insert the Setup Software & User's Guide CD-ROM. The setup program should run automatically. NOTE: If the setup program does not run, click Start, then Run, then type D:\msetup.exe, where D is your CD-ROM drive. 3 When the main menu appears, click Easy Install. IMPORTANT: If your computer cannot detect a printer port, click Help and refer to the online instructions. 5 Follow the on-screen instructions to install the remaining software. When the "Installation Results" window appears, click OK. 6 Follow the on-screen instructions to register your product. 7 When the "Print Head Alignment" screen appears, ensure that letter size paper is loaded in the auto sheet feeder (top paper feeder). Click Execute and follow on-screen instructions. 3 Double-click the iP3000 260.pkg icon, then follow the on-screen instructions. NOTE: When the "Authenticate" screen appears, enter your administrator name and password. If you do not know your administrator name or password, click , then follow the on-screen instructions. 4 When the message "The software was successfully installed" appears, click Restart. c. Select PIXMA iP3000 and click Maintenance. d. Ensure that letter size paper is loaded in the auto sheet feeder (top paper feeder). e. Click the down-arrow to select Test Print. Click the Print Head Alignment icon and follow the on-screen instructions. 9 Follow the on-screen instructions. When the "Installation has finished" screen appears, click OK. 10 Double-click on the Product Registration icon, found in the Mac OS X folder, to register your product. NOTE: Print head alignment will take several minutes to complete. 5 When a message asking you to align the print head appears, click OK. 8 When the "Installation completed successfully" NOTE: Print head alignment will take NOTE: Select Easy Install in order to install all of the application software, electronic screen appears, click Restart. several minutes to complete. manual and printer driver. Select Custom Install in order to choose the options you would like to install. Part no. QA7-3222-V01 © 2004 Canon U.S.A., Inc. Canon is a Registered Trademark of Canon Inc. All other products and brand names are registered trademarks or trademarks of their respective owners. Specifications subject to change without notice. P-iP3000-ESI-0304 Printed in Thailand.
-
 1
1 -
 2
2
 |
 |