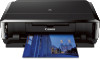
Canon PIXMA iP7220 Getting Started - Page 4
Lea el Manual en pantalla en el, ordenador, Read the On-screen Manual on, the Computer
 |
View all Canon PIXMA iP7220 manuals
Add to My Manuals
Save this manual to your list of manuals |
Page 4 highlights
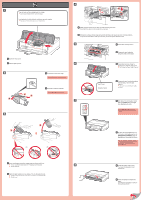
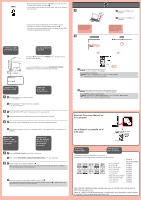
WPS • If the access point does not have a WPS button or you are not using wireless LAN connection, proceed to . • For the details of how to press the WPS button, refer to the manual of the access point. 1 • Si el punto de acceso no dispone de un botón WPS o no está utilizando una conexión LAN inalámbrica, continúe con . • Para obtener información detallada sobre cómo pulsar el botón WPS, consulte el manual del punto de acceso. If the USB cable is already connected, unplug it. If a message appears on the computer, click Cancel. 2 6 1 Insert the CD-ROM into the computer. 1 Introduzca el CD-ROM en el ordenador. Si el cable USB ya está conectado, desconéctelo. Si aparece un mensaje en el ordenador, haga clic en Cancelar (Cancel). Flashing Light and Solid Light Luz parpadeante y luz fija The light of Wi-Fi button and POWER lamp will flash and turn solid during the operation. La luz del botón Wi-Fi y de la luz de ENCENDIDO (POWER) parpadeará y se volverá fija durante el funcionamiento. Wi-Fi button Botón Wi-Fi Connection to Wireless LAN Conexión a la LAN inalámbrica 1 1 Press and hold for at least 2 seconds. starts flashing. 1 Mantenga pulsado durante al menos 2 segundos. empieza a parpadear. 2 2 Press and hold the WPS button of the access point for a few seconds. 2 Mantenga pulsado el botón WPS del punto de acceso durante unos segundos. 3 3 After a while, when the flashing light of and turn solid, the setting is complete. 3 Transcurrido un tiempo, cuando la luz parpadeante de y se quedan fijas, la configuración ha finalizado. When the Alarm Lamp Lights Up (Orange) Cuando la luz de Alarma (Alarm) se ilumina (naranja) 1 1 Press the RESUME/CANCEL button of the printer. 1 Pulse el botón REANUDAR/CANCELAR (RESUME/CANCEL) de la impresora. 2 2 Wait for a while. Then, redo the operation of . If the error persists, turn off and then turn on the access point and redo the operation of . Or proceed to and follow the instruction shown on the computer screen. 2 Espere un momento. A continuación, repita la operación de . Si se mantiene el error, apague y encienda el punto de acceso y repita la operación de . O continúe con las instrucciones que aparecen en la pantalla del equipo. y siga 2 Follow the on-screen instructions to proceed. To select a language, click Language. If the CD-ROM does not autorun: Double-click (My) Computer > CD-ROM icon > MSETUP4.EXE. Double-click the CD-ROM icon on the desktop. 2 Siga las instrucciones que aparezcan en pantalla para continuar. Para seleccionar un idioma, haga clic en Idioma (Language). Si el CD-ROM no se ejecuta automáticamente: Haga doble clic en (Mi) PC ((My) Computer) > icono de CD-ROM > MSETUP4.EXE. Haga doble clic en el icono de CD-ROM del escritorio. Read the On-screen Manual on the Computer Lea el Manual en pantalla en el ordenador Ordering Information Información para pedidos The following ink tanks are compatible with this printer. Los depósitos de tinta siguientes son compatibles con esta impresora. M: CLI-251XL M: CLI-251 BK: CLI-251XL BK: CLI-251 Y: CLI-251XL Y: CLI-251 PGBK: PGI-250XL PGBK: PGI-250 C: CLI-251XL C: CLI-251 Order # Número para pedidos 6450B001 6515B001 6448B001 6513B001 6451B001 6516B001 6432B001 6497B001 6449B001 6514B001 Call 1-800-OK-CANON to locate a dealer near you, or visit the Canon online store at www.shop.usa.canon.com Llame al 1-800-OK-CANON para buscar un distribuidor cerca de usted o visite la tienda en línea de Canon en www.shop.usa.canon.com
-
 1
1 -
 2
2 -
 3
3 -
 4
4
 |
 |
