Canon PowerShot A540 ImageBrowser 5.6 Software User Guide - Page 72
Deleting Images
 |
View all Canon PowerShot A540 manuals
Add to My Manuals
Save this manual to your list of manuals |
Page 72 highlights
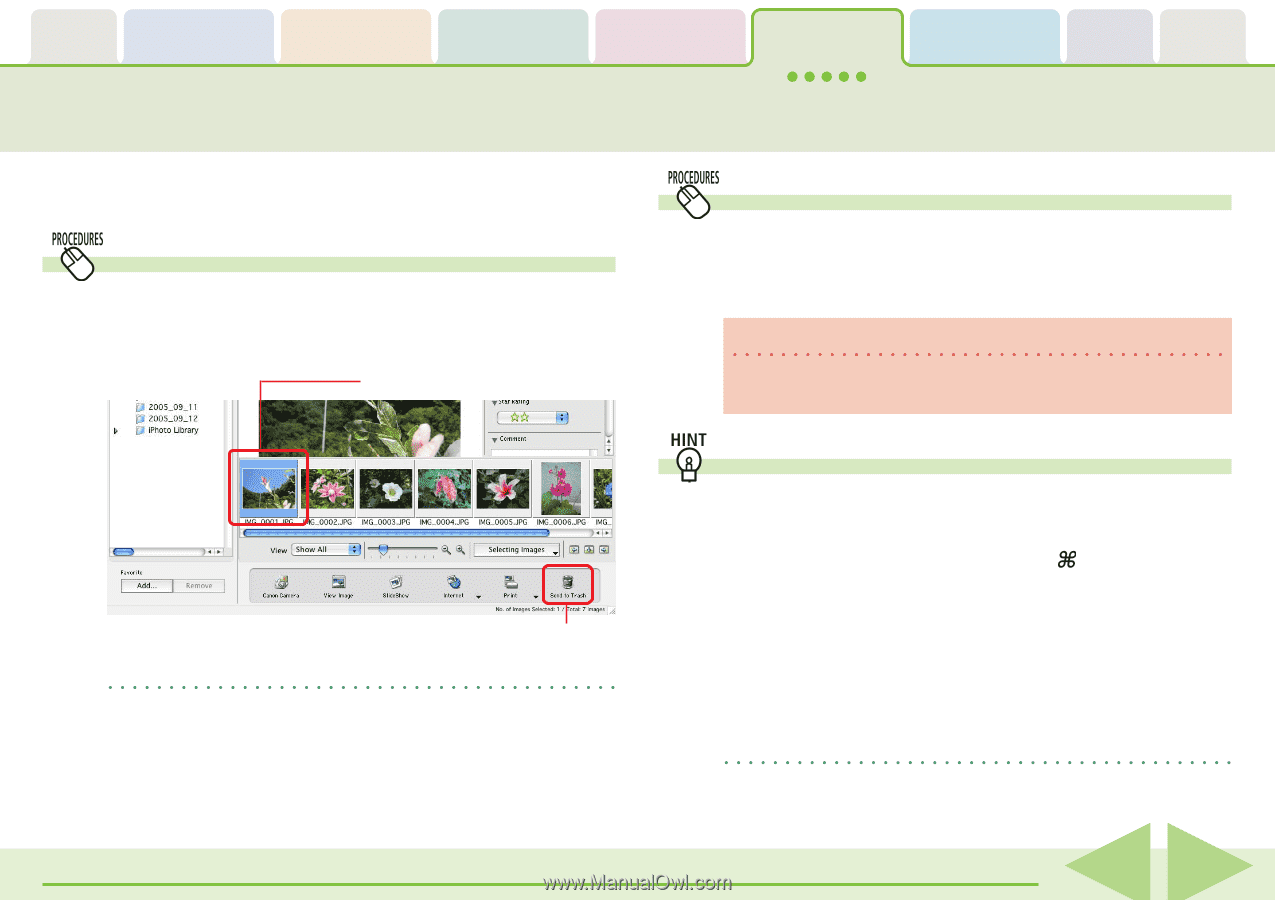
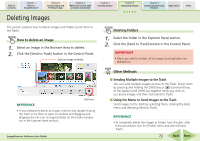
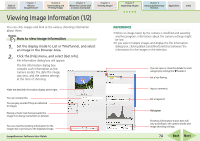
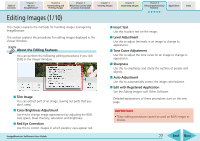
Table of Contents Chapter 1 What is ImageBrowser? Chapter 2 Downloading and Printing Images Chapter 3 What You Can Do with a Camera Connected Chapter 4 Viewing Images Chapter 5 Organizing Images Chapter 6 Using Supplementary Features Appendices Index Deleting Images This section explains how to delete images and folders (send them to the Trash). How to delete an image 1. Select an image in the Browser Area to delete. 2. Click the [Send to Trash] button in the Control Panel. Select an image to delete. Deleting Folders 1. Select the folder in the Explorer Panel section. 2. Click the [Send to Trash] button in the Control Panel. IMPORTANT • When you delete a folder, all its images and subfolders are deleted too. Click here. REFERENCE • If you mistakenly delete an image, retrieve it by double-clicking the Trash in the dock to open its window and dragging and dropping the file onto its original folder (in the Finder window not in the Explorer Panel section). ImageBrowser Software User Guide Other Methods ■ Sending Multiple Images to the Trash You can send multiple images at once to the Trash. Select them by pressing and holding the [shift] key or [ ] (command) key, or the [option] and [shift] key together while you click on successive images and then click [Send to Trash]. ■ Using the Menu to Send Images to the Trash Send images to the Trash by selecting them, clicking the [File] menu and selecting [Send to Trash]. REFERENCE • To completely delete the images or folders from the disk, after these procedures click the [Finder] menu and select [Empty Trash]. 72 Back Next
-
 1
1 -
2
-
3
-
4
-
5
-
6
-
7
-
8
-
9
-
10
-
11
-
12
-
13
-
14
-
15
-
16
-
17
-
18
-
19
-
20
-
21
-
22
-
23
-
24
-
25
-
26
-
27
-
28
-
29
-
30
-
31
-
32
-
33
-
34
-
35
-
36
-
37
-
38
-
39
-
40
-
41
-
42
-
43
-
44
-
45
-
46
-
47
-
48
-
49
-
50
-
51
-
52
-
53
-
54
-
55
-
56
-
57
-
58
-
59
-
60
-
61
-
62
-
63
-
64
-
65
-
66
-
 67
67 -
 68
68 -
 69
69 -
 70
70 -
 71
71 -
 72
72 -
 73
73 -
 74
74 -
 75
75 -
 76
76 -
 77
77 -
78
-
79
-
80
-
81
-
82
-
83
-
84
-
85
-
86
-
87
-
88
-
89
-
90
-
91
-
92
-
93
-
94
-
95
-
96
-
97
-
98
-
99
-
100
-
101
-
102
-
103
-
104
-
105
-
106
-
107
-
108
-
109
-
110
-
111
-
112
-
113
-
114
-
115
-
116
-
117
-
118
-
119
-
120
-
121
-
122
-
123
-
124
-
125
-
126
-
127
-
128
-
129
-
130
-
131
-
132
 |
 |