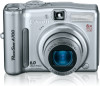
Canon PowerShot A700 PowerShot A700 Manuals Camera User Guide Basic - Page 7
Reviewing an Image Right After Shooting, Basic Shooting Functions
 |
View all Canon PowerShot A700 manuals
Add to My Manuals
Save this manual to your list of manuals |
Page 7 highlights
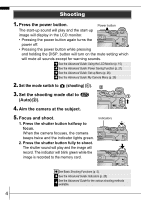
Reviewing an Image Right After Shooting After a shot is taken, the image appears in the LCD monitor for approximately 2 seconds. You can continue to display images regardless of the review duration setting with the following procedures. • Keeping the shutter button pressed after a shot. • Pressing the FUNC./SET or DISP. button while the image is displayed in the LCD monitor. To stop displaying the image, press the shutter button halfway. Î See the Advanced Guide: Review (p. 24) Î See Erasing (p. 11) Basic Shooting Functions „ Selecting a Shooting Mode 1. Set the shooting mode dial to the desired mode (a). In the and modes, use the or button (b) to select a shooting mode. Creative zone Shooting a Auto b Image zone „ Shooting Modes Auto Image zone The camera automatically selects settings. When a shooting mode appropriate for the shooting conditions is selected, the camera automatically adjusts settings for optimal shooting. Portrait Blurs the background and makes a person stand out. Landscape Optimized for shooting landscape scenes which contain both near and far subjects. 5
-
 1
1 -
 2
2 -
 3
3 -
 4
4 -
 5
5 -
 6
6 -
 7
7 -
 8
8 -
 9
9 -
 10
10 -
 11
11 -
 12
12 -
13
-
14
-
15
-
16
-
17
-
18
-
19
-
20
-
21
-
22
-
23
-
24
-
25
-
26
 |
 |
