Canon PowerShot G1 X PowerShot G1 X Getting Started - Page 25
Saving Images to a Computer
 |
View all Canon PowerShot G1 X manuals
Add to My Manuals
Save this manual to your list of manuals |
Page 25 highlights
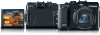
Included Software, PDF Manuals Saving Images to a Computer Windows 7 and Mac OS X 10.6 are used here for the sake of illustration. Connect the camera to the computer. z Make sure the camera is off. z Open the cover ( ). With the smaller plug of the included interface cable (p. 2) in the orientation shown, insert the plug fully into the camera terminal ( ). z Insert the larger plug of the interface cable in the computer's USB port. For details about USB connections on the computer, refer to the computer user manual. Turn the camera on to access CameraWindow. z Press the 1 button to turn the camera on. z On a Macintosh computer, CameraWindow is displayed when a connection is established between the camera and computer. z For Windows, follow the steps introduced below. z In the screen that displays, click the link to modify the program. 25
-
 1
1 -
2
-
3
-
4
-
5
-
6
-
7
-
8
-
9
-
10
-
11
-
12
-
13
-
14
-
15
-
16
-
17
-
18
-
19
-
 20
20 -
 21
21 -
 22
22 -
 23
23 -
 24
24 -
 25
25 -
 26
26 -
 27
27 -
 28
28 -
 29
29 -
 30
30 -
31
-
32
-
33
-
34
-
35
-
36
 |
 |
