Canon PowerShot SD430 Software Starter Guide (For the Canon Digital Camera Sol - Page 86
Click [Finish].
 |
View all Canon PowerShot SD430 manuals
Add to My Manuals
Save this manual to your list of manuals |
Page 86 highlights
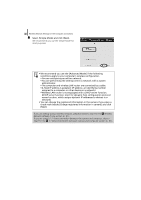
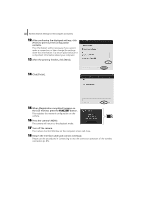
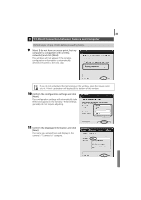
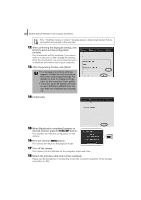
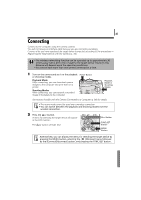
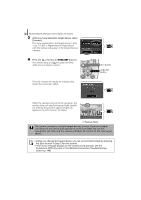
82 Wireless Network Settings for the Computer and Camera 12 After confirming the displayed settings, click [Print] to print out the configuration contents. This information will be necessary if you cannot make a connection or later change the settings. Store this information in a secure place because it is important information about your computer. 13 After the printing finishes, click [Next]. 14 Click [Finish]. 15 When [Registration completed] appears on the LCD monitor, press the FUNC./SET button. This registers the network configuration on the camera. 16 Press the camera's MENU. The camera will return to the playback mode. 17 Turn off the camera. The Camera Control Window on the computer screen will close. 18 Detach the interface cable and connect wirelessly. Please use the procedures in Connecting to test the correction operation of the wireless connection (p. 85).
-
 1
1 -
2
-
3
-
4
-
5
-
6
-
7
-
8
-
9
-
10
-
11
-
12
-
13
-
14
-
15
-
16
-
17
-
18
-
19
-
20
-
21
-
22
-
23
-
24
-
25
-
26
-
27
-
28
-
29
-
30
-
31
-
32
-
33
-
34
-
35
-
36
-
37
-
38
-
39
-
40
-
41
-
42
-
43
-
44
-
45
-
46
-
47
-
48
-
49
-
50
-
51
-
52
-
53
-
54
-
55
-
56
-
57
-
58
-
59
-
60
-
61
-
62
-
63
-
64
-
65
-
66
-
67
-
68
-
69
-
70
-
71
-
72
-
73
-
74
-
75
-
76
-
77
-
78
-
79
-
80
-
 81
81 -
 82
82 -
 83
83 -
 84
84 -
 85
85 -
 86
86 -
 87
87 -
 88
88 -
 89
89 -
 90
90 -
 91
91 -
92
-
93
-
94
-
95
-
96
-
97
-
98
-
99
-
100
-
101
-
102
-
103
-
104
-
105
-
106
-
107
-
108
-
109
-
110
-
111
-
112
-
113
-
114
-
115
-
116
-
117
-
118
-
119
-
120
-
121
-
122
-
123
-
124
-
125
-
126
-
127
-
128
-
129
-
130
 |
 |
