Canon REALiS WUX5000 D Pro AV Multimedia Projector WUX5000 / WUX4000 User's Ma - Page 147
Setting Up the Network, Setting Basic Information [Network
 |
View all Canon REALiS WUX5000 D Pro AV manuals
Add to My Manuals
Save this manual to your list of manuals |
Page 147 highlights
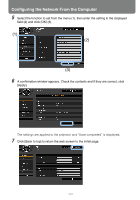
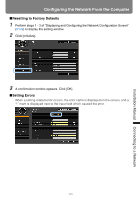
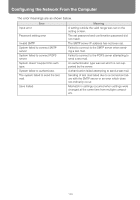
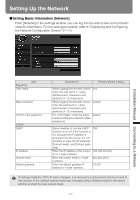
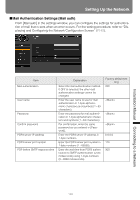
Setting Up the Network ■Setting Basic Information [Network] From [Network] in the settings window, you can log into the web screen and set basic network information. For the setting procedure, refer to "Displaying and Configuring the Network Configuration Screen" (P142). Installation Manual Connecting to a Network Item Password User name New password Confirm new password TCP/IP DHCP IP address Subnet mask Default gateway Explanation Factory default setting When logging into the web screen, root enter the user name in 1-byte alphanumeric characters and symbols (4 -15 characters). When logging into the web screen, system enter the password in 1-byte alphanumeric characters and symbols (4 -15 characters). For confirmation, enter the same system password that you entered in [New password]. Select whether to turn the DHCP OFF function on or off. If the function is on, because the IP address is acquired from the server, it is not possible to enter the [IP address], [Subnet mask], and [Default gate- way]. Enter the IP address of the projec- 192.168.254.254 tor in 1-byte numbers. Enter the subnet mask in 1-byte 255.255.255.0 numbers. Enter the default gateway IP 0.0.0.0 address in 1-byte numbers. If settings related to TCP / IP were changed, it is necessary to disconnect and reconnect to the network. If the network subnet mask was changed, select [Subnet mask] in the above window and set the new subnet mask. 147
-
 1
1 -
2
-
3
-
4
-
5
-
6
-
7
-
8
-
9
-
10
-
11
-
12
-
13
-
14
-
15
-
16
-
17
-
18
-
19
-
20
-
21
-
22
-
23
-
24
-
25
-
26
-
27
-
28
-
29
-
30
-
31
-
32
-
33
-
34
-
35
-
36
-
37
-
38
-
39
-
40
-
41
-
42
-
43
-
44
-
45
-
46
-
47
-
48
-
49
-
50
-
51
-
52
-
53
-
54
-
55
-
56
-
57
-
58
-
59
-
60
-
61
-
62
-
63
-
64
-
65
-
66
-
67
-
68
-
69
-
70
-
71
-
72
-
73
-
74
-
75
-
76
-
77
-
78
-
79
-
80
-
81
-
82
-
83
-
84
-
85
-
86
-
87
-
88
-
89
-
90
-
91
-
92
-
93
-
94
-
95
-
96
-
97
-
98
-
99
-
100
-
101
-
102
-
103
-
104
-
105
-
106
-
107
-
108
-
109
-
110
-
111
-
112
-
113
-
114
-
115
-
116
-
117
-
118
-
119
-
120
-
121
-
122
-
123
-
124
-
125
-
126
-
127
-
128
-
129
-
130
-
131
-
132
-
133
-
134
-
135
-
136
-
137
-
138
-
139
-
140
-
141
-
 142
142 -
 143
143 -
 144
144 -
 145
145 -
 146
146 -
 147
147 -
 148
148 -
 149
149 -
 150
150 -
 151
151 -
 152
152 -
153
-
154
-
155
-
156
-
157
-
158
-
159
-
160
-
161
-
162
-
163
-
164
-
165
-
166
-
167
-
168
-
169
-
170
-
171
-
172
-
173
-
174
-
175
-
176
-
177
-
178
-
179
-
180
-
181
-
182
-
183
-
184
-
185
-
186
-
187
-
188
 |
 |
