Canon SELPHY CP740 SELPHY CP750 / CP740 Printing Guide - Page 11
Connecting the Printer to, Your Computer - photo printer
 |
View all Canon SELPHY CP740 manuals
Add to My Manuals
Save this manual to your list of manuals |
Page 11 highlights
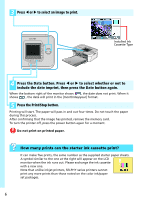
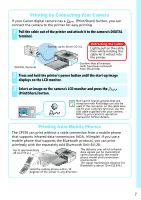
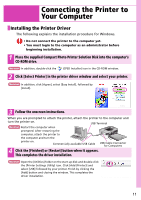
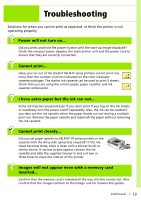
Connecting the Printer to Your Computer Installing the Printer Driver The following explains the installation procedure for Windows. • Do not connect the printer to the computer yet. • You must login to the computer as an administrator before beginning installation. 1 Place the supplied Compact Photo Printer Solution Disk into the computer's CD-ROM drive. In addition, double-click the (CPSD Installer) icon in the CD-ROM window. 2 Click [Select Printer] in the printer driver window and select your printer. In addition, click [Agree], select [Easy Install], followed by [Install]. 3 Follow the onscreen instructions. When you are prompted to attach the printer, attach the printer to the computer and turn the printer on. USB Terminal Restart the computer when prompted. After restarting the computer, attach the printer to the computer and turn the printer on. Commercially available USB Cable USB Cable Connector for Computers 4 Click the [Finished] or [Restart] button when it appears. This completes the driver installation. Open the [Utilities] folder on the start-up disk and double-click the [Printer Settings Utility] icon. Click [Add (Printer)] and select [USB] followed by your printer. Finish by clicking the [Add] button and closing the window. This completes the driver installation. 11
-
 1
1 -
2
-
3
-
4
-
5
-
 6
6 -
 7
7 -
 8
8 -
 9
9 -
 10
10 -
 11
11 -
 12
12 -
 13
13 -
 14
14 -
 15
15 -
 16
16
 |
 |
