Canon SELPHY CP740 SELPHY CP750 / CP740 Printing Guide - Page 3
Prepare - ink and paper
 |
View all Canon SELPHY CP740 manuals
Add to My Manuals
Save this manual to your list of manuals |
Page 3 highlights
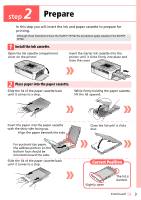
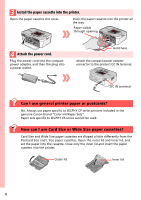
2 step Prepare In this step you will insert the ink and paper cassette to prepare for printing. Although these illustrations show the SELPHY CP750, the procedures apply equally to the SELPHY CP740. 1 Install the ink cassette. Open the ink cassette compartment cover on the printer. Insert the starter ink cassette into the printer until it clicks firmly into place and close the cover. 2 Place paper into the paper cassette. Slide the lid of the paper cassette back until it comes to a stop. While firmly holding the paper cassette, lift the lid upward. Insert the paper into the paper cassette with the shiny side facing up. Align the paper beneath the tabs. For postcard size paper, the address portion on the bottom face should be oriented toward the tabs. Slide the lid of the paper cassette back until it comes to a stop. Close the lid until it clicks shut. Correct Position Slightly open The lid is slanted. Continued 3
-
 1
1 -
 2
2 -
 3
3 -
 4
4 -
 5
5 -
 6
6 -
 7
7 -
 8
8 -
 9
9 -
10
-
11
-
12
-
13
-
14
-
15
-
16
 |
 |
