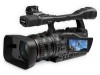
Canon XH G1S XH G1S / XH A1S Instruction Manual - Page 86
Recording an External Video Signal (HDV/DV In, Analog Line-In), HDV/DV In, Copyright Signal
 |
UPC - 013803100747
View all Canon XH G1S manuals
Add to My Manuals
Save this manual to your list of manuals |
Page 86 highlights
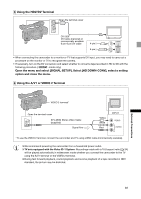
Recording an External Video Signal (HDV/DV In, Analog Line-In) You can record on the tape an external video signal, either from the HDV/DV input (SD or HD standard) or from the analog video input (SD standard). HDV/DV In When recording from an external digital device you can select the time code to be used for the recording made with this camcorder. Select [COPY] to keep the original time code of the video source, or [REGEN.] to use instead this camcorder's internal time code. 1. Open the menu, select [SIGNAL SETUP] and then select the [TIME CODE] submenu. 2. Select [HDV/DV IN], select a setting option and close the menu. 3. Connect the camcorder to the external video device. For the connection diagram to a digital device refer to Section 3 of Connecting to a Monitor/TV ( 81). 4. Press the and buttons (or the REC PAUSE button on the wireless controller). • The camcorder enters the record pause mode. In this mode you can monitor the picture on the screen. • If you press only the button, recording will start immediately. 5. Press the button (or the PAUSE button on the wireless controller) when the scene you wish to record appears. Recording starts. 6. Press the button to stop recording. Analog Line-In 1. Open the menu and select [AUDIO SETUP]. Select [DV AUDIO], select a setting option and close the menu. 2. Connect the camcorder to the output terminals of the analog video device. For the connection diagram to an analog device refer to Section 4 of Connecting to a Monitor/TV ( 81). 3. Press the and buttons (or the REC PAUSE button on the wireless controller). • The camcorder enters the record pause mode. In this mode you can monitor the picture on the screen. • If you press only the button, recording will start immediately. 4. Press the button (or the PAUSE you wish to record appears. Recording starts. button on the wireless controller) when the scene 5. Press the button to stop recording. Copyright Signal Certain software tapes are copyright protected. If you attempt to play back such tape, "COPYRIGHT PROTECTED PLAYBACK IS RESTRICTED" appears and you will not be able to view the contents of the tape. If you attempt to record from such tape via the DV terminal, "COPYRIGHT PROTECTED DUBBING RESTRICTED" appears and you will not be able to record the contents of the tape. We recommend powering the camcorder from a household power outlet. 86
-
 1
1 -
2
-
3
-
4
-
5
-
6
-
7
-
8
-
9
-
10
-
11
-
12
-
13
-
14
-
15
-
16
-
17
-
18
-
19
-
20
-
21
-
22
-
23
-
24
-
25
-
26
-
27
-
28
-
29
-
30
-
31
-
32
-
33
-
34
-
35
-
36
-
37
-
38
-
39
-
40
-
41
-
42
-
43
-
44
-
45
-
46
-
47
-
48
-
49
-
50
-
51
-
52
-
53
-
54
-
55
-
56
-
57
-
58
-
59
-
60
-
61
-
62
-
63
-
64
-
65
-
66
-
67
-
68
-
69
-
70
-
71
-
72
-
73
-
74
-
75
-
76
-
77
-
78
-
79
-
80
-
 81
81 -
 82
82 -
 83
83 -
 84
84 -
 85
85 -
 86
86 -
 87
87 -
 88
88 -
 89
89 -
 90
90 -
 91
91 -
92
-
93
-
94
-
95
-
96
-
97
-
98
-
99
-
100
-
101
-
102
-
103
-
104
-
105
-
106
-
107
-
108
-
109
-
110
-
111
-
112
-
113
-
114
-
115
-
116
-
117
-
118
-
119
-
120
-
121
-
122
-
123
-
124
-
125
-
126
-
127
-
128
-
129
-
130
-
131
-
132
-
133
-
134
-
135
-
136
-
137
-
138
-
139
-
140
-
141
-
142
-
143
-
144
-
145
-
146
-
147
-
148
-
149
-
150
-
151
-
152
-
153
-
154
-
155
 |
 |
