Canon imageFORMULA DR-2010C Compact Color Scanner Easy Start Guide - Page 2
Step 4, Step 5, Step 6
 |
View all Canon imageFORMULA DR-2010C Compact Color Scanner manuals
Add to My Manuals
Save this manual to your list of manuals |
Page 2 highlights
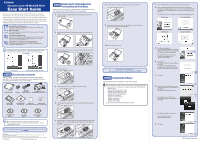
Continued from front side 9. Read the software license agreement, and click [Yes] if you consent to the conditions of the software. 10. Check the destination folder and click [Next]. Installation of CapturePerfect 3.0 starts. 11. Click [Finish] to complete the installation of CapturePerfect 3.0. Next, the User Manual installation wizard appears. 12. Click [Next]. Installation of the User Manual starts. 13. Click [Finish] to complete the installation of the User Manual. 14. When all installations are complete, the Installation completed screen appears. Click [Exit] to exit the installer. (Click [Back] to return to the menu screen.) This completes the software installation. Next, you need to connect the scanner to your computer. ( STEP4) STEP 4 Connecting the Scanner to Your PC Perform the following steps to connect the scanner to your PC with a USB cable. Caution Use only the AC adapter and power cord included in this package. Connect the DR-2010C/DR-2510C to your computer while the DR-2010C/DR-2510C is turned OFF. 1. Make sure that the power switch of the scanner is turned OFF. If the power switch is ON, turn it OFF. STEP 5 Turning the Scanner Power ON (Scanner Recognition) When you turn the scanner connected to the PC ON, the plug-and-play function recognizes the scanner, and the device driver is automatically installed. Caution Be sure to log on with administrator privileges when logging on to Windows. If you turn the power OFF, wait at least 10 seconds before turning it ON again. When you are not using the scanner for a long period of time, be sure to disconnect the power cord from the outlet for safety. 1. Make sure that the scanner and computer are connected. 2. Turn the scanner ON. The power indicator is lit green. 2. Connect the power cord to the AC adapter. 3. Plug the AC adapter into the connector located on the back side of the machine in the order of (1) and (2). 3. Turn ON your computer. 4. Windows automatically recognizes the DR-2010C/DR-2510C as new hardware. 3. Thoroughly fan the pages of your documents, and shift the pages so that the top edge of the first page is the bottommost page. (Place your documents on the scanner so that the top edge is facing down.) 4. Place your documents so the top edge is facing down and the rear side is facing towards you. Adjust the document guide adapter to fit the size of the documents. 5. Press Job Button 3 (the top button). "Monitor for DR-2010C" or "Monitor for DR-2510C" is displayed at the bottom right of the screen and scanning starts. 6. When "Sending complete" is displayed on the "Monitor for DR-2010C/DR- 2510C", this indicates that scanning has ended. Click "Close" to close the "Monitor for DR-2010C" or "Monitor for DR-2510C". 4. Connect the USB cable included with the scanner to the scanner and your PC. The scanner and computer are connected. Next, turn the scanner ON and Windows recognizes it. ( STEP5) The scanner is now correctly recognized by your computer. Next, select the scanner in an application. ( STEP6) STEP 6 Scanning When you have finished installing the software and the scanner has been recognized, you can load and scan a document. With this scanner, scanning can be performed with the job function by simply pressing the scan button. Follow the steps below to load a document, press the scan button, and test that your document is scanned properly. 1. Open the document feed tray. 2. Switch the feed selection lever on the side to the page separation mode ( ). Be careful, because when the feed selection lever is set to (bypass mode), document pages feed as a stack. For details on the feed selection lever, refer to the DR-2010C/DR-2510C User Manual. Memo The initial settings for the job button functions are as follows: Job Button 1: Start Job Button 2: Stop Job Button 3: Save to a File The function of the job button can be changed. For details, see "Scanning with the Job Function," in the User Manual. Scanned image files are saved in the [My Pictures] folder in [My Documents]. (Default) Image files that are saved according to the default settings are saved as PDF files with a 17-digit file name. This file name indicates the date and time that the image was saved. You can change the scan settings by using the Job Registration Tool registered in the Programs menu. The setup of the DR-2010C/DR-2510C is now complete. This completes the setup of the DR-2010C/DR-2510C. Before you start using the DR-2010C/DR-2510C, be sure to thoroughly read the DR-2010C/DR-2510C User Manual and Reference Guide. For information on using CapturePerfect 3.0, refer to the operation guide registered in the Programs menu.
-
 1
1 -
 2
2
 |
 |