Canon imageFORMULA DR-2020U Universal Workgroup Scanner Reference Guide - Page 4
Connecting to a Computer, Installing the Software, Turning the Scanner ON, Before Installation
 |
View all Canon imageFORMULA DR-2020U Universal Workgroup Scanner manuals
Add to My Manuals
Save this manual to your list of manuals |
Page 4 highlights
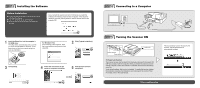
Installing the Software Before Installation ● Do not connect the scanner to the computer before installing the software. ● Log on to Windows as an Administrator. ● Close all other applications before installing the software. If you connect the scanner and turn it ON before you install the software, the following wizard screen will appear. If this wizard is displayed, click the [Cancel] button to exit the wizard, and turn the scanner OFF. 1 Insert the Setup Disc into the computer's CD-ROM drive. The setup menu automatically starts up when you insert the CD-ROM into the drive. (If the menu does not start up, execute setup.exe from the CD-ROM.) For Windows Vista If the following screen appears, enter the current administrator password and click [OK]. 2 Click [Typical Installation]. 3 Click [Install]. 4 Follow the instructions on the screen to complete installation. 5 Click [Exit] to close the setup menu. Connecting to a Computer Turning the Scanner ON Power indicator Power button PC Power Link Function The scanner's power can be linked to the computer, allowing it to be turned ON/ OFF in accordance with the computer. When you enable this function and turn ON the computer to which the scanner is connected, the scanner automatically turns ON. Under default settings, this function is disabled. To enable this function, display the scanner's properties from [Scanners and Cameras] in the Control Panel. For details, refer to the User Manual. The plug-and-play function recognizes the scanner, and the device driver is automatically installed. This completes setup.
-
 1
1 -
 2
2 -
 3
3 -
 4
4 -
 5
5 -
 6
6 -
 7
7 -
 8
8 -
 9
9 -
 10
10 -
11
-
12
-
13
-
14
-
15
-
16
-
17
-
18
-
19
-
20
-
21
-
22
-
23
-
24
-
25
-
26
-
27
-
28
-
29
-
30
-
31
-
32
-
33
-
34
-
35
-
36
-
37
-
38
-
39
-
40
 |
 |
