Canon imagePROGRAF TA-30 TA-20 / TA-30 Setup Guide - Page 2
Overview of Setup, Confirming the Installation Space, ENGLISH - without stand
 |
View all Canon imagePROGRAF TA-30 manuals
Add to My Manuals
Save this manual to your list of manuals |
Page 2 highlights
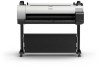
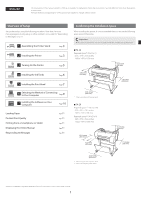
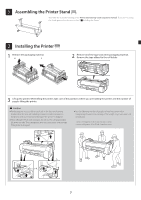
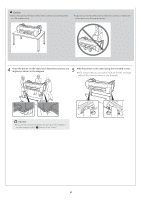
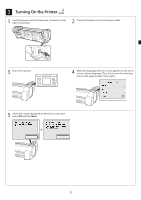
ENGLISH The illustrations in this manual using the TA-30 as an example for explanation. Note that your printer may look different from these illustrations in some cases. The specifications and appearance of this product are subject to change without notice. Overview of Setup Set up the printer using the following procedure. Note that if an error message appears during setup or other problems occur, refer to "Responding to Messages" on p.11. 1 Assembling the Printer Stand 3 Page 2 Installing the Printer 3 Page 3 Turning On the Printer 5 Page 4 Installing the Ink Tanks 6 Page 5 Installing the Print Head 7 Page 6 Selecting the Method of Connecting to Your Computer 9 Page 7 Installing the Software on Your Computer Page 10 Loading Paper For Best Print Quality Printing From a Smartphone or Tablet Displaying the Online Manual Responding to Messages Page 11 Page 11 Page 11 Page 11 Page 11 Confirming the Installation Space When installing the printer, it is recommended that you secure the following space around the printer. Important ● The printer stand may not be included with the model you purchased. ■ TA-30 Required space* (W x D x H) 66.5 x 57.9 x 53.6 inches 1689 x 1470 x 1359 mm 11.8 inches (300 mm) 7.9 inches (200 mm) 7.9 inches (200 mm) 23.6 inches (600 mm)* * When using the SD-33 printer stand ■ TA-20 Required space*** (W x D x H) 54.5 x 53.1 x 29.1 inches 1382 x 1348 x 738 mm Required space** (W x D x H) 54.5 x 57.9 x 53.6 inches 1382 x 1470 x 1359 mm 23.6 inches (600 mm)*** 7.9 inches (200 mm) 11.8 inches (300 mm) 7.9 inches (200 mm) 23.6 inches (600 mm)** ** When using the SD-24 printer stand *** When not using the printer stand Windows is a trademark or registered trademark of Microsoft Corporation in the U.S. and/or other countries. 1
-
 1
1 -
 2
2 -
 3
3 -
 4
4 -
 5
5 -
 6
6 -
 7
7 -
 8
8 -
9
-
10
-
11
-
12
-
13
-
14
-
15
-
16
-
17
-
18
-
19
-
20
-
21
-
22
-
23
-
24
-
25
-
26
-
27
-
28
-
29
-
30
-
31
-
32
-
33
-
34
-
35
-
36
-
37
-
38
-
39
-
40
-
41
-
42
-
43
-
44
-
45
-
46
-
47
-
48
-
49
 |
 |
