Canon imagePROGRAF TX-3000 MFP T36 SmartWorks MFP - User Manual v3.00 - Page 87
Default, Display, User/Global, Favorites, Copy a Preset Make a new Preset
 |
View all Canon imagePROGRAF TX-3000 MFP T36 manuals
Add to My Manuals
Save this manual to your list of manuals |
Page 87 highlights
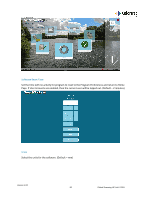
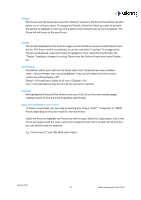
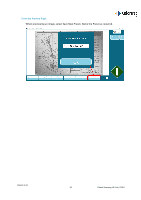
Default: The Preset with the Green dot under the "Default" column is the Preset that will be set after power on or a timeout reset. To change the Default, select the Preset you wish to become the default to highlight it, then touch the white circle of that Preset to set it as Default. The Green dot will move to the new Preset. Display: The Presets displayed on the function pages can be limited to remove unused Presets from the list. The Preset itself is not deleted, so can be used later if required. To change which Presets are displayed, select the Preset to highlight it, then select the on/off under the "Display" heading to change its setting. Please note the Default Preset must have Display = On. User/Global: This defines which users will see the Preset when User Accounts have been enabled. Fixed = Factory Presets that cannot be deleted. They can be hidden from the function screens by setting Display = Off. Global = A Preset that is visible to all users if Display = On. User = A Preset that can only be seen by the user who created it. Favorites: Any highlighted Presets will be shown at the top of the list on the main function pages making it easier to find the most frequently used Presets. Copy a Preset (Make a new Preset): To make a new Preset, you can copy an existing one. Copy a "Color", "Greyscale" or "B&W" Preset depending on the color mode for the new Preset. Select the Preset to highlight the Preset you wish to copy. Select the Copy button, and a new Preset will appear with the same name as the original Preset with a number at the end, but you can edit the name as required. E.g. "Color Lines (1)" and "My NEW color Preset". Version 3.00 87 Global Scanning UK Ltd © 2018
-
 1
1 -
2
-
3
-
4
-
5
-
6
-
7
-
8
-
9
-
10
-
11
-
12
-
13
-
14
-
15
-
16
-
17
-
18
-
19
-
20
-
21
-
22
-
23
-
24
-
25
-
26
-
27
-
28
-
29
-
30
-
31
-
32
-
33
-
34
-
35
-
36
-
37
-
38
-
39
-
40
-
41
-
42
-
43
-
44
-
45
-
46
-
47
-
48
-
49
-
50
-
51
-
52
-
53
-
54
-
55
-
56
-
57
-
58
-
59
-
60
-
61
-
62
-
63
-
64
-
65
-
66
-
67
-
68
-
69
-
70
-
71
-
72
-
73
-
74
-
75
-
76
-
77
-
78
-
79
-
80
-
81
-
 82
82 -
 83
83 -
 84
84 -
 85
85 -
 86
86 -
 87
87 -
 88
88 -
 89
89 -
 90
90 -
 91
91 -
 92
92 -
93
-
94
-
95
-
96
-
97
-
98
-
99
-
100
-
101
-
102
-
103
-
104
-
105
-
106
-
107
-
108
-
109
-
110
-
111
-
112
-
113
-
114
-
115
 |
 |
