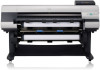
Canon imagePROGRAF iPF825 iPF815/iPF825 Setup Guide - Page 7
Install the Printer Driver and the User Manual, Windows - drivers
 |
View all Canon imagePROGRAF iPF825 manuals
Add to My Manuals
Save this manual to your list of manuals |
Page 7 highlights
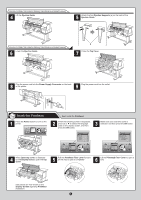
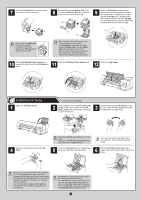
7 Make sure the Ink Lamp is lit in red. 8 Repeat steps 2-7 to install each Ink Tank. Close the Ink Tank Cover. A A Y GY MBK BK M • If the Ink Lamp is not lit, repeat steps 2, 5 and 6. After you have installed the Printheads and all Ink Tanks, the system is automatically filled with ink for the first time. This process takes about 14 minutes. In the meantime, install the printer driver and manual. If you will install the printer driver and manual later, skip to "Load Paper to Adjust the Printhead" on page 15 after ink has filled the system. • During printer installation, ink fills the system MEMO between the Ink Tanks and Printhead. In addition, cleaning is performed to keep the printer in optimal condition. This may cause the Maintenance Cartridge capacity indicator to drop to about 50%, but this is not a problem with the printer. Install the Printer Driver and the User Manual Windows You can print from Windows via USB or TCP/IP (network) connections. The installation procedure varies depending on how your printer is connected. Install the printer driver and User Manual as follows. < Compatible Operating Systems > Windows 7, Windows Vista, Windows Server 2008, Windows Server 2003, Windows XP, Windows 2000 • Installation requires administrative rights (such as those of Administrator). Be sure to log on using an account with administrative rights before installation. • The following screen may be displayed during installation depending MEMO on the security settings of your computer. Select Deactivate the block and click Next. For USB connections • Use a USB cable that conforms to the HiSpeed USB specification. • Connect the USB cable to the printer as instructed during installation of the relevant printer driver. If you connect the USB cable before installing the printer driver, the printer driver may not be installed correctly. 1 After making sure the printer is not connected to the computer, turn the computer on. Insert the provided User Software CD-ROM for your particular operating system in the CD-ROM drive. 2 In the Setup Menu window, click Install Printer Driver. 3 Confirm that the required installation items are selected in the Installation List window, and then click Next. • To choose a different language, click MEMO Language. 4 On the Select Country or Region of Use window, select the country or region of use and click Next. 5 After reading the license agreement, click Yes. • Point at a software title to view a summary MEMO of the software. 7
-
 1
1 -
 2
2 -
 3
3 -
 4
4 -
 5
5 -
 6
6 -
 7
7 -
 8
8 -
 9
9 -
 10
10 -
 11
11 -
 12
12 -
13
-
14
-
15
-
16
 |
 |
