Canon imageRUNNER ADVANCE C5240A imageRUNNER ADVANCE C5200 Srs Before Using Th - Page 38
Feeder, Document Feed Scanning Area
 |
View all Canon imageRUNNER ADVANCE C5240A manuals
Add to My Manuals
Save this manual to your list of manuals |
Page 38 highlights
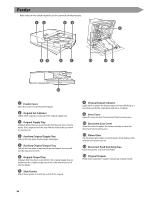
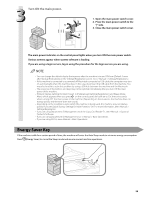
Feeder Both sides of two-sided originals can be scanned simultaneously. 1 2 3 4 9 87 6 5 12 11 10 13 1 Feeder Cover Open this cover to remove jammed paper. 2 Original Set Indicator Lights when originals are placed in the original supply tray. 3 Original Supply Tray Originals placed here are automatically fed sheet by sheet into the feeder. Place originals into this tray with the surface that you want to scan face up. 4 Auxiliary Original Supply Tray Pull out this tray when feeding large sized paper. 5 Auxiliary Original Output Tray Pull out this tray when outputting large sized paper. You can pull out this tray up to 2 levels. 6 Original Output Tray Originals that have been scanned from the original supply tray are output into the original output tray in the order that they are fed into the feeder. 7 Slide Guides Adjust these guides to match the width of the original. 8 Original Output Indicator Lights when originals are being output and starts blinking in a specified period after outputting originals is complete. 9 Inner Cover Open this cover to clean the document feed scanning area. 10 Document Scan Cover Open this cover to replace the stamp cartridge or clean the document feed scanning area. 11 Platen Glass Use the platen glass when scanning books, thick originals, thin originals, transparencies, etc. 12 Document Feed Scanning Area Scans documents sent from the feeder. 13 Original Stopper Holds down originals to support outputting originals neatly. 36
-
 1
1 -
2
-
3
-
4
-
5
-
6
-
7
-
8
-
9
-
10
-
11
-
12
-
13
-
14
-
15
-
16
-
17
-
18
-
19
-
20
-
21
-
22
-
23
-
24
-
25
-
26
-
27
-
28
-
29
-
30
-
31
-
32
-
 33
33 -
 34
34 -
 35
35 -
 36
36 -
 37
37 -
 38
38 -
 39
39 -
 40
40 -
 41
41 -
 42
42 -
 43
43 -
44
-
45
-
46
-
47
-
48
-
49
-
50
-
51
-
52
-
53
-
54
-
55
-
56
-
57
-
58
-
59
-
60
 |
 |
