Carvin C2440 Instruction Manual - Page 5
Stereo Live Sound System, Channel Connections And Sub-mixing, Master Outputs
 |
View all Carvin C2440 manuals
Add to My Manuals
Save this manual to your list of manuals |
Page 5 highlights
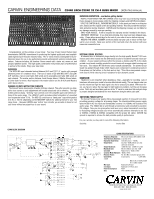
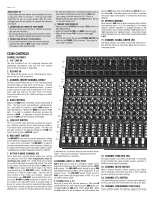
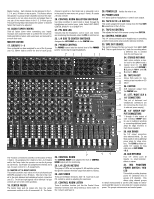
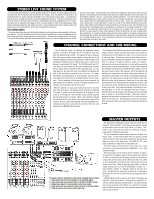
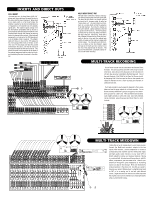
STEREO LIVE SOUND SYSTEM In a live sound reinforcement or a public address system (P.A. System), the input signals to the mixer will come from the microphones and instruments on the stage. Each microphone or instrument to be amplified by the P.A. system must be connected to one of the mixing console inputs. It is preferred to have as many of the stage instruments as possible plugged into the mixer. This allows for the best overall sound control of the instruments as they are mixed together and then amplified by the P.A. system. The mixer can be operated on the stage or from a remote location in front of the stage using a snake cable to bring the signals from the stage to the mixer. The advantage of the remote operation allows the performance to be monitored and mixed from the audience's perspective. THE SOUND CHECK The sound check takes some skill, but mostly patience from the performers and especially you the system operator. If you get frustrated during the sound check, the performers can lose confidence and the sound may suffer due to things missed in the sound check. The basic sound check follows this format: First test all microphones and other input devices(direct boxes, etc.) before the performers are includ- ed in the sound check. A good thing to also check here is feedback in the monitors from the micro phones. Good positioning of the monitors and the use of a graphic equalizer solves most major mon itor feedback problems. Now for a sound check with the performers. First set the level of each per former individually and in cases where a performer has multiple microphones, such as with drum mers, set each drum mic individually then the drum set as a whole. This is also a good time to make some channel tone control adjustments to tailor the sound of the individual performers and instru ments. After setting each individual, have the performers run through a song. Don't hesitate to stop the performers if something needs to be adjusted or a performer or microphone needs to be heard solo again. Remember the sound check is not a rehearsal, but a system check. It is always a good idea for the mixer operator to have a microphone to inform the performers of what is needed during the sound check. If a monitor system is being used, the mixer operator's microphone should only be heard through the monitors when addressing the on stage performers, especially if something needs to be checked during the show. If the sound check is allowed to run through its full course, the sys tem should run smoothly at show time. CHANNEL CONNECTIONS AND SUB-MIXING The 24 XLR Mic inputs are balanced low impedance inputs. Channels 1 through 8, 9 through 16 and 17 through 24, each have their own phantom power switch. This enables the user to group all Mics that require phantom power together, leaving the rest of the channels available for dynamic microphones or XLR line inputs. The grouping of the phantom power reduces noise, power, and the risk of damage to unprotected XLR inputs. The XLR Mic inputs and 1/4" Line inputs on each channel can be used simultaneously, however the two signals will be controlled by the single Gain knob. For this dual input use, the levels will have to be balanced by adjusting the level of the instruments connected at the Line input. For stereo instruments, such as keyboards or drum machines, use two consecutive channels to connect the Left and Right outputs from the instrument. Then by adjusting the Pan controls on the two channels, the stereo image can be retained. If a pair of individual channels are not available, one of the stereo returns can be used. Whenever possible, try to group all related instruments or mics near each other on the mixer. For example: put all drum mics on channels 1 through 8, guitars, bass and keyboards on 9 through 16, and vocals on 17 through 24. This will make mixing, channel assigning and sub-mixing easier to manage. When a long distance separates the sound source from the mixer, a mic snake cable system will be required. Be sure to get a snake that has more than enough Mic connections and returns as you may need to use them in the future. (ask about Carvin's SNK24XR cable systems) The 4 Groups on the C2440 can be used for main outputs, surround outputs, side fills, outputs to a multi-track recorder, etc., but the most common use is for sub mixing to the main L-R or in a mono out case to the Center Fader. Sub-mixing is used in cases where there are a group of channels controlling microphones from a common instru ment or a group of musician working in unison, for example: a drummer with 4 or more microphones, or a choir with several micro phones, needs a simple level adjustment. In each of these examples, the individual microphones all use different fader settings, so during the sound check or show if the drummer, with 6 microphones indi vidually set to a good drum set sound, needs to be turned up, all 6 microphones would have to be turned up individually paying close attention to the original relative settings of the faders to each other With sub-mixing, this all becomes a simple one or two fader move ment during the show leaving intact the original drum set mix. With sub mixing, the same 6 microphones are individually set for the over all drum set sound. Then the drum channels are assigned to one of the group pairs, 1-2 or 3-4, and unassigned from the L-R mains. If the drums are to be mixed mono, then the pan control can be further used to assign to the individual groups. After each channel is assigned, then the group is assigned to the L-R or Center as the case maybe for the main mix. Now during the show if the drummer or other group level needs to be adjusted, the assigned Group fader can be used. MASTER OUTPUTS The main stereo loudspeakers should contain an overall mix of all channels. The Group faders 1-4 can have certain channels assigned to them before the mix arrives at the master L-R faders. This is known as sub-mixing and can improve the efficiency of mixing a large number of channels (see above). The two independent monitor mixes should use the AUX 1 and 2 AUX 2 sends. On the channel these AUX's are pre-EQ, pre-fader with the pre/post switch up position allowing the channel EQ and fader to be used for the main mixes. Also AUX 1&2 1/4" output 1 jacks are balance for long mixer to stage cable runs. The Center output can be used for a main mono mix, a center 4 mono mix in a surround sound type of application, or as a mono subwoofer output. The Group outputs can be used as side fill monitors on stage, or as back fill for the audience. Back fill for the audience is used to fill in areas of a room that may be lacking sound from the main mix. Long rooms can have poor sound at the back of the room, setting up a set loudspeakers in the back to fill in that area can improve the 3 sound of the room. Without using the group faders to sub-mix, assign channels such as vocals & instruments to groups 1-2 to help eliminate "muddy" or "delayed" sounds at the back of the 5 room. Be careful not to overpower the main mix or the people at the back of the room will only hear what you've assigned to that "fill in" group. The diagram depicts a standard live sound system and breaks down as follows: 1. Stereo power amp for the main speakers on the Left Right outputs. 2. Stereo power amp for two monitor mixes on the AUX 1 and AUX 2 outputs. 3. Bridged power amp for a mono subwoofer on the Center output. 4. Power amp for the use as side fill or back of room fill on the Group outputs. 5. Effects processor in the Aux send, stereo return loop. External effects should be used on AUX sends 3 through 6, leav ing AUX's 1 and 2 for monitors. The purpose for using AUX's 3 -6 are their channel post-fader and EQ positions. This allows the auto matic raising and lower of the effects on a channel to correspond with the channel level in the mix. If the channel is turned off then the effect is also turned off.
-
 1
1 -
 2
2 -
 3
3 -
 4
4 -
 5
5 -
 6
6
 |
 |
