Casio EX-Z2000 Owners Manual - Page 61
Advanced Settings, Using On-screen Menus
 |
View all Casio EX-Z2000 manuals
Add to My Manuals
Save this manual to your list of manuals |
Page 61 highlights
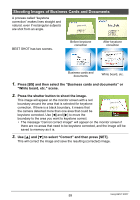
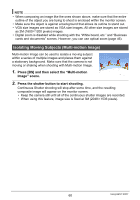
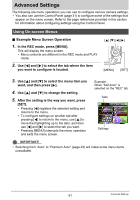
Advanced Settings The following are menu operations you can use to configure various camera settings. • You also can use the Control Panel (page 31) to configure some of the settings that appear on the menu screen. Refer to the page references provided in this section for information about configuring settings using the Control Panel. Using On-screen Menus . Example Menu Screen Operation 1. In the REC mode, press [MENU]. This will display the menu screen. • Menu contents are different in the REC mode and PLAY mode. 2. Use [4] and [6] to select the tab where the item you want to configure is located. [8] [2] [4] [6] [MENU] [SET] 3. Use [8] and [2] to select the menu item you want, and then press [6]. 4. Use [8] and [2] to change the setting. 5. After the setting is the way you want, press [SET]. • Pressing [4] registers the selected setting and returns to the menu. • To configure settings on another tab after pressing [4] to return to the menu, use [8] to move the highlighting up to the tabs, and then use [4] and [6] to select the tab you want. • Pressing [MENU] interrupts the menu operation and exits the menu screen. Example: When "Self-timer" is selected on the "REC" tab Tabs Settings IMPORTANT! • Switching from "Auto" to "Premium Auto" (page 23) will make some menu items unavailable. 61 Advanced Settings
-
 1
1 -
2
-
3
-
4
-
5
-
6
-
7
-
8
-
9
-
10
-
11
-
12
-
13
-
14
-
15
-
16
-
17
-
18
-
19
-
20
-
21
-
22
-
23
-
24
-
25
-
26
-
27
-
28
-
29
-
30
-
31
-
32
-
33
-
34
-
35
-
36
-
37
-
38
-
39
-
40
-
41
-
42
-
43
-
44
-
45
-
46
-
47
-
48
-
49
-
50
-
51
-
52
-
53
-
54
-
55
-
 56
56 -
 57
57 -
 58
58 -
 59
59 -
 60
60 -
 61
61 -
 62
62 -
 63
63 -
 64
64 -
 65
65 -
 66
66 -
67
-
68
-
69
-
70
-
71
-
72
-
73
-
74
-
75
-
76
-
77
-
78
-
79
-
80
-
81
-
82
-
83
-
84
-
85
-
86
-
87
-
88
-
89
-
90
-
91
-
92
-
93
-
94
-
95
-
96
-
97
-
98
-
99
-
100
-
101
-
102
-
103
-
104
-
105
-
106
-
107
-
108
-
109
-
110
-
111
-
112
-
113
-
114
-
115
-
116
-
117
-
118
-
119
-
120
-
121
-
122
-
123
-
124
-
125
-
126
-
127
-
128
-
129
-
130
-
131
-
132
-
133
-
134
-
135
-
136
-
137
-
138
-
139
-
140
-
141
-
142
-
143
-
144
-
145
-
146
-
147
-
148
-
149
-
150
-
151
-
152
-
153
-
154
-
155
-
156
-
157
-
158
-
159
-
160
-
161
-
162
-
163
-
164
-
165
-
166
-
167
-
168
-
169
-
170
-
171
-
172
-
173
-
174
-
175
-
176
-
177
-
178
-
179
-
180
-
181
-
182
-
183
-
184
-
185
-
186
-
187
-
188
-
189
-
190
-
191
-
192
-
193
-
194
-
195
 |
 |
