Casio YC-430 User's Guide - Page 20
Setting Up the PJ Camera
 |
View all Casio YC-430 manuals
Add to My Manuals
Save this manual to your list of manuals |
Page 20 highlights
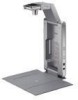
Setting Up the Multi PJ Camera System This section explains how to set up the Multi PJ Camera System for operation. Setting Up the PJ Camera First, load the battery into the camera and then charge the battery 1. Open the battery cover. While pressing lightly on the cover, slide it in the direction indicated by the arrow to open. 2. Load the battery into the camera. 3. Close the battery cover. 4. Plug the USB cradle into a household power outlet. z Note that the shape of the AC adaptor depends on the area where you purchased the camera. AC adaptor 5. Place the camera onto the USB cradle. [CHARGE] lamp Red: Charging Green: Charged (Full) • It takes about three hours to achieve a full charge. z The battery also can be charged while the PJ Camera is installed on the PJ Camera Stand. E-20
-
 1
1 -
2
-
3
-
4
-
5
-
6
-
7
-
8
-
9
-
10
-
11
-
12
-
13
-
14
-
 15
15 -
 16
16 -
 17
17 -
 18
18 -
 19
19 -
 20
20 -
 21
21 -
 22
22 -
 23
23 -
 24
24 -
 25
25 -
26
-
27
-
28
-
29
-
30
-
31
-
32
-
33
-
34
-
35
-
36
-
37
-
38
-
39
-
40
-
41
-
42
-
43
-
44
-
45
-
46
-
47
-
48
-
49
-
50
 |
 |
