Casio YC-430 User's Guide - Page 29
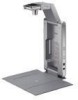
Place the document you want to project onto the PJ Camera Stand's document stage.
 |
View all Casio YC-430 manuals
Add to My Manuals
Save this manual to your list of manuals |
Page 29 highlights
Setting Up the Multi PJ Camera System 6. Place the document you want to project onto the PJ Camera Stand's document stage. z When placing a landscape orientation document onto the document stand, the top of the page should face towards the arm. z Take care to make sure that the entire document is within the area of the document stage. z For more information, see "Precautions when Using the PJ Camera Software" in the PJ Camera Software User's Guide, which is on the CASIO CD-ROM. z After PJ Camera Software starts up, it projects the document on the document stage. At first the image is a relatively rough monitor image, but this is replaced after a short while with the high-resolution recorded image. Rough (monitor) image Full-resolution recorded image E-29
-
 1
1 -
2
-
3
-
4
-
5
-
6
-
7
-
8
-
9
-
10
-
11
-
12
-
13
-
14
-
15
-
16
-
17
-
18
-
19
-
20
-
21
-
22
-
23
-
 24
24 -
 25
25 -
 26
26 -
 27
27 -
 28
28 -
 29
29 -
 30
30 -
 31
31 -
 32
32 -
 33
33 -
 34
34 -
35
-
36
-
37
-
38
-
39
-
40
-
41
-
42
-
43
-
44
-
45
-
46
-
47
-
48
-
49
-
50
 |
 |
